Showing posts with label scrap quilt. Show all posts

Friday, February 3, 2023

Quick(ish) Finish

TA-DA!!
Started December 31, 2022 -- finished February 1, 2023
Pieced, machine quilted, bound!
Ready to be washed.
And I love it (which means it will be so hard to part with it)!!

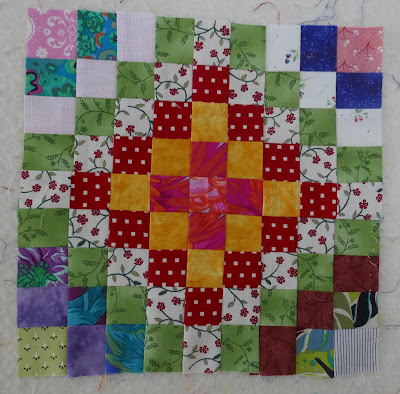
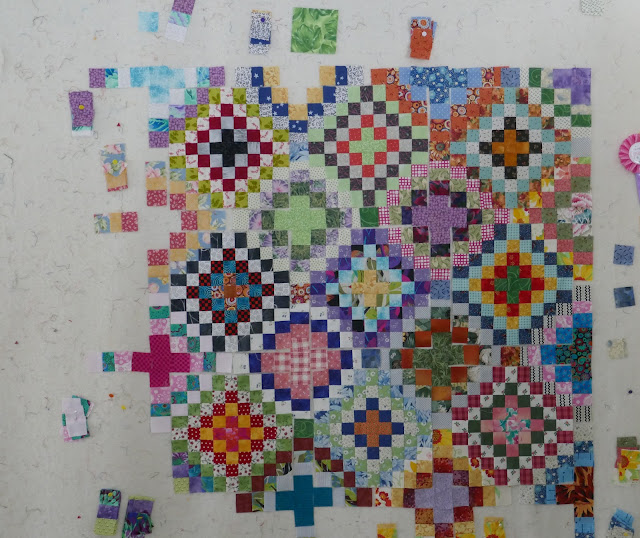
I gave you a glimpse of the top a couple weeks ago but I'll review what I did here today and how it achieved one of my goals for the year (already?).

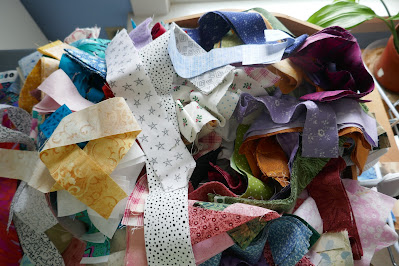
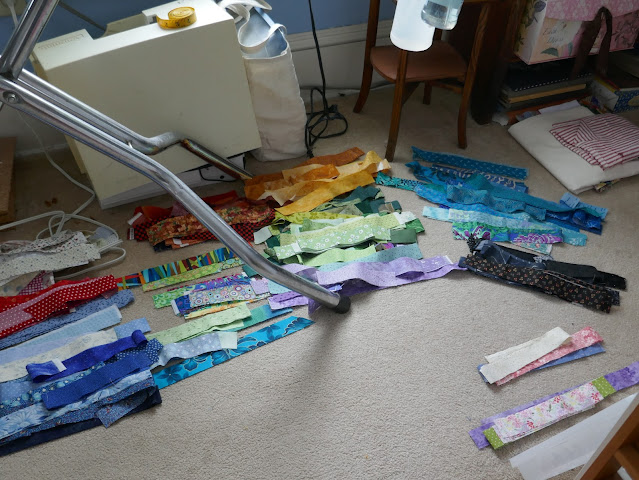
On December 31, I spent an entire afternoon tidying up my very messy box of 
2 1/2" scrap strips sorting out strips that were less than 12" long to cut up into squares for the 2 1/2" scrap squares box.  Daydreaming along, I started to consider making a "jelly roll" quilt -- you know sew the strips together end-to-end for a couple miles and then -- just "google" it.  
 
Then I recalled a pattern -- Sakura Sun -- which has been on my "I want to make that" list for a couple years.  It's a free pattern on the RJR Fabrics website designed by Linda Fitch.
Upon reading through the pattern instructions, it calls for three different strip lengths all under 12" -- perfect use for that growing pile of short strips.

Time to make a color plan!
The aspect of the pattern that first caught my eye was the way the colors bled down the length of the quilt.  So to achieve that, I decided to use the warm colors down the middle of the quilt and the cool colors down each side.  When I sorted out cools and warms, there was twice as much green as blue or purple and lots more cool prints than warm prints. 

The resulting strategy was to "muckle up" (old Mary Ellen Hopkins term) the warm colors down the middle, with greens down both sides bleeding into blues on the right and purples on the left.  All the strips in each band are the same length and the pattern calls for ten sets of the three different bands.  So every set began with purple, then green, then warm colors, green again and ending with blue.  The sets with seven pieces have three warm color prints in the middle and the sets with six pieces have two warm color prints.
After setting the top together, I went back and added an eleventh set of bands.

I stacked the strips for each band from left to right without being fussy about "matching" or "coordinating" the prints -- the quicker this step is done, the more random the results! 
After piecing and pressing the bands, I put them on the design wall as they came off the ironing board -- no fiddling at this point.  When I walked away from the design wall and turned around to look at the layout, I gasped!!  This was so much better than I imagined!!
I did fiddle a bit to move the reds to the top and bottom of the quilt and concentrate the yellows in the middle but I didn't necessarily need to do that.

TIP: I forgot to do this until I realized the quilt top was skewing to one side --
I stitched the bands into pairs, pressed the seams to one side and then began to stitch the pairs into fours -- my mistake at this stage was I always started at the blue end.
To eliminate the skewing, I needed to switch and start at the purple end to join the rest of the bands.
Does that make sense?

Also, the bands are a bit random in their finished length -- part of the reason for that is there are varying numbers of seams.  So a band with seven strips will be shorted than a band with five strips because there are more seams -- not because you are a "bad" piecer!! 

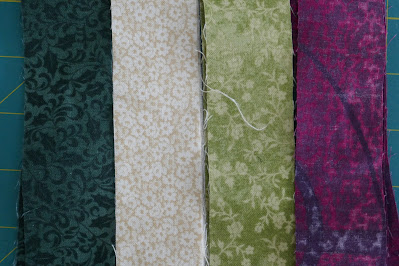
Once the top was finished it was time to figure out a backing.  Of course, I didn't find any piece large enough so I pulled four colorful prints that have some common colors and were all florals.  Here they are laying on the quilt top (on the design wall) to make sure my calculations are good.
Nothing more frustrating than piecing a backing and having it short!!
As I layered it with batting (a Frankenbat made from three leftover pieces), I considered whether random lines zigzagging down the quilt would emphasize the color flow. It just took a few chalk lines drawn across the quilt to convince me it was a good idea.

I drew the first line down the length of the center of the quilt, stitched it and then used my straight line quilting guide tool to achieve the random spacing as I worked out to the sides from the center. 
It's not apparent in this photo, but I also changed thread colors as I progressed -- yellow down the middle, a variegated pink/red on either side of the center, then a variegated green down through the green prints, finishing up with a variegated blue thread on the right and variegated purple on the left. 
 I played two rounds of "thread chicken" running out of both the blue and the purple threads with just a few inches left to quilt.  After another cuppa' to calm me down, I was able to think and estimate how many more lines I could get from the remaining thread.  I spaced those lines further apart.  
Then I came back in and added lines with a thread color that blended with what I had already used.   Could you tell if I had not point it out?
As I finished the quilting, I started thinking about the binding.  All my auditioned ideas weren't working -- black, rainbow strip . . . .    But then I had a "clever" moment, dove back into the 2 1/2" strip box and made a scrappy binding that changed colors to (almost) match the edges of the quilt -- blue on the right, green and warm colors on the top and bottom, purple on the left!!
The "goals" reached?
I used a pattern from my "want to make" list!
I used about 6 yards of my stash, leftover batting, and thread I had on hand!
I finished the quilt in a timely fashion!
(My kids don't appreciate the favor I'm doing them using up some of the stash!?!)

My version is 53" by 66" -- did I say I love it!
An easy, cheerful, and quick make during the gray months of winter here in NE Ohio.
I have another simple quilt in the works using the shortest strips from the same stash box!
Hope you are able to do some satisfying stitching this weekend.
Mary

P.S. -- here's a link to a "jelly roll 1600" quilt I did out of my stash a few years ago that you might also find inspiring!  After re-reading it, I'm wondering if I followed through on making a charity quilt from every shelf of fabric in my stash that year -- guess I have to go back and read more posts?!?  Plus there's a great (I think) tip on managing the assembly of this style of quilt top.


Monday, March 14, 2022

The Ups and The Downs

I don't like change!  How about you?

It took me a while (as I'm sure it did you) to settle into a Covid way of life and find a level of contentment in what I could safely function.  Now it seems I have to reverse engines and go back the other way.  The question is how far back do I want to go? 

As things would have it, an official diagnosis of arthritis in my back last week will be a factor in my return to "normal" (whatever that is?).  It's been suspected for several years and I've actually been taking steps to manage it with monthly maintenance sessions with a physical therapist, monthly massages, and a morning stretching routine since it was first a possible reason for my back issues.  But something about having the doctor say where it's located and that it's "severe" threw me for a bit of a loop and I spent lots of time last week fretting about what this means long term -- the DOWNS.

  I have to fret -- that's how I deal with change -- but today I'm done with the fretting and ready to make changes that will enable me to feel energetic and as pain-free as possible.

Thank goodness for my sewing!!  It has been my default for a long time when fretting -- the familiar actions of piecing calm me down and allow the rational, practical part of my character to activate.  While I haven't had any finishes for almost a month, I've made lots of progress on a variety of projects since doing anything more than 30 minutes at a time leads to backaches so lots of changing up around here!?!

My version of @jemimas_creative_quilting EPP project has finally reached part 7.  The auditioning for each part goes slowly and I waffle about fabric choices though being a couple steps behind the release of the mystery parts is a bit of an advantage because I know where the design is going.  Actually, as I write this and look at the picture, I think the picture will help me make a couple of decisions.  I work on it during the evenings (watching murderous English TV series) and during webinars about native plants and pollinator insects (which are abundant right now).

I finished the blocks for Forever Friends (in the  book, Sisterhood of Scraps) -- settled on 24 blocks and started adding the sashing and setting the blocks together. 

 It should be about 40" by 60" -- nice laprobe!
I think I found a pressing misprint in the instructions for the strip sets in steps 6 (page 39) and 8 (page 41).  I noticed I was having to re-press every corner unit as I set the blocks together.  I tried pressing the strip sets opposite to the instructions and didn't have to do that anymore.  So if you try out this pattern, keep that in mind and see if you have the same experience.
 
Yesterday, I tidied up all the strips and had an inspiration -- drat?!?
Warm versus cool log cabin or pineapple blocks!?!  Sorted and ready to go!!!
But I'm not allowing myself to start that until I get this top quilted (and there are a few ahead of it in that queue) -- I need to cut more warm strips anyway.
 
For the moment, I'm caught up with Katja Marek's current sewalong, too!  Weeks 1 through 10 are pieced!  
This is a close up of the "wreath" so far.   I'm using stash fabrics and my only fear is that I'll use up all my light blues . . . . but then I'll have to shop!!!
I'm a little behind on the pressing but doesn't it look great when it's done?
Week 11's flower is pink and I'll use it as "leaders and enders" as I assemble the Friends Forever top.
I managed to get back into my early morning machine quilting habit over the weekend -- finished one small piece and started working on this small quilt.  Seems to be the best strategy for me -- quilt 30 minutes first thing!
How's this for a cheerful bouquet?  There are a half dozen amaryllis bulbs in this big bowl -- I have more red than I remembered but a couple have yet to open so hoping the white one and the red and white striped one are among them.
We are expecting a week of mild weather here in Northeast Ohio -- that will be good!!
It  makes it so much easier to convince myself to go outside!  I'm looking forward to spring "firsts" as always -- the first red-winged blackbird is here, the turkey vultures are back, the garden witch hazel bushes are blooming and skunk cabbage has been sighted.  Singing frogs should be soon and I'm checking everyday for the rhubarb plant to poke through.  That also means it is time to cover the strawberry bed so the deer don't browse the plants and shift the pots full of spring bulbs to the patio entrance.

Looking forward to a week of being UP!
Mary


Friday, February 18, 2022

The Lure of a "Rabbit Hole"

Are you susceptible to the lure of interesting ideas?

I certainly am!!  That's why I have so many "oars out of the boat" all the time.  Something catches my fancy and I'm off like it is the most important thing in the world for me to do or learn.  I love the thrill of the original curiosity and then the conquest of learning about it or being able to do it!  Sometimes that is all I need to accomplish but other times, I fall down a rabbit hole of obsession.

Enter the Forever Friends pattern by Sandy Klop in Sisterhood of Scraps.  It's so scrappy and I just love that!  I've had the book for almost two years and been cutting strips for over a year but I held back (such restraint) during 2021 in my drive to #quilt21in2021.  It didn't hurt that every time I read through the directions, I was puzzled -- the instructions made no sense and that made it easier to delay the deep dive.

But last weekend,  as I hid in the sewing room (in an attempt to reverse a mental health downturn) I decided to tackle the instructions the way my mother taught me -- read one sentence, do it, read the next sentence, do it and so on.  The first block took three hours on Saturday afternoon and I was exhausted mentally!?!  But when I returned on Sunday, my inclination to build a personal work process enabled me to complete two blocks in just two hours.  The instructions were beginning to make sense and they are thoughtfully written.
Since the weekend I've been up there every day, cracking out another block (or two) and I'm in love with the results and the process.

So I decided that I'd share some tips on pushing through the early stages of this project in hopes that it might either give you the courage to try this pattern or to push through to understanding with a pattern that has you intimidated.

As a quilt making teacher for almost 40 years, I saw lots of students and customers suffer from the intimidation of trying new patterns because "it didn't make sense".  As a pattern writer who traveled regionally to teach those patterns, I learned that how each of us approaches instructions is based on how we were taught to read instructions and the skills we learned.  While my local students could take one of my patterns and whiz through it because they learned their basic skills and terminology from me, students in other regions who learned a different sets of skills and terminology were puzzled.
So it might not be you and I hope that encourages you to try!

This isn't a call to change the way you work through a new pattern.  I'm going to share the reasons I was puzzled by these instructions and how I moved through them as an illustration for you to consider how your skills and work habits influence the way you approach a new project.

To begin, I was trained by Mary Ellen Hopkins to be a machine piecing teacher and learned to cut as you go.  We never cut all the pieces for a project before doing any sewing.  The reason for that was we didn't have 1/4" presser feet, so seam allowances varied a bit from machine to machine.  We cut the first step, stitched the first step, and then measured the results before cutting for the second step. 
The result of that is that I'm skeptical of any pattern that tells me to cut everything up front.
And so I always skip that step which is okay because it works for me!
(BONUS -- if I get bored with the project, I can quit and repurpose easier with no guilt because I don't have all that fabric cut up.) 

Second, when my mother taught me to knit and sew, she waited to explain things to me until I had attempted to figure it out for myself.  Read one sentence, do it.  Read the next sentence, do it.
Often, we read all the instructions before starting a project and they make no sense because we can't visualize how the process is working.  But if we go sentence by sentence even though we don't understand why we are doing something, we get to the end and can look back to see how things went together and THEN we understand the process because we've experienced it.

Finally, I could be wrong but I'm under the impression that the restrictions of editors on pattern writers (especially in books) can oversimplify explanations that might benefit readers so it might not be that the designed is a poor instruction writer - there could be other reasons. 
(That's why some elect to self-publish!)

I've watched quilters work through this pattern on Instagram and all seem to work block by block but when I read the instructions (over and over), the implication is that all the strip sets are made first ("make 252 each of A, B, C, and D units") and then arranged?  
Where's the "shocked" emoji??

So I began with my chaotic pile of strips (see first picture) and proceeded one sentence at a time for just ONE block even though I could not make sense of how it would come together.

It took three blocks before the process made sense and it's brilliant.
Here's the block I just made in place on the work wall.  Notice above that the center of the block stops at the green round and the four corners are different.  
Each adjacent block shares two corners and with the addition of sashing units, a new Trip around the World motif is created.   Now I get it!!  The more "blocks" I make, the easier the process becomes and I'm happy with the results.
If this beauty is on your "want to do" list -- here's a couple tips. 
Page 38 to 40 -- Steps 1 through 4 make the central "trip" motif and use 4 fabrics.  I pick those as I'm finishing a work session so they are ready and waiting when I return making it easier to dive back in.
This is a dull combo but that's the beauty of scrappy quilts -- the dull has a place!
Steps 6 through 8 make four corner units and four different ones are needed for each block.  After the first block, you always have at least two corner units already done each time you start a new block.  Since these units use three different prints, I set aside groups of three that catch my eye as I'm rummaging through the pile so they are ready to pick up and stitch.

And most important, follow the pressing directions to the "T" -- they are thoughtful and will make the assembly so easy but if you ignore them . . . . . . . . . . big mess!!

I set aside strips once used so they aren't repeated too close together.  Last evening, I returned all the strips used for the first 9 blocks into the "stash of strips" and sorted them out into color families - yes, on the floor -- which will make it easier to pull combos (and less messy).
(Notice the two "corner combos" in lower right corner that I pulled during the tidy-up.)
As soon as I finish editing this post, I'm headed back up to the sewing room to crack out another block!  My original idea was to make a lap robe size quilt with 20 blocks but I might go bigger depending on how much fun I'm having at the 20 block mark?!?
(Those units pinned to the wall around the edges are corner units waiting for their block to be made.)
And I'm not falling behind on my Homage to Grandmother's Flower Garden because I can use it for "leaders and enders" as I assemble the Forever Friends blocks!!!
Part 7 almost finished.
LOL -- at this rate, it won't be long before I have another 21 quilt tops stacked up?!?

Enjoy your weekend and try to get outside especially if you are up "north" -- it's good for our mental health!!  My foray a couple days ago led me to this group of tundra swans resting on the ice out on Lake Erie!  One never knows what wonders are waiting out there even in crummy weather!

Back to puttering around in my current "rabbit hole"!
 Mary


Thursday, March 5, 2020

National Quilting Month Scrap Challenge

I got all my English paper pieced blocks appliqued to the backgrounds over the weekend and now that I'm home with them up on the design wall, I'm hesitating.
One quilt with all twelve, two quilts with six, three quilts with four -- twelve big pillow covers?
So the best strategy is to leave them up there staring at me and do something else.
Let my subconscious work on it for a bit!

It's National Quilting Month here in the USA and so lots of quilters are gearing up for that with special projects, sew alongs, and retreat days!  Meg, @teaandbrie on Instagram, is leading a "Sew the Scrap out of March" and her first email got me all wound up to tackle my scraps, too!  She had lots of ideas to share and the hashtag #nqmscrapchallenge on Instagram is full of inspiration!

Getting quilt fabric scraps under control and using them up is a universal form of entertainment, don't you agree?  There must be hundreds of blog posts and tutorials out there for how to organize and how to use fabric scraps.  For at least 25 years, perhaps more, the 2 1/2" strip stash has been my main "go-to" strategy.  When the box is full, it's time to do something with them.
(The box is full . . . . again?!?)
There's also a 2 1/2" squares stash which actually pre-dates the strip box.  I put a big dent in this basket last fall with the Scrappy Triple Irish Chain quilt I made -- you can revisit that post with a brief tutorial on my strategy HERE! 
I just came down from my studio (I yelled down but Willie, my cat, wasn't willing to bring lunch up to me) where I've been sorting and chopping and stitching for half the morning!
Bright scraps are going into this cute box.
They are destined to be stitched into little slabs for cat faces! 
I made a cute quilt to donate in 2018.  The blocks were so much fun to make that I've wanted to do another little project for myself -- perhaps a couple pillows?  The pattern was designed by Elizabeth Hartman for the Janome Sewing machine website -- HERE is a link to it.
This was a seriously cute little quilt and a bit hard to let go but I did in the end! 
As usual, if I'm in the studio, I can't stay away from the sewing machine for long -- either "I just have to sew this together to see what it looks like" or the cutting is getting boring!?!  
For the past couple months, I've been stitching the leftover triangles from the hexagon quilt I cut last summer from a layer cake into pairs. The triangles were just "chopped", no template used.  I've sewn them into pairs of light and dark.  There wasn't a plan and it got tedious more than once but they were just sew-offs so I persisted.
Here's where they came from -- I chopped the "hourglass" leftovers in two to get the triangles.
Once I started to join the pairs into rows and put them up on the design wall, "chevrons" started to appear -- now I'm glad I persisted!! 
Today, I stitched the rows together as sew-offs while I assembled some old teaching hexagon blocks into a quilt top.  It's fun!!  I'll set it aside to quilt later and I'm thinking it will become either a pillow cover or a tote bag front?
Scraps busted!!
This is the quilt I'm piecing -- it's destined for donation to a local veteran's project.
Then it was back to the pile of scraps -- all pressed and ready to chop up.
2 1/2" strips or squares are always first.
For some time I've been cutting colorful squares for this block -- there are several tutorials for it floating around -- I'm using the one from Purple Poppy Quilts (link HERE) because it uses lots of  2 1/2" squares and strips which I already have cut! 
I have enough of the colorful squares to start but need lots more light 2 1/2" squares so those are a priority with the scraps I'm busting these days!  I'm anxious to get started on the piecing this one so it's up next and will start as sew-offs while I finish up a few more UFO's -- still finding teaching samples that needs to be eliminated one way or the other!!
So go check out the @teaandbrie feed on Instagram and follow the hashtag #nqmscrapchallenge -- be inspired and make another assault on your scraps -- you won't be done with them, but it will be fun!!

The triplets are 9 months old!!  
Lots of smiles, sitting up and starting to move around on their own!?!

Hope your weekend is full of good things!
Mary


Friday, July 19, 2019

Scrappy Triple Irish Chain with a Twist

Greetings from all of us in my backyard!!
When I said on June 13, I'd organize cutting instructions, I didn't mean to take so long to share the them.  Either I've had too many oars out of the boat this past month or I've lost my sense of urgency as I enjoy the lazy, hazy days of summer?
I finished piecing the top yesterday, organized the backing and I'm ready to hand it off for quilting. 
I've checked the math several times and am pretty sure I've got my counts correct.
If I don't, sorry -- just post a polite comment if you find an error.

As I explained in the original post, my goal was a twin size quilt using 14" blocks.  That meant that 4 blocks by 6 blocks would be the ideal size but an Irish Chain setting wants odd numbers of blocks to keep the corners identical -- 3 by 5, 5 by 7, etc.  Once I stumbled onto the idea of piecing "half blocks" for the outer rows, my problem was solved.

Since this is a charity quilt, my goal is to keep the quilting process simple and a big white empty space never brings "simple" to my mind.  So I started to try out ideas for filling the center of the alternate blocks and a "trip" variation was perfect since all the squares and strips needed could be cut using the same grid as the blocks -- 2 1/2" cut!

Ready?
Here are the statistics for my twin size quilt top.
I made seven of the basic 7 by 7 blocks using 2 1/2" cut squares (from my very scrappy basket).
For each block, I used thirteen assorted green squares, four white (background) squares, and thirty-two assorted squares.
I pieced the blocks in vertical rows and pressed every block exactly the same - alternating seams so they nest together.
The outer left and right sides rows are both pressed down (towards the bottom of the blocks).
Once the rows were pieced together, I pressed all the vertical seams to the right.
I made eight of the alternate blocks using the same 7 by 7 grid.
I wanted more green in the quilt and liked the unity of using just one other color with it through out the quilt but this block could be as scrappy as you wish.
Here's the block broken down so you can see the rectangles needed and their placement.
Each block used twelve scrappy 2 1/2" squares, nine assorted green squares, four assorted yellow squares, and four white (background) squares.
In addition to the squares, there are four 2 1/2" by 6 1/2" rectangles around the outside edges of this block plus four 2 1/2" by 4 1/2" rectangles in the second and sixth vertical rows.
To make it easy to set the finished blocks together, I pressed these blocks opposite of the first set of blocks.  The outer left and right edge row seams are pressed up (towards the top of the block) and the vertical seams are pressed to the left.
Time to make the half blocks!  Each one is a 4 by 7 grid of squares.
Ten of these blocks are needed for the twin size I made.
There are three white (background) squares, seven scrappy green squares, and eighteen scrappy squares.  I found it easiest to stay on track by laying out the green squares and the white squares in the correct positions, then filling in with the scrappy squares.
Looking at this photo, the left edge of the block will always be on the outside edge of the quilt so it must be rotated for each side of the quilt.  
For that reason, I found I had to press each one so it would nest together with the adjacent block rather than pressing all of them identically -- the left side blocks were pressed opposite of the right side blocks, etc.
I wasn't sure the half-alternate block would look good, but once I pieced one and added it to the design wall, it was fine.  Six of these blocks were needed for my size.
I used six scrappy 2 1/2" squares, six assorted green squares, three assorted yellow squares, two white (background) squares, four 2 1/2" by 4 1/2" rectangles, and one 2 1/2" by 6 1/2" rectangle for each block.  
Pressing is the same as above -- adjusting to nest with adjacent blocks. 
Finally, I made four corner blocks.  
Do these last so you can determine the best pressing directions more easily.
Each corner blocks uses three scrappy 2 1/2" squares, four assorted green squares, two assorted yellow squares, one white (background) square, and three 2 1/2" by 4 1/2" white rectangles. 

Here are my cutting totals for the complete quilt!

                          734 -- 2 1/2" assorted squares (that's 46 2 1/2" strips cut into squares)
                          161 -- 2 1/2" squares for central cross of main block (my greens) 
                                         To use one fabric for this, get 1 yard.
                          Background -- 2 3/4" yards (includes first border)
                                  Cut 4 lengthwise strips, 2 1/2" wide by 2 3/4" yards long for first border.
                                  From remainder of background fabric, cut
                                                    106 -- 2 1/2" squares
                                                     84 --  2 1/2" by 4 1/2" rectangles
                                                     38 --  2 1/2" by 6 1/2" rectangles
                           Border -- I cut mine 4 1/2" wide on the lengthwise grain and pieced strips end to                                          end to get the length needed so used about 1 1/2 yards.

Here it is!!  My finished top is 70" by 93".
I love how balanced and cheerful it looks!!
Using up 895 squares out of my "sourdough" basket is great, too!!
(The picture is a little lame but it's really HOT here and my daughter has short arms so we were working quickly to get back inside!!)
There might be another one of these in the future because the 2 1/2" strip box is pretty full and could use a good thinning out! If I were going to do anything different, I would use one really dark print (or solid) for the center chain -- my green chain disappears partially because there is so much variation in value -- mediums to darks instead of just darks.

Book mark or print out the text of this post so you can give it a try down the road with your scrappy stash.  If this inspires you to make your own version, post a photo on Instagram and tag me @hueymary - I want to see it!!

Mary