Thursday, October 21, 2021

On the Home Stretch!!


As fall begins to look more like itself here in Northeast Ohio (leaves falling, rain, cooler days), I'm vacillating back and forth about whether I'll meet my #quilt21in2021 goal.  One day it feels like I won't make it so why try so hard and the next day, today in fact, I think I might just make it!
Number 15 has been under the needle for the past week and yesterday I finished the border quilting 
so I will bind it this afternoon!  
I've been trying to remember the original motivation for piecing this top so looked through old blogposts but can't find anything.  Perhaps I never shared it?  As I recall, the bright fabrics were leftover strips from another quilt.  And I may have pieced the drunkards path units as curved piecing demos and/or "sew-offs" for other piecing.  
I do remember there wasn't a specific plan and the whimsical nursery rhyme blocks were a serendipitous after thought.
I "echo" quilted the entire top using the 3/4" guide from Sew Steady which is one of my favorite accessories!
There is a total of five rows of stitching around each large unit and I love the way the quilting reinforces the graphics of the piecing design. 
The only glitch occurred when I started the border.  My original intent was "piano key" style straight lines but they looked so weird against the wavy print lines that I ripped the first few lines out and started again using wavy lines.  I was stitching the lines towards me and away from me,  but the tension on the backside was bad when stitching away from myself.  
Happily, the tension issue was quickly solved by working side to side instead.  Usually, my machine has good thread tension but occasionally the tension is poor when going in one stitching direction.  I've learned to sidestep the issue by testing different approaches to the design (clockwise or counterclockwise, side to side, etc.) and then adjusting my stitching plan to eliminate the issue.  
The whole job took seven 45 minute work sessions so once again I found myself wondering "why has this taken so long to do"???

I also "whipped up" a set of six little pumpkin blocks that Sandy Gervais shared on her blog recently and made them into a table runner for the triplets' family plus a big mug rug for my librarian daughter.
The little wall hanging she designed with this block is really cute and on my "to do" list.
I forgot to take a picture of the finished runner but it's really cute, too!!
I've started "big stitch" hand quilting my large EPP blocks (Sharks Dinner BOM) done in 2019.
It will probably be quilt number 19 or 20 when it's finished! 
Using a chenille needle, pearl cotton, and no hoop, the work is going quickly!
It takes 3 to 4 evenings to quilt one block (about 23" square).  That means if I stay on task, all twelve blocks will be quilted by the end of November!
I'm using Quilter's Dream Request cotton batting which is a firm construction and thin so the texture of the quilted sections is soft and supple.  Happily, I like the blocks better quilted than I do unquilted and that's proving to be a good motivation to keep stitching!  I have twelve blocks and at this point I think it will be two lap size throw quilts rather than one large quilt.
I realized this past week, I might be signing up for ZOOM webinars so I can work on my version of the hexagon mystery quilt from Jemima's Creative Quilting.  LOL  I'm using 3/4" hexagons to keep it scaled down and working out of the stash so far.
 I have Parts 1 and 2 stitched together 
and about half of the basting done for Part 3.
Part 4 was just released on Monday so I'm not too far behind.

I'm picking up quilt number 16 from the quilter on Saturday -- wahoo!  Another top is going out to a quilter in early December. And I might layer up number 17 this weekend if I have the right size batting on hand which leaves two quilt tops on the shelf.
AMAZING!!
Success is within sight (as long as I don't get distracted by something cute).

And speaking of something cute!?!
Auntie A (the children's librarian) and I babysat Saturday evening -- look how serious they are about that book!!  Of course, she really knows how to read a book out loud properly!!
We had a good time with them in spite of flunking getting them to bed.
Enjoy your weekend where ever you live -- it's mid-fall or mid-spring -- best times of the year!

Mary 


Friday, October 1, 2021

The Opposite of Procrastination

Do you ever wonder why you've been putting off doing something?  

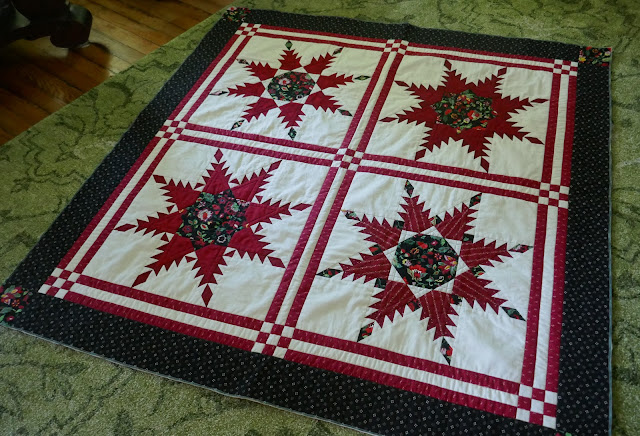
I do every time I finish another top off that shelf in the sewing room!  This feather star has had me "paralyzed" because complicated (looking) patchwork needs complicate quilting . . . . . right?

It's important to realize that is not necessarily true.   I think we live with that impression because we are constantly comparing our work to that of professional machine quilters.  They do amazing work but they also have an advantage over us in that they don't have to move the quilt through the machine.
So "come on down" and quilt some of that pile!!
The chances of your quilts being cherished by friends and family are a lot greater if they are finished!
This quilt top was a teaching sample I made using one of Marti Michell wonderful Feathered Star templates sets to illustrate fabric placement options.  I loved teaching this workshop because as a rule every student was successful -- there was one exception but I'm not telling you that story.
In this close-up, you can see the simple strategy I took -- curves in the triangle points and a series of interlocking straight lines to "quilt down" the center of the block successfully.
My goal was not to ruin the quilt top with my quilting.
I'm still adding some straight lines in the background pieces to "frame" up each block but decided to do that with a walking foot on my Bernina -- straighter lines!
I've also finished adding the pieced borders to the Courthouse Stars quilt -- lots of strips there so I didn't have to leave the house to shop for lavender fabric!!
This pattern is available in my Etsy shop -- MaryHueyQuilts.
I sent it off yesterday to a professional quilter so that is almost as good as crossing it off the list!!
Someone asked me how I calculate number of strips needed and the strip size for a border like this.  
Keep it simple -- I ballpark it.  
I these strips the same width as the strips used for the courthouse step blocks to maintain visual continuity.  Then I did an estimate of how many to cut but you know it's part luck to get that perfect.  So I cheat just a little bit -- the last strip on each border is wider so that I can adjust things easily at the end. Sometimes the last strip is wider and sometime it's narrower.  If you saw this quilt in person, you wouldn't notice that skinny strip!

The star blocks in the corners are the same stars used in the body of the quilt -- same size, same fabrics, continuity.
Now all there is to do is wait!
I've decided to quilt another one of the 21 tops by hand so this past weekend.  The "top" is this set of twelve large English paper pieced blocks I made in 2018?
Each block is about 21" square and I'm still debating two quilts or one quilt???
I created a placement map for the blocks (that was a challenge) and numbered each of them.  They are sewn together in pairs at this point. 
So this weekend, I made the backing for it. I'll be working in six sections using pearl cotton "big stitch" quilting which I enjoy.  That and working in sections rather than the entire quilt top will help me stay engaged as this is another top I'm a bit paranoid about "ruining" with my machine quilting.
(And you thought you were the only one who felt that way.) 
I'll layer each pair with one of these big 4-patch sections you see in the photo below making them easier to handle.
Making the backing turned into an enjoyable and spontaneous experience.  Each of the blocks began with a fabric from Kaffe Fassett and my goal was to use as many non-Kaffe fabrics with each one as I could (from my stash, I might add) to illustrate to my students that those fabrics are more flexible than they think.  So it was just fitting that the backing be all Kaffe fabric.  
I
I had four one yard cuts and lots of fat quarters and fat eighths.  
Plan A was to cut forty-eight 12" squares and pieced them together to make the backing units.  
After cutting all the fat quarters, there were just sixteen 12" squares. 

As I unfolded the one yard cuts, I realized someone had fussy cut around one of them -- hmmm??
Not surprisingly, a bit of math revealed the one yard cuts would not yield the balance of 12" squares needed.

Plan B started to evolve out of "necessity" (a major factor in many of my creative decisions).
In the end, I cut forty-eight 6 1/2" squares and pieced them into sixteen more 12" units.
To finish up, I cut four large squares from the one-yard cuts and I was ready to arrange!
It occupied the living room floor for about 12 hours being rearranged anytime I walked through the room until something in my head said "stop and sew them together".

With the plan for that quilt moving forward, I have just four tops left to machine quilt myself and that shelf will be empty!!

As I reward, I let myself start an EPP mystery being led by an Aussie shop owner on Instagram.  
I'm already engaged with the second part so just one part behind but I'll catch up. If you want to be behind with me, you can find the first three clues at @jemimas_creative_quilting via Instagram or her blog at jemimascreativequilting.com   Part four is still two weeks off so there is time!!
And how about these grandkids?!?
The four of us enjoy being silly together and looking at goat reels on Instagram -- yes, I'm sitting cross-legged on asphalt with three 2 year olds on my lap.  
And I was able to stand up . . . . very slowly.
Happy October!!
Mary