On January 11, I shared a photo of a scrappy honeycomb quilt laying on the floor of my studio. It came out of "hiding" (LOL) and I have been using it for sew-offs as I work on other projects over the past month. It's the best way to me to make progress on a UFO when I've lost interest. Since I chain-piece all the time, sew-offs are always in demand in my studio -- I may not be able to stand working on a project anymore but I can always muster up the interest to sew a 2" seam here and there while working on my "newest" love interest!?!
.JPG)
I started this in response to a question about whether honeycombs could be machine-pieced using the Set-in Piecing Simplified technique that I taught -- I can remember getting Erin's email, perhaps 10 years ago? I was in California on a teaching trip so I sketched an idea on graph paper and was ready to try it out when I got home.
I cut some pieces from the 2 1/2" scrappy strips that are always on hand!
I stitched just enough of it to confirm that my idea was on target and then put it in a box.
I'm not sure I ever responded to Erin with an answer???
So here's the answer, Erin!
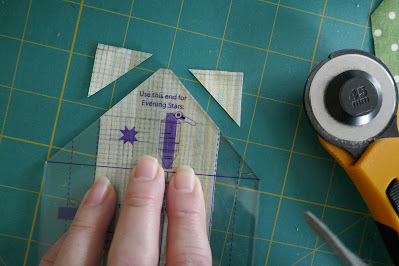
All the pieces are cut with Marti Michell tools.*** The yellow squares are cut using template #12 from Set B and the honeycombs are 2 1/2" by 4 1/2" rectangles trimmed with the Evening Star end of the Sashing Stars Set (linked HERE). Position.

 Wa-la!!
.JPG)
.JPG)
.JPG)
.JPG)
.JPG)
.JPG)
.JPG)
.JPG)
.JPG)
.JPG)
.JPG) Repeat, repeat, repeat.
Repeat, repeat, repeat.
.JPG)
.JPG)


Trim.

.JPG)
Finally I marked the corners of the honeycomb pieces with dots using the 45 degree angle on Marti's Corner Trimmer tool.***
After a bit of fiddling to determine the best piecing order, I made all the 3-piece units with two honeycomb pieces and one square. Once I find my rhythm, this is the type of repetitive work that makes a perfect sew-off.
.JPG)
If you are familiar with Set-in Piecing Simplified, the upper left seam between the two honeycombs is stitched from the outer edge and stops at the "dot" as in the photo below. The two seams attaching the square to the two honeycombs art stitched dot-to-dot.
.JPG)
144 sew-off's later, all 48 of the basic 3-piece units were stitched together!
.JPG)
Time to lay them out!
The easiest way to layout a scrap quilt is the same way you deal a game of Solitaire -- off the top of the deck in random order. Once they are all laid out you can see where to tweak -- if there are 3 of the same brown print clustered together, un-cluster them..JPG) My layout is six units by eight units -- each honeycomb and each square counts as 2" side to side -- so my piece is 26" by 34". Once I was happy with the layout, I cut more honeycombs to finish the right edge and the lower edge and added those to the "design floor". To make the edges straight, I cut triangles using the quarter square method and template #14 from Marti's set B -- the straight of fabric grain runs along the "diagonal" of the triangle so the outer edge of the piece will not stretch when I add borders.
My layout is six units by eight units -- each honeycomb and each square counts as 2" side to side -- so my piece is 26" by 34". Once I was happy with the layout, I cut more honeycombs to finish the right edge and the lower edge and added those to the "design floor". To make the edges straight, I cut triangles using the quarter square method and template #14 from Marti's set B -- the straight of fabric grain runs along the "diagonal" of the triangle so the outer edge of the piece will not stretch when I add borders.
.JPG)
Now to assemble the units! I've got lots of pictures to share. Even if you never want to piece this, reading through the process and looking at the pictures might help you figure out the best approach to a project in your future?
I added a triangle to the lower edge of each left side unit.
.JPG)
I added a triangle to each right edge honeycomb.
.JPG)
And I added a honeycomb and triangle to the lower edge of each lower edge unit.
.JPG)
Once all those units were pieced, I started pieced in the upper left corner and worked across the piece to the right. Once the first row was assembled, I returned to the left side and added the next row of units, one unit at a time. This was much easier than assembling the units into rows and then attaching the rows -- just take my word for it!?!
After a bit of trial and error, I determined the best sewing order for the four seams needed to insert a unit was to start by attaching the intersection of the four honeycombs -- dot-to-dot seam.
Since this is the most critical matching point, it worked best when I did it first.
.JPG)
Second, attach the left side of the vertical honeycomb to the right edge of the adjacent square --
dot-to-dot seam.
.JPG)
Third, attach the upper edge of the horizontal honeycomb to the lower edge of the adjacent square --
dot-to-dot.
.JPG)
And finally, attach the right edge of the horizontal honeycomb to the left edge of the vertical honeycomb in the row above -- dot-to-edge.
.JPG)
Soon, the top will be coming together and covering the sewing table!

The final corner (lower right) looked like this and notice, I added that last triangle to the lower right side of the honeycomb in the row above. Also, I used two triangles in each corner because I like the way it blended instead of a bigger triangle.
.JPG)
Scroll back up to the first picture -- the top isn't finished. I'm thinking a yellow frame next and then I don't know what? It's on the design wall and percolating in my head. If I had used a lighter print for the squares, the lattice created by the honeycombs would have been stronger looking but I'm just having fun here .
And that's the third quilt top from that 2 1/2" strip box this winter. The 4-patch is all set together and a backing made -- planning to take it along to a retreat in a couple weeks and get it layered up!
.JPG)
Didn't it turn out great! The black and white print alternate squares make all those scrappy 4-patches hang together beautifully. I even got a bit artsy with the layout to get those diagonal rows of darker prints. The main reason for the shifting value of the alternate squares was "I ran out of fabric", not just once, but twice?!? And as usual, it looks all the better for it.
Running out of a print can be fun if you let it have it's way with you!!
If I've made you curious about the Set-in Simplified technique for chain piecing, see my face up there on the right -- click on it and it will take you right to my Etsy shop where you can purchase an instructional PDF (download it tonight) and try it out!
If you have questions about today's tutorial, leave them in the comments!
Mary
***EDIT April 2025
Marti Michel closed her business in late in 2024 and while some shops may still have a stock of her templates, you can also find them on Ebay and Etsy.
.JPG)


.JPG)
.JPG)
.JPG)


.JPG)
.JPG)