Friday, August 28, 2015

Rather Piece than Quilt?

I'm home and unpacked from my teaching trip to the Remembrance Quilt Guild in Springfield, Ohio where I taught Set-In Piecing Simplified and the gals started scrappy tumbling blocks quilts.  We had a good time on Tuesday!
 
But now it's time to get back to the third quarter list for the 2015 Finish Along -- eight on the list, two finished, one in progress (hand quilting), and if I stay focused I can get this one quilted and back to my daughter when I see her next weekend!! 
 
(That will leave only four to finish in September?)
 
So I auditioned threads, wound bobbins, changed the needle, oiled my machine, made a cuppa', found my gloves and started!!
I layered this quilt before leaving (so I could get right to it) and have been trying to think about how to quilt it.  I've done some finger sketching on the flower motifs and still haven't come up with the simplest path though I do have a germ of a design idea.
I plunged in by starting with some continuous curve work through the 9-patch blocks.  I am working across them diagonally, coming down the right side of the center patches and out into the right corner.
When I reach the end of that diagonal row, I head back up the left side of the blocks.
Before leaving the last corner of the center patch,
I am retracing another series of curves inside the first set to give it an extra detail.
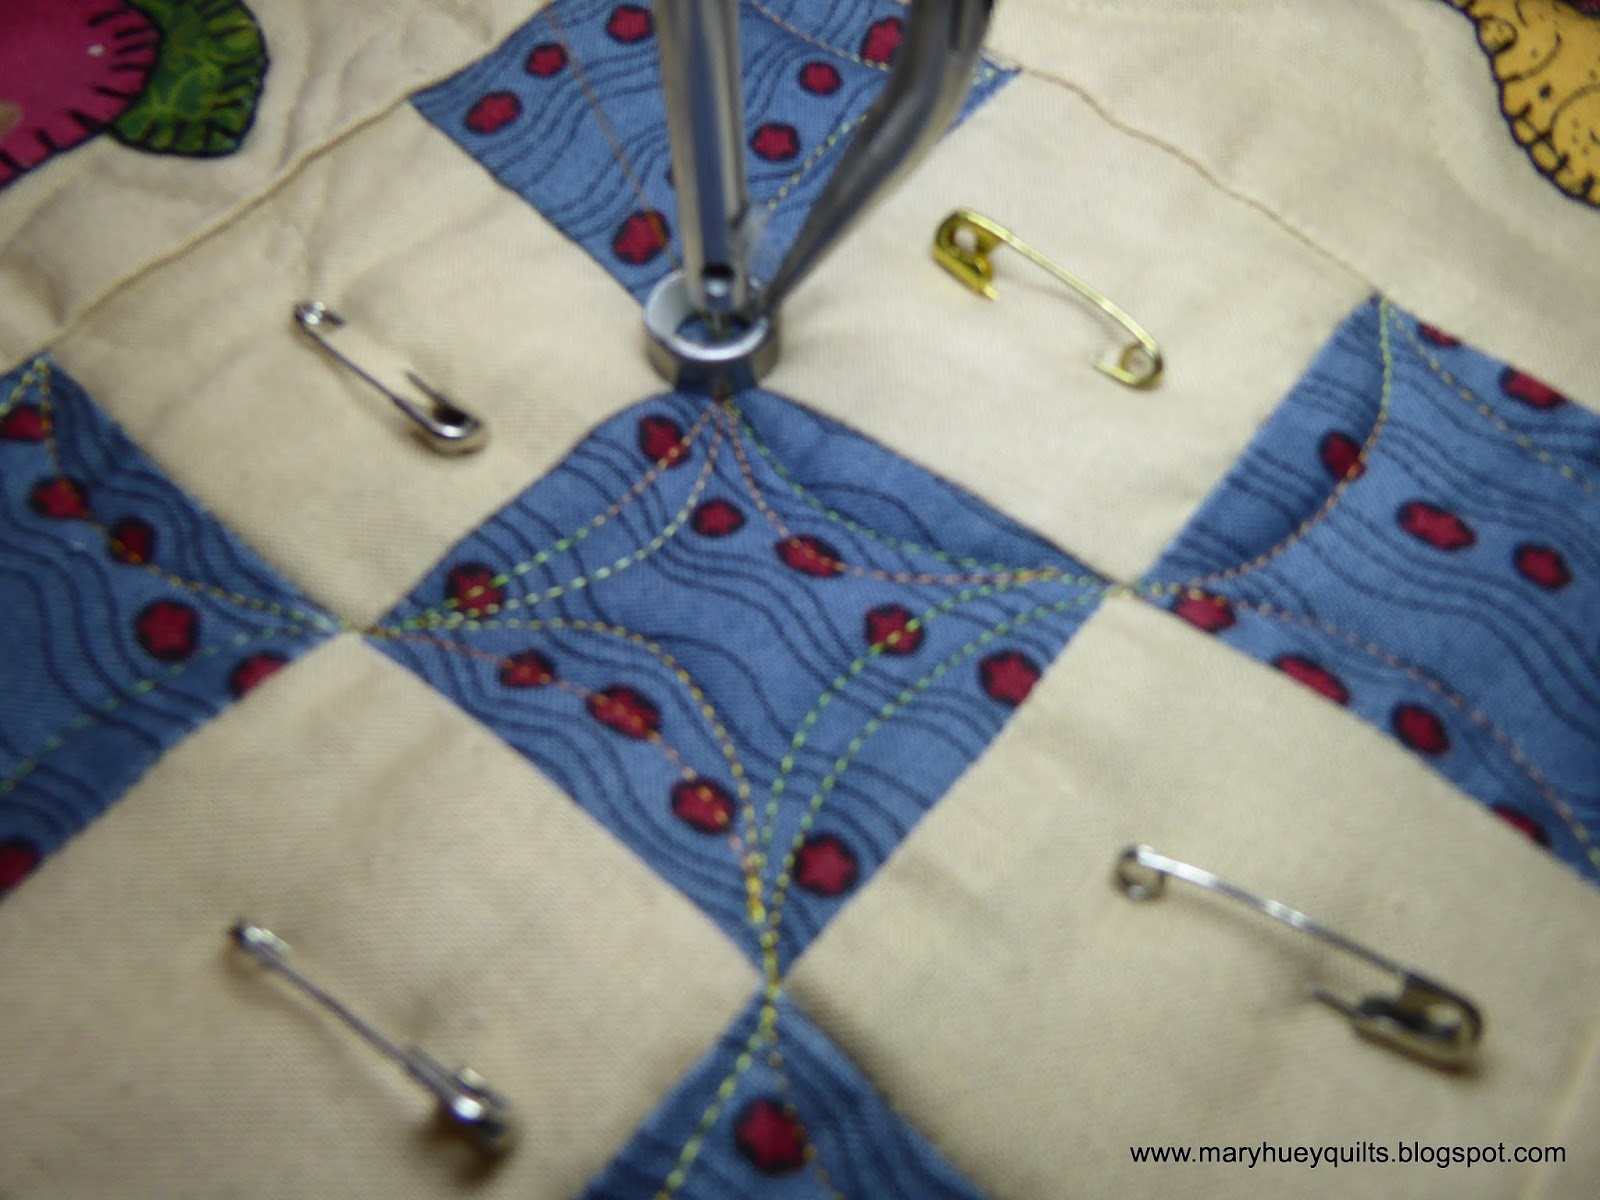
I like the impact and it reminds me a bit of a "god's-eye".
I expect to finish this part of the quilting quickly and will have to face the next set of design decisions.  One of the gals in the workshop Tuesday asked me how I stay focused on quilting when piecing is so much more fun?  Her question was in the forefront of my mind as I began to work on this piece.  I've been trying out several answers while I stitch and I think I've settled on the basic issue for me.
 
When I piece a quilt top, I know what it will look like before I start -- I have a diagram of some sort that satisfies my need to see where I'm going. 
 
But when I begin to quilt a piece, I very seldom can see what it will look like when it's finished.  The exception is when I'm making a quilt for the second or third time -- then I've quilted that design once before and know what the finished product will look like. 
 
So I waffle and demure and procrastinate and go piece another quilt top to add to my "to-be-quilted" piles.
 
What about you?  What keeps you from quilting as many tops as you piece?
 
Mary Huey

Tuesday, August 25, 2015

A Value and Spontaneity Exercise to do with Friends

This week, I'll be teaching in Springfield, Ohio for the Remembrance Quilt Guild.  It's a Set-In Piecing Simplified workshop using a scrappy tumbling blocks quilt as the project.  As I was packing my workshop samples, I got to thinking about how much easier making a spontaneous, scrappy quilt is for me since teaching the spontaneity and value workshops based on Gai Perry's classic book, Color From the Heart.
 
 
Earlier this year, Joanne over at Everyone Deserves a Quilt asked how I organize that exercise and this is what I shared with her.  I'm sharing it with you today because I think it would be a  good warm up for your fall quilt making activities.  Invite a few quilting friends, a minimum of 5 to 6 people is best -- more is fine, to join you.  Here's how I set it up.
 
Everyone cuts 4" squares into triangles -- usually two squares each from 50 fabrics so there are 200 triangles.  When the group gets together, everyone trades 50 triangles -- easiest, fastest way to do that is to count out 5 stacks of 10 triangles then trade each stack with a different person. 

The amount of time for the session determines whether or not the group does any sewing. 

For a half-day session, there is no sewing.  After the trading, put all the triangles into a brown paper bag.  Have a piece of flannel or cotton batting set up for a "work wall".   Pull two triangles out of the bag, decide which is the darker of the two and then position them on the flannel depending on the overall layout being used. 

For an all-day session, after the trading is done everyone sits down with their bags, pulls out two triangles out of the bag lottery style and stitches them together -- no cheating -- chain piecing should get most quilters through this step in a hour to an hour and a half. 
 
Press the seams towards the darker triangle.  Then back into the bags they go again.  Now begin to draw out the HST's, one at a time, and place them onto the "work wall" in the correct position for the design.  Expect to whine a lot at this point but just keep pushing through!!

Everyone starts at the upper left corner and works across the top row until there are 10 HST's in place.  Then begin the second row at the left end and just keep going until the piece is 10 across by 10 down.  Once everything is laid up on the work wall, it's best to take a break. 

After about 5 minutes, participants should then come back to their work and they can make minor adjustments.  First though it's important to identify what they like about the spontaneous layout.  An important part of the exercise is to experience the spontaneity and see that when you are working with fabric you enjoy, it works well.  An example of a minor adjustments might be something like there are only 5 aqua triangles in the entire piece and they are all clustered in the same area -- then it's good to scatter them around so they don't draw the eye to that area but rather serve as a "bit of sparkle" here and there. 

It's helpful to the group to make part of the exercise walking around and looking at each participants work wall, talking about each piece, identifying things that work, and paying attention to how they feel about each other's pieces.  Doing this quadruples the effectiveness of the exercise.
 
It's easy to overwork these pieces by switching so much around that the piece loses it's spontaneity and becomes too controlled to be interesting.  The unexpected is what makes a quilt interesting!!  The two fabrics in each HST don't have to be coordinated or match -- the light vs. dark positioning carries the design.

There are lots of options for the overall layout.  Usually I have everyone do the same simple arrangement but it might be fun to have several arrangements and randomly assign different ones to each participant?  I've never tried that.
 
This is the last one I did.  They are fun to make and the final border really brings them to life.
And they make cheerful charity quilts as well. 
 
My charity group just had some books donated to us to sell off to raise money for our batting.  There is a copy of Color From the Heart available if you are interested!!  $10 plus shipping -- just leave me a comment!!
 
Hope your week is off to a good start!!
 
Mary Huey
'


Friday, August 21, 2015

A really, really, really old UFO!?!

Once upon a time (long, long ago), there was a quiltmaker who decided to make her oldest daughter a scrappy basket quilt.  Her daughter was in high school and so the quiltmaker started the blocks for a double size quilt knowing that she would have several years to make the quilt before her daughter would need such a large quilt.
And then there was this long pause . . . . . . . . . . . . my daughter graduated from high school in 1990. 
 
Every time I come across these blocks in one of my studio tidy-ups, I think "I love these blocks, I have to finish this quilt".  So this year, I put it on my list of 12 UFO's (there are more than 12 up there) for the APQ Resolution challenge -- and it's number came up for July (yes, I know this is August).
 
One of the reasons I didn't finish it was that I needed one more block for "the plan".   I know from prior experience that making one more block the same size would be a challenge -- you see, these blocks were made in the days before 1/4" presser feet -- so I've never tried to make one more.
 
 Now lest you think my daughter is quilt-less, no worries -- she has at least a dozen finished ones!!  And one more large one isn't really necessary.  So to facilitate this finish, I repurposed the blocks and divided them up into 3 sets to make lap size quilt tops for my charity work.
 
Years ago, I taught "settings" workshops based on Sharyn Craig's terrific book, Setting Solutions.  I go back to her creative ideas frequently and framing all of the blocks to create faux sashing addressed several issues. It's been out of print but is again available currently as an e-book.  You can connect to it HERE.  I recommend it highly!!
 
I sashed all the blocks, some in a variety of prints and some with the background fabric.  Then I trimmed them to the same size to camouflage the inconsistencies. 
The center blocks have background sashing around them.
The setting triangles were created with 4 triangles from the leftovers I had (wisely) kept with the blocks.  I "sashed" two edges with the same width strips I used for the basket blocks but doubled the width for the outside edge to gain some "float" between the corners of the blocks and the final borders.
 
The corner triangles presented a bit of a challenge -- there were a couple trial and error stitching and trimming sessions but in the end they work!  In the picture above, the upper left corner blue triangle doesn't quite align with the triangles in the side setting triangle and it bothered me.  The right corner is better and the third try.
 
As I was contemplating border fabric, I realized that I should tidy up my workwall.  Usually there are several unrelated projects on the wall (so I don't lose track of them?) and as you can see in this picture, that can be distracting.
So I tidied things up to eliminate the distractions. 
I think it will be a good change and make decision making easier!!
I brought one of my portable work walls that I take to workshops up to the studio to use for keeping those few projects "in sight" (and off the work wall) and installed a bulletin board that has been malingering in a corner for keeping track of schedules and notices.
 
Still one week of tidying to go though I have to admit, I'm currently doing more stitching than tidying.  I must refocus so this weekend, I'll target the messiest areas and strive to be zealous next week!!
 
There's been lots of comments about the tidying over the past month -- isn't it nice to know we are all in good company!!
 
Mary Huey


Tuesday, August 18, 2015

Just for my Grands!!


Nothing like a (sort of) tidy sewing table to set off my urge to stitch. 
That is likely the real reason the studio never gets a complete do-over -- as soon as I get some open space on the tables, I take a break and stitch!! 
I'm part of one of Alison's Stash Bee groups -- the awesome Hive #7 -- and during July everyone made me funky birds based on this tutorial over at Block Lotto (tutorial is HERE)!  
 
I've made quite a few of them myself and with a camping trip on the horizon with my two grandchildren, I decided to use two of my blocks to make each of them a drawstring backpack. 
I enjoy all the tutorials that are shared over at Sew Can She and it didn't take long to find one for the bags.  You can find the full tutorial HERE.
I picked a bird for each, trimmed them up, and read through the instructions. 
First step was to frame up the blocks to the size needed for the bags.
I scaled the size of the bags down to fit my grands -- my beginning rectangles were 14" by 12".
I happen to be a long-time birder myself and have studied how American birds were named at one point.  So part of creating these birds has been "naming" them!!
This one is for my granddaughter and the bird's wing has a scrap from an outfit I made for her a couple years ago.
The Bashful Catbird is for my grandson who insists he "hates" catbirds (they rob the berry bushes in his yard).  And our native gray catbird is NOT bashful at all!
I'm always thankful for my years of experience making garments -- like turning the corner with a couple diagonal stitches to help make a sharper corner when the bag is turned.
And this is a trick I learned to helped guide the seams allowances into an "opening"  when it's turned to the inside making stitching the opening closed easier after it's turned. 
I was not looking forward to making the straps but the photos in the tutorial reminded me that I might have a bias trim maker tool.  Sure enough, there it was in the bottom drawer of the sewing table -- my designated storage spot for all seldom used tools!!
Of course, the instructions have disappeared so it took a bit of experimenting to remember that cutting the end of the strips on the diagonal and using a big corsage pin to encourage the strip into the tool works quite well. 
Once it's the strip is threaded into the tool, the pressing goes well and soon I was ready to stitch!!
Here are the results of a happy afternoon in a tidier studio!!
 I packed them with small journals and pencils to use during our 3-day camping break!
They were both delighted with the results and wore them for every hike and outing that the three of us enjoyed together.
This is one of my favorite pictures -- of course I want everyone to be a birder, too!!
The instructions and photos in the tutorial for the backpack are clear and easy to follow.  I loved working out of my fabric stash to create them and they just make me smile every time I look at them.  I'll be making more of these -- there are some moms and aunts with "backpack envy"!!
 
Mary Huey


Friday, August 14, 2015

The "tidying" continues!!

 The "tidying" in my studio continues in spite of all the temptation in the garden.
I've tackled this pile of fabric on the floor because it always in the way (blocks creativity).
Most of it is BIG HUNKS that I hoarded during my years as a quilt shop owner.  I whittle away at it for borders and backings.
I moved it all onto the (cleared off) cutting table and sorted it by color pulling out a few pieces to donate to my charity quilt making group for backings.
It lived on this shelf for a long time before taking temporary refuge on the floor (my son is replacing windows in the studio), so I was happy to have it back in place and out of the way.
Doesn't it look neat and tidy??
Turning around, I decided to handle these floor piles as well -- a combination of UFO's to be repurposed and fabric that hasn't been put back into the "floral" collection.
In the process, I uncovered this hoard of random strips that I used for a charming little string-pieced kaleidoscope quilt.  I'm not sure why I haven't let the leftovers go since I never do the same thing twice.  You could help me out with this!!  There is at least 1 1/2 yards in the assortment and if you'd like to use it, you can have it for the cost of postage -- just leave me a comment -- first one wins!!
My magazine hoard is also housed there and I let go of some and have plans to let go of more as the month progresses (we'll see??), but I found this article and set it aside for a closer look!! 
Perhaps we could use that information??
So that corner of the studio is much tidier!!
At this point, I decided I had earned a stitching break!!  This wall hanging is on my third quarter 2015 Finish Along list and I decided to try out "pencil" quilting on it.  It's 29" square and a teaching sample from the triad color scheme lesson in Quilting From the Heart by Gai Perry.
I thought I would use a turquoise thread since that is the dominate color, but at the last minute decided to audition a variegated gold thread as well.  In the end, that was my choice primarily because it didn't contrast so strongly with the background fabric.
I used the edge of my walking foot to measure the distance between the lines.  I started at the center of quilt and worked out to each side.  The lines became somewhat "organic" -- why can't I quilt as straight as I piece??  Not sure why, but it is what it is this time.
I love that there are no thread tails to tie off when I am done with the quilting since all the lines went from raw edge to raw edge!!
I need to learn how to keep the line spacing more uniform or else do this as whimsical lines in the future, but I like the look and the flatness of the finished piece. (The wonky upper right corner is the camera angle, not the quilt!)
 
I spent the evening stitching on the binding and adding a casing to the back so it's all ready to share with someone.  I've decided to call it Cactus Flower for no other reason that it seems like the right name. 
 
I'm feeling good!! 
A bit more of the studio tidy and another UFO finished!!
Next???
 
Mary Huey
 
Linking up over at PINK DOXIES!!


Tuesday, August 11, 2015

A Third Quarter Finish!!

One down, seven to do!! 
My list for the 2015 Finish Along is HERE.
As I was working on this quilt, I was reminded of my first "major" machine quilting effort.  I had been quilting by machine for over 10 years, but I decided to enter a local quilt show so I needed to do an extra special good job -- no more "this is just practice"!! 
 
As I tried in vain to move around the appliques carefully and retrace these curly-ques, I made a decision!  It looked whimsical but not perfect.  As always, I was in a time crunch, no time to have a meltdown about lack of skill.  
Solution??  Ever since I have described my machine quilting style as "whimsical". 
Identifying that aspect of my style released me from all the pressure of imitating the style of more detail oriented, skilled long-arm machine quilters. 
 
So I engaged in a little whimsy to quilt all the flowers in this quilt.  I took some photos while quilting the borders to share with you.
 
I meandered along the borders and after some experimentation discovered it was best to approach each cluster at the base of one of the leaves.  From there, I traced around the outside edge of the flower (I'm much better at that these days).
Next, I zig-zagged around the "petal" area of the flower -- random whimsy! 
And at some point when I was against the center of the flower, I outlined it. 
Arriving back at the outside edge of the flower and the base of a leaf, I then outlined the leaves and echoed them.  From here, I continued to meander through the border to the next cluster.  An expert could tell where I started working on the border because my "design" evolved a bit as I progressed, but the quilt isn't for an expert. 
I've used a "wonky" diamond cable many times as it eliminates the need to calculate the "lowest common denominator" of different border lengths.  Since acquiring a "Fine Line" Quilter's Ruler and my ruler foot, it's so easy.  Just plop the ruler down and follow it!!
I go all the way around the quilt doing one side and then the other, then come back and echo the first lines twice.  That safety pin is to remind me that I have to tie threads off there. 
Six trips around the last border and the quilting is finished!!  Gasp!!  Just in the nick of time, too.  It's hard to see in the picture but that is the end of the thread I have in my fingers.  Another 12" and I would have been irritated!!
Isn't the backing wonderful?  Oddly, I had picked out the backing for this quilt (an old sample from my shop) as I was closing in 2005.  It was only as I was binding the quilt that I realized just how perfect it was for this quilt.
The gal who now owns the quilt is a dear friend of my daughter.  We were very sorry to see her move out of our town and church but so happy to be able to send her off with a memento to celebrate the friendship we hope will survive the distance.
On to the next quilting task.  It's layered, the thread is chosen, the quilting ideas are flowing!!
 
Mary Huey