Thursday, October 26, 2017

Dodecagon Plans and Auditioning

It's fall here in Northeast Ohio and the riot of color we all look forward to is building to a climax.
It's the maples and the sassafras and the black gum trees that give us all the reds and oranges.
It's hard for me to stay indoors and stitch when there's all this fleeting beauty!
So it was good that I already had a plan in mind for today's post because when the text came this morning from one of my birding buddies that a nearby woods was "dripping" with migrating birds, my daughter and I were off to enjoy an amazing sight!
Hundreds of birds -- ruby-crowned and golden-crowned kinglets, brown creepers, winter wrens, song sparrows, white-crowned sparrows, white-throated sparrows, a few thrushes, and a blue-headed vireo made for a great morning!!

I came home inspired to fiddle around in the studio because I wanted to begin the on-the-design-wall auditioning of my paper plan for the Dodecagon quilt I'm piecing.  I have to make a decision about which of two large scale print motifs I'll use.
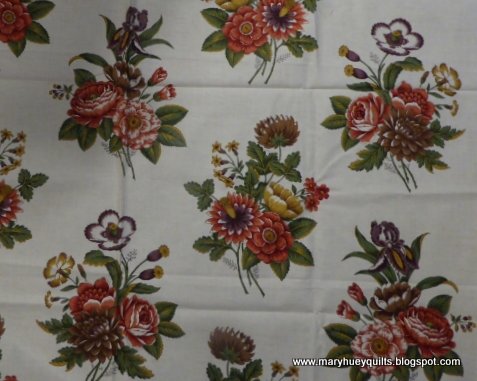
This one has a very light background and three different motifs.
The second one (on the left) has just one motif and a darker more traditional background.
I pinned the two of them to the design wall and then began to position some of the finished dodecagon blocks. 
I've been basting hexagons for 74 days (#100hexies100days2017) and have quite a stash.
The black ones have all been portioned out with dodecagons. 
The central dodecagon will be surrounded with yellow hexies.
I like the results. 
The floral motifs need to be appliqued inside a large diamond of black hexies.
Then green hexies will border (I think) the next round of dodecagons.
In the picture below I plugged a few yellow hexies in at the top of the white background motif because of the stem bits that will show.  I'm not sure I like this idea but time will tell. 
Here's a full look at the draft so far -- a couple days of coming and going from the studio should help me decide on the floral motif I'll use -- they both are beautiful pieces of fabric but each will have a very different impact on the overall quilt. 
Once I decide, my plan is to add green and yellow hexies to the black diamond so I can remove the papers from the black hexies and do the applique stitching more easily.
That makes sense right now. 
Any suggestions?

Edit September, 2019 -- Marge Sampson-George now has the Dodecagon pattern, templates, and papers available via this Etsy shop -- click HERE.

Here's a close-up of that same section of woods in the first picture.
As I was clicking the shutter, my mind was saying -- cool color scheme and those dry grass stems!!!
Hope you are able to enjoy the change of seasons in your part of the world this weekend!!

Mary


Monday, October 23, 2017

Quilt Backings on the Cheap!

Over the past week, I've been goading a follower, Pat, to finish her Jolly Holiday blocks and since I was poking away at her, it only seemed fair that I should get that second top together myself -- mission accomplished!!
Time to get the backings organized!
I found this new print that will suit my grandson perfectly but of course one length of it is too narrow.
No worries, just slice it (not down the middle) and add a strip of something else.
Now I have two backings hanging over the studio door ready to do some layering this week -- yuk!
The pine sprigs on the right has been in the stash for many years but I've never been able to cut it up (too lovely to cut?) and so using it for a backing (finally) gets it off the shelves and into circulation! 
Since I closed my shop back in 2005, I've used up quite a bit of my stash making backings for quilts.  Want to see some of them?
I pulled a pile of quilts off the guest bed where they live when they are off display or not traveling with me.
My daughter and housemate, Alison, did duty as my holder.
The easiest strategy is to slice it and add more.  I rarely slice down the middle -- looks more "artsy" to be off center -- unless there is a need to cut down the middle like a faded center fold line.  Fold lines fad sometimes because I have lots of fabric that I've had for a while. 
I recall that the plain green I used here was actually some reject borders from another project that had gone back on the shelf.  Perfect and used up!!
Sometimes the "additions" are leftovers from the piecing.  The band of triangles on the left got lost and I had to make a replacement strip to finish the quilt top.  Of course, then I found the band at once?!? No point leaving it lay around the studio because while I can't throw it away, I'll also never find another use for it.
I cut dozens of bright strips for the piecing in this quilt and had so many leftovers even using some to get the width I needed hardly made a dent in them.
This quilt is lovely, but the prints that were left were just going to take up space on the shelves so together they went for the backing!  The right side is narrower than the left so that center seam isn't on the center fold of the quilt.  Good strategy!
When I'm thinning out a color group, I often set the pieces I cull aside for pieced backings. 
Blue-greens were very strong in the late 1990's but not so much now, so using up some of them for this backing was perfect!
Lots of leftover strips worked together to make this backing the right width!
And I've entered this quilt in two shows and not had any negative comments from the judges about the pieced backing.
I hope this tour of backings has inspired you to use up some of your stash for backings!
All the quilts are back resting on the guest bed until their next call.
Not having "backing" fabric is never a problem here -- I have yards and yards of fabric that will work -- just need to stitch them together!!

Are you pouring on the steam to finish quilts as the holidays begin to approach?
Mary


Monday, October 16, 2017

Distracted by Fair Isle

Last Friday, I attended a workshop at Knitting Temptations in Dublin, Ohio with Janine Bajus from California, a recognized authority on Fair Isle knitting and design.  I've been fascinated by Fair Isle design for many years -- proof?  I have owned Knitting Tams by Mary Rowe since it was published in 1989 (the best book written about designing and making Fair Isle tams according to Janine) and a large quantity of Shetland fingering wool. 
(Mary's book is out of print but you can find used copies HERE if interested.)
Two years - no, make that three years ago, I started knitting a massive shawl designed by Christel Seyfarth of Denmark (her website is HERE) in an effort to use all the fingering wool and thanks to Karen, the lovely owner of Knitting Temptations, I now have the information I need to clear the final hurdle to getting this finished!!
The interesting aspect of the workshop I attended -- Color Outside the Lines, Fair Isle Tam -- was the conversation about color and the fact that "value is more important than color" in organizing a Fair Isle design.  I wanted to jump up and shout "YES" -- exactly what I emphasize in my piecing workshops!!

We spent our "working" time laying out and knitting color swatches to understand our preferences and our options.  I finished one and a half in class and am continuing to experiment with ideas.
I'm cruising Ravelry and Pinterest looking at Fair Isle projects to help sort out my value preferences - that can be a bit challenging because color is always distracting me from my focus.
Just like my piecing, if I can sort out the value elements of a design, it helps me understand my personal preferences faster than making everything I see the is "pretty".
Understanding my personal preferences is the key to being satisfied with project results whether it be piecing or knitting!
I signed up for the workshop on an impulse and squashed it into my schedule!
What an excellent decision it was -- a mini vacation -- doing something that I've longed to try under the tutelage of an excellent teacher in delightful surroundings with lots of like minded gals!
Doesn't get much better than that.

I highly recommend Janine as a teacher and Knitting Temptations as a shop!
You can find Janine at the Feral Knitter HERE to check out her teaching schedule.
Knitting Temptations is on the north side of Columbus, Ohio in historic Dublin and their website is HERE.
Of course, I left the workshop with Janine's new book, The Joy of Color. It promises to be a good read and I'm looking forward to finding more connections with my piecing approach!
I've no idea how I'm going to squash knitting Fair Isle tams into my work time -- thank goodness, the garden is going to bed for the winter.  That's always the challenge isn't it -- how to make time for new ideas when you love everything you are doing right now!?!

Have a good week!!
Mary


Thursday, October 12, 2017

A New Project???

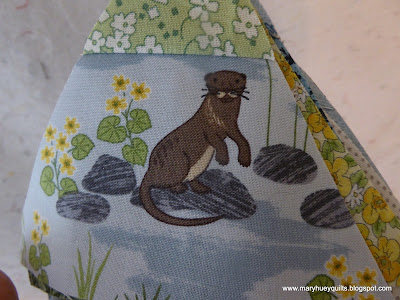
It's the otter's fault!
He sucked me into buying a fat quarter bundle of Down by The River by English designers, Lewis and Irene
And my new rule is to use the newest fabrics I purchase as soon as possible!!
So first I made a stack of pieces in my stash that "go with"!
And then, I found a project -- it's a Triangle Sew Along hosted on the Bernina blog by Brigitte Heitland -- Zen Chic!!  It's slow paced -- only need to make four of the current block and it's a modern quilt -- something I still find a bit baffling.
So I'm thinking that this sew along will help me understand some of the underlying principles of simple clean modern quilt layouts.
We'll see??

I can use Marti Michell's 60 degree ruler to cut all the pieces -- these are the first blocks!
Simple!
And the second blocks -- only six!! 
I scattered them up on the design wall yesterday afternoon as I started cutting the pieces for the third set of blocks.  I think I like where this is going!!
Brigitte edited the post for the first block HERE based on a comment from a follower and shared an idea for stitching together a band of rectangles and then using the triangle ruler to cut the units.
I adapted that idea a bit for the third block by alternating 3" by 5" rectangles with 1 1/2" strips.
The ruler is centered on the 1 1/2" strips and a triangle unit is cut.
Then rotate the ruler 180 degrees and cut another -- very little waste, very efficient.
I had eight blocks in no time!
Back to the design wall for another preview!
There is a total of 12 different blocks which will be finished by the end of February.
It's an easy pace and it's so much fun to use some of the new stuff right away!!

Have a good weekend!!

Mary


Tuesday, October 10, 2017

The Quilting Progresses

I could not resist -- I had my current hand quilting project along to use during my lecture presentation and there was that beautiful bed!!
The location is the Cook room at the National House Inn in Marshall, Michigan where I stayed last Saturday night -- oozes charming!!
It's almost too perfect isn't it -- the color of the room and the bed with the canopy??

I'm currently working on the center row of the quilt.
I'm using Presencia perle cotton, size 16.
I had picked up a few spools of it here and there.  Somewhere along the middle of the second row, it became obvious that I wasn't going to have enough thread -- I searched locally in vain.
Then an Instagram friend tipped me off about the Colonial Needle Company and they carry a complete selection of the colors in that size!
The thread dilemma had me stalled but then I stumbled across the #100daysofhandquilting hashtag on Instagram and that sparked me back into action. 
Posting my progress daily and all those little red 💖's is just the incentive I needed. 
I hope my followers will not get tired of seemly repetitive pictures as I slog along. 
Today will be Day 14!!
If you are on Instagram you can find me @hueymary
(There is also #handquiltWednesday on Instagram for more inspiration!!)

It takes me three to five evenings to quilt one motif and I've steered away from the traditional "outline the hexagon" approach.  Another Instagram follower asked me to share close-up photos of the quilting designs from the back side -- that won't help very much, will it?
So I've made some sketches and taken a few photos to illustrate some of the quilting motifs I've created. 

This photo shows the double zigzag outline of each motif and the quilting of the path hexagons.
These drawings might clarify it a bit.
The pink lines are the quilting lines -- diamonds in the light floral print
and a trefoil-like chain around the green intersection hexagons.
Here's a closer look at one of the intersections.
In the diagram below, the pink lines illustrate the outline of the entire motif.  
The first line is approximately 1/4" from the seams and the second line (along the lower left corner of the drawing) illustrates the placement of the second line which uses the corners of the hexagons as guide points.
Does it make sense? 
The blue "snowflakes" in the central hexagons is a filler I'm scattering here and there.
The light green diagram (above) that "joins" three hexagons is my favorite and it's featured in the photo below.
Below is my favorite motif quilting design so far -- it's the one I'm currently doing in the photo of my hoop at the beginning of this post.  It's the second time I've used it in the quilt and it won't be the last!
The green hexagons represent the path around a motif.
The blue line traces the outside seams of the motif and the center hexagon (not quilting lines).
I begin at the center hexagon with the "snowflake".
The pink line traces the first line of quilting.  It is 1/4" from the seam lines where it traces the shape of a hexagon and as those lines (which I'm drawing with a chalk pencil) extend towards the center intersecting to form the "V".
The second quilting line is green and it's 1/4" from the seam lines.
The third line is brown and it bisects the center of the hexagons and echoes the "V"s.
Put your finger on the screen and trace each line to clarify it.
I thought long and hard before adding the third line, but there was too much empty space without it.
As I look at the drawing, I'm thinking I should plunge the "V" of the third line deeper.
Someone asked what inspired this approach to quilting the hexagons.
As I think about how to answer that question, it seems like it goes way back in my quilting experience when someone said to me to look at the "shapes" created by the patchwork rather than the individual pieces of the patchwork.
Don't know who said it? 
But glad it stuck!!

Now that I'm halfway along with the center of the quilt, it is moving along smoothly as I'm repeating motifs.  But I'm already expecting to struggle with how to quilt the border.
Hopefully by the time I arrive at that point, my subconscious will have solved that and planted an idea in my head!!

Back to the hoop!!

Mary 


Thursday, October 5, 2017

On the Road!!

My week began with a teaching trip to western Michigan -- explored the area a bit on my way there!
 I found the Otis Farm Audubon Preserve down one country road and actually got out of my car and just stared down this road for a few minutes because it was so lovely and peaceful.
Ever since my trip to New Zealand in 2009, I've been aware of natural silence and I found it walking around this lovely meadow bordered by old fence lines now marked by trees.
No freeway or train noise in the background!
Just crickets and distance crows.
It is the season for the turkey foot grass which has been planted in this meadow and I took quite a few pictures of it blooming against the horizon.  The subtle colors drew me in and it might become something?
As I headed out to the eastern shore of Lake Michigan, I hoped I would come across a dune area that I could explore.  Sure enough, the Rosy Mound Dunes have been preserved for just that purpose!
The map warned me about all the steps but I wasn't prepared for the height of the dunes and the diversity of them -- not just little mounds of sand -- ancient huge accumulations of sand with mature forests and alluring little valleys.
This little area of loosely scattered oaks at the bottom of the stairs was teaming with birds when I got down there!
There was shopping, too.
Three new to me shops and some small amounts of fabric to fill in here and there.
This one is curious and I have no idea of it's destiny, but couldn't leave without it.
And a few new birds prints!!
Today, I'm heading back out to help Denise from Mercantile on Main in Coshocton, Ohio vend at the Granville, Ohio quilt show this weekend.  I've packed up lots of hand stitching for my Dodecagon project and expect to make big headway!?!
There are hexies to baste so I can keep up the #100hexiesin100days2017 momentum.
Look how many I've done in the first 52 days!
And kits of black hexies to make three more "loops" that will have a large scale print appliqued into the center.
I have two more dodecagons to border with the black hexies.  I'm anxious to get these two parts of the project finished so I can begin to assemble the center of the quilt.
My Sew Together Bag has the last four dodecagon motifs cut and ready to baste and assemble.
And it all fits into the Maker's Tote along with my date book, Kindle, camera, and reading glasses!
Actually, this bag can get a bit heavy.
And just in case I get all that done, I think I'll take along the box of hexies and the other 12 dodecagons so I can start to border them with the black hexies.
What an optimist?!?
Is that the way you travel, too? 

I'm looking forward to the drive down to central Ohio and hoping the fall colors are beginning to dazzle.
Hope your weekend is relaxing!

Mary