Showing posts with label machine piecing. Show all posts

Saturday, August 31, 2024

Good Intentions -- Forgotten Again

The last day of August and I'm surprised at how long it's been since I wrote a blogpost!?!  I had good intentions of posting every couple weeks this summer but obviously I didn't.  That seems to reflect my theme this summer -- forgetting.   I've always been a "list maker" but that habit seems to have slipped -- so perhaps I was always forgetful but didn't notice because I relied so much on lists??  

Yea, that's it!  I'm going with that!!

One of my other intentions for the summer was to focus on "contentment" -- specifically being content with my diminished energy and what I'm able to accomplish in that new mode.  The tricky aspect of this is that I still have lots of good ideas, but with less energy picking the ideas that benefit myself and others the most feels imperative.  It seems like to understand the aging process, one needs to be aging??  That's "past me" reflecting on my reactions as I watched older friends and family do less with their lives and seem to just step back -- and now here I am, stepping back every chance I get.

I should quit gardening and piecing and birding -- all of my favorite occupations require lots of mental or physical energy and wear me out these days.  The gardening could be winding down naturally -- I've let go of lots of high maintenance plants this summer (our little drought has helped).  I'm thinking of my outdoor gardens as habitat more than gardens -- providing shelter and food for native wildlife like beetles and spiders and bees and birds rather than the groomed beauty spot I was raised to work towards.  The birding away from home has slowed down but I've always enjoying observing bird behavior more than chasing rare birds so the increasingly native habitat of my yard caters to that.  Plus my growing fascination with insects provides some of the same experiences -- I know this will be disconcerting to some but outdoor spiders are quite interesting!

Then there's the piecing!  It is all muscle memory for me at this point so a very relaxing way to spend my time.  There are very few old UFO's in my stash at this point so starting something new is generally safe!  I'm currently a bit behind on the summer sewalong -- Chrysalis Cascade from the Darty Kite pattern company but sometimes that is okay as I can see the next step before I have the current step finished and make alterations in my fabric scheme (LOL).

Some of the versions in the Facebook group are amazing.  While I didn't have any sort of vision going into the project beyond using up some 1800's "reproduction" stash, I'm surprised by the results so far.  I've hardly used any of the intended stash but using any of the stash is good!  Of course, I'm machine piecing it instead of English Paper Piecing -- my left hand doesn't tolerate much hand work at this point.

One of the downsides of hardly any UFO's anymore is that I've run out of "leaders and enders" when chain-piecing -- using UFO piecing for that has been my "go-to" strategy for finishing, especially projects that I no longer enjoy.  Of course, there are those new ideas and so those have become the "leaders and enders" but this past week, the hexie piecing became the "leaders and enders" for a new idea that I was itching to start.

I'm always looking for ways to use up the 2 1/2" strips that I cut from the last bits of a piece of fabric.  The box gets so full it won't fit in it's designated space and so it must be culled productively and tidied up every so often.  
Actually, I love working out of this box.  Value becomes the primary selection criterion with color being secondary.  Spontaneous fabric choices always result in whimsical combinations and fabric gets used up!!

I sketched out this Granny Square block earlier in July in EQ7 and figured out how to piece the blocks together without using sashing.  (Sashing is fine but it slows me down and requires more accuracy to execute.)  Every time I figure out a "simpler" process for assembling patchwork, I thank Mary Ellen Hopkins -- her viewpoint was transformational for me.

The key is to think in "units" rather than blocks and eliminate seams.  I did this by adding the background squares to two sides of each unit and rather than piecing blocks,  I'm working in rows.  Once the entire layout is organized, I'll assemble the top by joining the rows of each unit to the rows of adjacent units.
Here is a unit laid out and ready for piecing. 
I'm piecing the rows from the upper left to the lower right - there are 7 rows varying from 2 squares to 8 squares.  I'm not setting these rows into units yet, but before adding them to the design wall, I press the seams.  Rows 1, 3, 5, and 7 are pressed in the same direction.  Rows 2, 4, and 6 are pressed in the opposite direction.  Each set of rows for every unit is pressed the same so when I string all the rows together in the final assembly, the seams will nest together consistently.
Then onto the design wall.  Everything looks askew at this point but I want to be able to move them around before the final row assembly so I'm holding off stitching the long rows.  
Here's a close-up so you can see the rows at this point.  I've started to add background squares to the right hand end of each row but they aren't stitched in place yet.
I'll add triangles to the end of each row to straighten the edges.  These are cut four from a square so the outer edge of the quilt top will be straight grain, not bias.  
This is another Mary Ellen skill -- by adding 2 1/2" to the finished size of my design squares I can cut these square on both diagonals to get triangles with straight grain diagonal edges.
Since my design squares are 2 1/2" cut and will be 2" finished, I added 2 1/2" to 2" and cut my squares 4 1/2".  The 2 1/2" extra is a constant no matter the size of the design square -- if it's a 9" block or a 12" block, an extra 2 1/2" still gives you the right amount of seam allowance.
These triangles will be set around the outside edges at both ends of each row.
The corner triangles are cut from a square 1 1/2" larger than the finished unit size that is cut on one diagonal as below.
These triangles are a bit larger than necessary but I like the extra space it gives me to straighten the outer edges of the top and add borders when needed.  Those little triangles can be trimmed off once the rows are joined.
 I have one more unit to organize and then after some rearranging for balance I'll start to stitch the rows together assembling the top much like a Trip Around the World design.
By the time I finish this laprobe quilt which will be donated to Sew4Service (a local group collecting and distributing hand made items in Northeast Ohio) the 2 1/2" strip box will be tidy again (although as I'm finishing up this post, I think another idea is percolating in my head?!?).
Finally here is my "sketch" along with two other versions inserting more background "sashing" with floating cornerstones into the piecing but using the same assembly process of units and rows rather than blocks.  The third idea (top right corner) is to insert a color "sashing".  Feel free to copy my sketch!  
If your scrappy strip stash is a different size, just go with that!  Don't cut new strips!
2" strips will yield blocks about 8 1/2" across
2 1/2" strips will yield blocks about 11" across 
3" strips will yield blocks about 14" across
How about 1 1/2" strips you say -- about 5 3/4" across
So use the size you have and do some stash busting!!

Watch my Instagram feed -- @hueymary -- for the finished top!!

Mary


Wednesday, January 11, 2023

It's been a GREAT day!!

The design wall is empty today!!  My version of Katja Marek's Homage to Grandmother's Flower Garden is completed -- well, the top is finished!!  
I've spent part of everyday since New Year's Day assembling the subsections into bigger sections until there were two diagonal halves.  All that was left to stitch were dozens of 3/4" seams -- stitch one, stitch a "sew-off", stitch another, and so on.

My goal was to finish the piecing by the time I leave for a retreat in a week where I started this project last winter.  Managing my neck arthritis is challenging.  It dictates how long I can sit at my sewing  machine, so I'm trying to develop a new habit of stopping before my neck starts to hurt.
The "set-in piecing simplified" technique I use to machine piece hexagons needs a "sew-off" at the end of every seam, so I've been going through dozens of them this week.  

On New Year's Eve day (itchy to start a new project), I sorted through my 2 1/2" strip stash and cut everything for a scrappy strip quilt that has been on my "want to piece" list for a while.  It is a take-off of a jelly roll quilt -- Sakura Sun (by Linda Fitch for RJR Fabrics).  Stitching the pieces into the bands was my first set of sew-offs.
Bonus -- getting up and down to press the bands as they were finished is a good mini-break from the machine and my neck appreciated that!!
165 sew-offs later and the bands were ready to put on the design wall -- well, that's exciting!!  
I spent an hour moving the bands around a bit to control some "hot-spots" --
like this hot pink/orange/red piece on the left that was screaming at me from the other side of the room.
Quick tip here -- I switched it with another more subtle "warm color" piece and settled it up against another red/orange piece to calm it down.
Much better!!
Of course, once the layout felt right I had to sew the bands together and finish the top immediately!?!
I added three more bands than the pattern specified to achieve a "tall" laprobe size. 
Time to hunt for some more sew-offs and get back to work on Homage!

It has been my habit for over a decade to use UFO's that have stalled out at the piecing stage as "sew-offs" -- two birds, one stone.  This piece surfaced sometime in November while I was hunting for something else so I laid out what was pieced on the floor and have been stepping over it for two months.  
No cutting needed as I had done that whenever I started it.
Sew-offs!!
And more set-in piecing -- so I was on a roll!
I see-sawed back and forth between the two projects 
adding the honeycombs to the layout.  I cut a few more of the hexa-poly shapes to finish the outer edges and . . . . . 
. . . . . then there it was, the very last 3/4" seam of Homage!!
And here it is in all it's glory!
All the fabric is from my stash.
Rotary cut with the little hexagon in Marti Michell's template Set N.***
It is completely machine pieced using the "set-in piecing simplified" technique that I taught.
The top is about 64" wide by 60" long and I won't add a border.
The backing is ready and I'll take it to the retreat next week to layer it (and show off)!
I even have ideas in mind for how I'll quilt it by machine!?!
My wheels will spin for a day or two now while I refocus and pick up the next project.
That's where all my lists come in handy -- minimizes the wheel spinning!

Keep stitching out there!!
Mary


***EDIT April 2025
Marti Michel closed her business in late in 2024 and while some shops may still have a stock of her templates, you can also find them on Ebay and Etsy. 


Monday, March 14, 2022

The Ups and The Downs

I don't like change!  How about you?

It took me a while (as I'm sure it did you) to settle into a Covid way of life and find a level of contentment in what I could safely function.  Now it seems I have to reverse engines and go back the other way.  The question is how far back do I want to go? 

As things would have it, an official diagnosis of arthritis in my back last week will be a factor in my return to "normal" (whatever that is?).  It's been suspected for several years and I've actually been taking steps to manage it with monthly maintenance sessions with a physical therapist, monthly massages, and a morning stretching routine since it was first a possible reason for my back issues.  But something about having the doctor say where it's located and that it's "severe" threw me for a bit of a loop and I spent lots of time last week fretting about what this means long term -- the DOWNS.

  I have to fret -- that's how I deal with change -- but today I'm done with the fretting and ready to make changes that will enable me to feel energetic and as pain-free as possible.

Thank goodness for my sewing!!  It has been my default for a long time when fretting -- the familiar actions of piecing calm me down and allow the rational, practical part of my character to activate.  While I haven't had any finishes for almost a month, I've made lots of progress on a variety of projects since doing anything more than 30 minutes at a time leads to backaches so lots of changing up around here!?!

My version of @jemimas_creative_quilting EPP project has finally reached part 7.  The auditioning for each part goes slowly and I waffle about fabric choices though being a couple steps behind the release of the mystery parts is a bit of an advantage because I know where the design is going.  Actually, as I write this and look at the picture, I think the picture will help me make a couple of decisions.  I work on it during the evenings (watching murderous English TV series) and during webinars about native plants and pollinator insects (which are abundant right now).

I finished the blocks for Forever Friends (in the  book, Sisterhood of Scraps) -- settled on 24 blocks and started adding the sashing and setting the blocks together. 

 It should be about 40" by 60" -- nice laprobe!
I think I found a pressing misprint in the instructions for the strip sets in steps 6 (page 39) and 8 (page 41).  I noticed I was having to re-press every corner unit as I set the blocks together.  I tried pressing the strip sets opposite to the instructions and didn't have to do that anymore.  So if you try out this pattern, keep that in mind and see if you have the same experience.
 
Yesterday, I tidied up all the strips and had an inspiration -- drat?!?
Warm versus cool log cabin or pineapple blocks!?!  Sorted and ready to go!!!
But I'm not allowing myself to start that until I get this top quilted (and there are a few ahead of it in that queue) -- I need to cut more warm strips anyway.
 
For the moment, I'm caught up with Katja Marek's current sewalong, too!  Weeks 1 through 10 are pieced!  
This is a close up of the "wreath" so far.   I'm using stash fabrics and my only fear is that I'll use up all my light blues . . . . but then I'll have to shop!!!
I'm a little behind on the pressing but doesn't it look great when it's done?
Week 11's flower is pink and I'll use it as "leaders and enders" as I assemble the Friends Forever top.
I managed to get back into my early morning machine quilting habit over the weekend -- finished one small piece and started working on this small quilt.  Seems to be the best strategy for me -- quilt 30 minutes first thing!
How's this for a cheerful bouquet?  There are a half dozen amaryllis bulbs in this big bowl -- I have more red than I remembered but a couple have yet to open so hoping the white one and the red and white striped one are among them.
We are expecting a week of mild weather here in Northeast Ohio -- that will be good!!
It  makes it so much easier to convince myself to go outside!  I'm looking forward to spring "firsts" as always -- the first red-winged blackbird is here, the turkey vultures are back, the garden witch hazel bushes are blooming and skunk cabbage has been sighted.  Singing frogs should be soon and I'm checking everyday for the rhubarb plant to poke through.  That also means it is time to cover the strawberry bed so the deer don't browse the plants and shift the pots full of spring bulbs to the patio entrance.

Looking forward to a week of being UP!
Mary


Wednesday, December 9, 2020

Inflating Flat Mary

 Even though I'm not a fan, it was encouraging to me that the Macy's Thanksgiving Day Parade figured out a way to happen this year!  If they can blow up those monster balloons to walk around the block, maybe I can inflate myself back into a daily machine piecing routine!?!

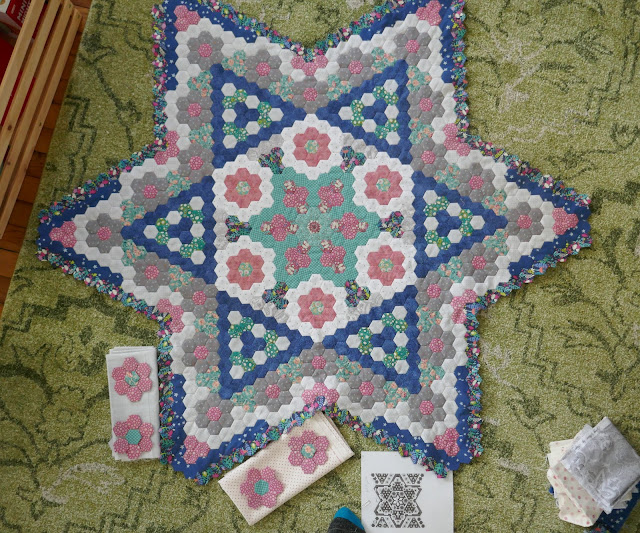
So for the past couple weeks, I've been finishing up a table runner I cut out late in October.  I used the large hexagon template in Marti Michell's Set G (template #42 - 2" finished on each edge) and a pack of 5" Moda holiday charm squares.  To piece it, of course, I used the Set-In Piecing Simplified technique from my teaching guide.  By assembling it in sections, I can employ the chain piecing strategy without any "leader or enders".  It's an easy project for practicing or refreshing this skill. 

As I get back to daily piecing, I've noticed I'm making more little mistakes than typical.  Each time I need to "undo", I'm trying to remind myself how lucky I am to have such excellent "ripping" skills.  My mom started me early and the sentence I remember clearly from those days -- "Mary, I think you better rip that out" -- so here I am, sixty years later, ripping out seams with professional skill!!

When I had this all assembled, I put it on the design wall to enjoy the surge of pride that comes with a finished piecing project.  "That's not right" -- sad face.  Leave the studio, come back later, take it down and start to rip out the seams to fix it. Fifteen minutes into it, I realize I'm ripping apart the wrong end of the runner -- arghhh.  I'll be back later.

It's all fixed now!!

 I'm so glad I wrote up a tutorial about finishing zigzag edges without binding several years ago so I could go back and see what I did!!

The complete process is HERE along with another link to how I set up the backing so I can stitch all the way around the piece with no stops!  If you don't have the 1" fusible batting tape available, you can cut strips of any lightweight fusible interfacing to use.  And definitely trim 3/8" from the edge of the batting instead of just a bit over 1/4"!

The plan for today is to quilt it with a simple grid and gold metallic thread!  
One more finish for the year!!
I made this one 9 hexagons long down the middle and it measures 10" by 30".
To keep the momentum going, I decided to follow along with the Moda Winter Frost sewalong -- here is a link to the startup post.  Their model quilt uses a palette of blues and the Bear Creek setting option just sucked me right in!!  I have a lot of blues plus that shelf is very tidy since using them for the finish of my Halo Quilt in the fall.  
And then my favorite blue winter quilt that hangs in the dining room is moving out this winter with it's owner, so . . . . . . . . totally justified that new project like a pro, didn't I?!?

The working pile on the floor next to my cutting table grows a bit every day.  I'm printing out the instructions in "black and white" making it easier to focus on the value placement rather than getting frustrated by not having "that specific print".   

 I've kept up with piecing the daily blocks (except for one which I don't like and might leave out).  I will confess to being a bit cranky about some of the instructions so if I have a different technique that I know gives me good results, I'm not above substituting that.
(Sorry, Moda designers.)
So I'm not pressing seams open -- doing that interferes with my ability to accurately line up seam intersections and it makes the pressing more time consuming.

These cutting lists can look daunting so I taking time to analyze and add notations helps me to be efficient -- is there a common denominator for print A which means I can cut all the pieces needed from a 2" strip rather than cutting four 2" by 1 1/2" rectangles and then four 2" squares, etc.
There has only been one set of "templates", so I rough cut them from the paper pattern I printed, laid them on top of the fabric, and used a rotary ruler to guide my cutting -- quick and accurate.
I'm not a fan of making units bigger than necessary and then trimming them down to the correct size.  I know that's a popular teaching technique these days, but it only works on simple units. 
It does not work on this unit!
The principle only works when you can align a central point or line and trim evenly on all sides.
The instructions called for trimming this unit after all four pieces are assembled.
If you must trim it, it needs to be done before the center diagonal seam is stitched, not after!
Can you hear the cranky tone in my voice?
Trouble is that piecers will think they've done something wrong when the last diagonal seam misses the mark at the corner of the square but the error is the instruction, not the piecing. 
After the poor results of the first one, I rescued mine by trimming the large triangle to the correct size before stitching the diagonal seam, laying it on top of the pieced unit and measuring the seam allowance from the edge of the plain triangle -- better but not perfect.
The only way to make "trimming" work for this unit is to cut the corner square, 2 1/4" not 2", and then trim the pieced triangle unit and the large triangle to the correct size before stitching the diagonal seam.
That is easier with a tool like Marti Michell's Multi-size Half Square Triangle.

While I'm here, let me explain my experience as an instructor working with piecers who trim all their work to the "right" size.  Because they rely on trimming, they have not developed the skill of stitching consistently accurate 1/4" seams because they don't have to.  That's fine until they tackle complex units with irregular shapes some of which may require templates.  
Trimming doesn't build piecing skills.
End of rant!

So the view from the sewing machine is looking busy.
I'm pleased with the Winter Frost blocks (I love blue quilts!) -- check out my Instagram feed to see some of the other blocks I've pieced -- @hueymary
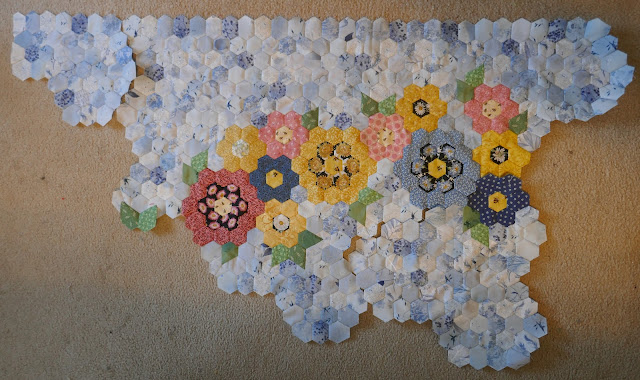
The hexagon piece on the right isn't growing very fast but looking at it every day will eventually pay off -- my subconscious is on the job and one day, I'll walk into the studio, look at the design wall and just know what to do!!
Almost all of us have some sort of holiday ahead of us this month and it won't be typical.
I'm trying to override "not typical" and make it "unique" instead.
Gift making and shopping needs to be done sooner.
Celebrations need to be smaller and simpler but more festive and more frequent --
(i.e., eating the Christmas baking now instead of saving it for the BIG day).

How about you?  Have a plan?
Stay well and strong!
Mary


Monday, July 6, 2020

Halo Quilt Sew Along - A Finished Top!!

During April, I shared a new project -- the Halo Quilt.  The booklet has been in my stash for a couple years and this scrappy quilt catches my eye on Instagram over and over!
I was in the midst of several other projects (of course) but when a couple Instagrammers announced they were going to host a Sew Along, I caved at once -- I could do the two blocks a week goal they shared easily.  I copied the template pages, glued them to template plastic, cut them out and started exploring my fabric stash for the right stuff.
A few blocks into the piecing and I made some basic fabric decisions such as the arcs would be simple prints, the four side shapes would be low volume prints, and I'd use a wide variety of print styles and novelty prints for the centers and corners.
I didn't stay with those guidelines 100% of the time, but they helped me start moving.
I machine pieced the blocks and used them as "sew-offs" (leaders and enders) for projects with deadlines.  My experience teaching the drunkard's path block with Marti Michell's templates made the curves easy and my blocks were generally square which was a delightful surprise!
Soon the blocks were accumulating and I was getting very relaxed about the fabric pulls.  In general, I pulled the fabrics for two or three blocks at a time and pieced them.  Some of the other participants cut all their fabrics before starting the piecing but I have a rather short attention span and am eager to see how "this block" is going to look!!
As the blocks were finished, I added them to the layout without much arranging.
As the number of blocks increased, I started researching the outer border blocks by looking through the dozens of Instagram photos from other quilters.  My first thought was to use more low volume prints for those units and I trialed a few -- meh . . . . 
Then I saw Maria's (@marvanzij) version using teals!!! -- check it out HERE!
I love teal and so off to my shelves I went -- but I don't have enough teal prints to pull it off .
Which color do I have lots of variety?
BLUES!!
                                           
Rather than use the border templates in the pattern, I cut rectangles for the sides and squares for the corners following the instructions and made this "cut away" template.  Once all the arc units were assembled and the border squares/rectangles cut, I worked on my design wall to audition them for placement to enhance the circles in the center of the quilt.  It took a couple days of coming and looking, moving, leaving - coming back, looking, moving, leaving, etc. until I was happy with the arrangement.
I was also going slowly because I wasn't completely convinced that the blues would be right.
Interestingly, I cut all the pieces for this quilt with my trusty Gingher scissors?!?  
I haven't done that since the early 1980's!?!
At this point, I was convinced the blues were just right for my blocks!
My version is smaller than the pattern and many of those being made by others.
It will finish at about 47" by 56" -- larger would have been fine but I could sense that I was getting bored with the piecing and I'm always happy to have another laprobe around the house!
Time to assemble the blocks into a top!
My blocks were pretty consistent but every now and then there was one with a wonky corner -- I'm blaming the grain of the fabric.  
I'm not a "trimmer" -- but I have lots of experience at "fudging" things together so my focus was to match the arcs and the block corners and everything happily fell into place!
I believe it helps that I always assemble quilt tops using pairs and quads instead of rows.
It's the same technique I described in my recent post on setting together the blocks for my Mississippi Mud pattern -- it's HERE.
Here's the finished quilt top.  The backing is in progress and I'm currently stalking Instagrammers for quilting photos of their versions!  I found a hand quilting one that inspires me -- not sure I want to hand quilt this one or that I can adapt the idea to machine quilting -- we'll see?!?
Are you doing any anti-racism work?
It would be easier in the short run to skip it, wouldn't it -- but I believe the sooner all whites get educated about this issue, the sooner things will improve.
It's easy to wish things would just go back to normal but normal wasn't really working.
I remember someone saying to me as my husband recovered from a stroke that it was good to see him getting "back to normal" -- I bravely responded that "back to normal" wasn't my hope for him as it led to the stroke.  There needed to be changes made and this isn't any different.

I'm halfway through Me and White Supremacy -- the questions are getting harder but my white fragility is getting less fragile.  I listened to another one of Ms. Saad podcasts -- twice -- introduced me to the white habit of "cultural appropriation" as it pertains to yoga and the spiritual practices in which it is rooted.
Now I can't stop wondering how quilters fascination with the work of Ghee's Bend reflects that same demeaning habit.

Over the weekend, I started listening to The Bluest Eye.  It's Toni Morrison's first novel and I was pleased to find a copy of it on Overdrive read by her.  I love to hear authors read their work -- I know it's being conveyed the way they intended.  Her word pictures are vivid and the fact that she has a soothing melodic voice is a bonus!


Finally, I'm hosting an OPEN GARDEN DAY this Saturday (7/11) from 10 a.m. to 2 p.m.
The daylilies should be at their peak and the native meadow and prairie plants should be starting to bloom!  It's free but donations to benefit The City Mission of Cleveland will be welcome.
There might even be a few plants for sale and a few quilts on display depending on how energetic I get?
I'm located in Northeast Ohio, Lake County and an email to 
maryhueyquilts at hotmail dot com 
will get my address.
Everyone is welcome!!

Mary