Friday, December 31, 2021

#quilt21in2021 Parade!!

Let me start today's post with a big THANK YOU for all the encouragement and cheering you shared with me this past year as I pushed through #quilt21in2021 -- you kept me accountable!!
So here they are -- all in the order of finishing!  
No comments necessary as this parade is mostly for my benefit and memory.

#1 -- finished January 25 -- sent it out to be quilted as a "kickstarter" for the year.
Lap robe, pattern from Country Threads, gifted to a long time friend relocating to the south.

#2 -- finished February 3 -- quilted it myself.
Crib size version of my pattern, Mississippi Mud -- waiting for the right baby to come along!

#3 -- finished February 15 -- quilted it myself.
Lap size -- 8 point star blocks made with Marti Michell's Stripper Set -- added to my stack!

#4 -- finished February 25 -- quilted it myself
Crib size, another version of my Mississippi Mud pattern -- added to my stack!

#5 -- finished March 13 -- quilted by myself
Lap size -- a Trip Around the World variation from Blanche and Helen Young's classic book using the pink/teal version of the print I colored for King's Road Imports in the early 1990's.
Gifted to my oldest granddaughter for her birthday.

#6 -- finished March 26 -- quilted by myself
Large wall hanging, original "mash-up" of random blocks to merge and expand two UFO's into my birth year temperature quilt.
Just try to get this one away from me!?!

#7 -- finished April 11 -- quilted by myself.
Lap robe using a Mary Ellen Hopkins "spools" pattern variation and another of the colorways from my brief stint of fabric design for Kings Road Imports.
Gifted to my oldest grandson for his birthday (but it seems to have escaped without a proper picture?)

#8 -- finished May 7 -- quilted by myself.
Large lap rob -- a merger of two sets of hexagon/star blocks from two different "quilt alongs" that were happily the same size blocks!  
Love this one so much -- it's a keeper!

#9 -- finished June 2 -- quilted by myself.
A small wall hanging with 6" Bride's Bouquet blocks made using Marti Michell templates.
In the stack!

#10 -- finished July 4 -- quilted by myself.
Lap robe -- the final color exercise from Gai Perry's Color From the Heart book.
In the stack!

#11 -- finished July 26 -- quilted by myself
Lap robe version of my pattern, Stars All Around, using Marti Michell Sashing Stars templates.
In the stack!

#12 -- finished August 7 -- hand quilted by myself.
The long twin size quilt started with Marge Sampson George's English paper pieced Dodecagon blocks and ran amuck as I incorporated other design styles -- a medallion setting and fussy cut fabric motifs.  It took 7 months to hand quilt and it might be sold?  Special friends have asked to buy it!

#13 -- finished September 25 -- quilted by myself.
A small experimental version of a design from Quilters Companion magazine.
Waiting for the right baby!

#14 -- finished October 3 -- quilted by myself.
Large lap robe/wall hanging pieced using Marti Michell's Feathered Star Set P.
This is my new Christmas quilt for the living room!

#15 -- finished October 31 -- quilted by myself.
Large crib size pieced using Marti Michell's Drunkard Path template set.
Make me an offer!

#16 -- finished November 4 -- quilted by a professional machine quilter.
This is the double-size version of my pattern, Courthouse Stars, and has been gifted to a young friend to inspire her bedroom makeover!

#17 -- finished November 15 -- hand quilted by myself.
Large lap robe using six of the twelve blocks in the @lemonshark's BOM in 2019.
The other half are layered and being quilted in January.  Family members are muttering about this one so it may find it's way into one of their stacks.

#18 -- finished December 9 -- quilted by myself.
A twin size quilt made from antique blocks that I rescued from horrible green sashing.
(For the purists in the crowd, I believe the woman who pieced this would be happy to see it finished and used by quilt lovers.)

#19 -- finished December 10 -- quilted by a professional machine quilter.
Twin size sample of an old pattern that is no longer available.  I was going to let this one go, but now I'm not so sure -- it turned out so lovely!

#20 -- finished December 22 -- quilted by myself.
No pattern for this large wall hanging -- just combining hexie mosaic elements I liked.
The plan is to hang it in my home after some winter painting.

And last but not least #21 -- finished December 28 -- quilted by myself.
Crib size pieced from a panel of pre-prints by my mother and now waiting for the birth of her next great grandchild!


What a year!!!  
Not what I was expecting but with good bits just the same.
Not only did I eliminate a stack of quilt tops rendering them more useful but I also gained confidence about my ability to finish/quilt my own work.  
My quilting skills improved.  
I gained a new understanding of the productivity of daily work to make progress.   
I hope the future will see me moving through my projects all the way to the end instead of stopping and turning to something new.  
The satisfaction of finishing can't be overrated!!

For the past week, I've been returning to my studio every day for a few hours to sort and tidy up the chaos.  There are still UFO's up there to motivate me and keep me busy. 
 I'm making a new list and some new goals for 2022.

2021 has been a challenging year for all of us -- I've been lucky -- the hardships have been generally manageable for me.  2022 could be more of the same but it will also be what I make of it.
I've been looking back to find the good parts of the past year in search of insights into the possibilities for the new year.  I hope I'll find ways to pay attention and lift up the "exhausted" around me who are being crushed!

Onward to 2022!!
Mary


Tuesday, December 28, 2021

MISSION ACCOMPLISHED!!


This afternoon, I finished the binding of #21 and boy, am I feeling amazed!!   I accomplished #quilt21in2021.  That shelf is empty (though I'm sure it will attract new stuff quickly)!! 
As I said a couple weeks ago, I saved the easiest quilting job for last -- I believed I could get it done in three days once I decided "raining hearts" would work for the quilting!  The edge-to-edge wavy lines with hearts inserted randomly went quickly and there were no thread ends to bury!!  I've used the same  idea on other quilts inserting snowflakes, stars, leaves and little flowers.
It's dreary and raining here today so I had to settle for draping it over the front porch railing for a photo.  This top was a shop model to sell the preprinted nursery rhyme panels and my mother pieced it for me -- as usual the fabric sold out before the top was quilted so it's been patiently waiting for it's day at the machine for about 20 years?!?  My plan is to give it to mom's next great-grandchild!!
And I need to share number 20!  It was another intimidating top!  First I had to let go of the "it's hand- pieced, it should be hand-quilted" notion.   If I was going to reach my goal, hand-quilting wasn't a good option.  I literally had no ideas about a quilting design but with time growing short, I pushed myself to "just start".   

I outline-quilted the central wreath and the large green wreath and happily, the inspiration began to appear, one piece at a time -- each aspect growing out of the previous quilting.  About half way through the quilt, I remembered that the piecing design occurred in the same fashion -- little by little, section by section.  While it probably would not be considered improvisation in "design", it was definitely a work of improvisation in "ideas". 
I found some inspiration by revisiting one of my blogposts from 2014 HERE and pulling out the quilt I did that winter as I experimented with machine quilting flower garden motifs.  Each of the six corners of the green wreath are quilted like a hexie flower motif.
A pencil sketch I found in my drawer 
and a practice piece provided the design for the balance of the green wreath.
Of course, it hardly shows up on the scrappy hexagons but it was fun to stitch through and a close up view will reveal it's details.
My "go-to" background quilting design for hexagons is an equilateral triangle grid but with English paper pieced hexagons, it need to shift a bit  as the opened seams of English paper piecing are too weak for stitch-in-the-ditch quilting so the grid is based on the centers of each hexagon edge as in the photograph below.  
The motifs that are appliqued around the wide border are not as perfectly aligned as I intended (what is??), so after an afternoon of gridlock -- drawing chalk lines, erasing chalk lines, etc. -- I settled on arcs  in the hexagons and straight lines connecting the motifs that camouflaged the imperfect alignment and spacing. 
I did have one challenge with quilting this top -- occasional crappy bobbin thread tension!?!  There are three possible reasons for this -- an un-balanced tension setting for the threads I'm using which is the easiest to correct in my opinion.  Then there is un-balanced speed when I'm moving the quilt through the machine too fast for the speed the machine is running -- I have to constantly remind myself to slow down my feeding speed.  And finally, it happens when I quilt to the "northeast".  My machine behaves badly when I move the quilt through heading in that direction.  There is no option but to stop and adjust the quilt so I'm not quilting "northeast".
Happily, I've figured out a fix that works 90% of the time!
Working on the topside of the quilt, I lift each individual stitch to pull the excess top thread up until the stitching on the back looks normal.  This creates a "loop" of extra thread on the top.
Then I insert a self-threading needle at one end of the loop and carefully "grab" that loop and pull it under the surface of the quilt top.  It's much like burying a thread end.
It's also rather tedious and I find that doing it a few times reinforces the idea with my brain that I need to slow down the hands to mesh better with the speed at which I'm running the machine.
Of course, you can also take the stitching completely out and start over again -- equally annoying, so take your pick.

My purpose for finishing all these tops into usable quilts this year is to make it easier for my family to deal with them when the time comes to downsize or disperse -- in theory, a finished quilt should be easier to rehome than a quilt top.   The "master plan" is to let my family put their names on quilts they want, then gradual disperse ones they don't want as opportunities present -- I've already rehomed 8 quilts in the past five months!!  At 44" by 48", this one is a little small for a lap robe, but a little large for a wall hanging . . . . . and then on my way down the stairs after binding it, I made the instant decision to keep this one for now as it will fit perfectly on the stair wall!!
(We'll see how long it takes to add a casing?!?)

We sort of missed Christmas here (thanks, Covid) and it appears New Year's will be the same.  The options are limited again and the challenge once more is to push away "fatalism" and find that corner of contentment where hours drift past more easily.  I'm already weary of our dreary weather (no snow) and aside from the lettuce in the cold frame and invasive ivy to pull, the garden offers no respite.  Luckily, I have a messy studio with an empty shelf to occupy my time -- I'm sure I can fill that shelf back up.
The past couple afternoons have seen tidy-up progress already and a list is emerging of stuff to do.
Next week starts another year with new goals for me.

Blessings to each of you in the New Year and thank you for encouraging me to achieve
#quilt21in2021!!

Mary


Wednesday, December 15, 2021

And That Makes Nineteen!!

Real quick today -- one more FINISH thanks to the work of a local professional machine quilter!
This was an unfinished pattern model from my shop (laying around for 15+ years).  I chose the fabric and did the piecing, but I didn't do the applique work.  Chris did that and those of you who were customers know what a skilled seamstress she is!!
The large floral print in the alternate blocks and the wide border is gorgeous and if I keep this quilt it will be for that print!
The backing is pretty gorgeous, too!!
To keep the cost of the quilting reasonable I chose an overall pattern -- it was an instinctive choice, soft curves but not random looking.  I think it provides a nice contrast with the angular piecing while complementing the curves of the appliqued flowers and leaves.
This is the third quilt I sent out this year.  I'm glad I chose this method of finishing because I would have agonized too much over the "how to quilt" decisions.
Now it's finished and it's beautiful!!

In other news, I finished up two little doll cradle quilts so now I have three to go along with the refurbished doll cradle for a triplet Christmas gift.  The cradle was built by my father-in-law for my oldest (his first grandchild) and needed some TLC since I'm pretty sure the girls convinced their younger brother (the triplets' father) to lay in it one time too many.  Happily, a friend of mine who makes stringed instruments (think mandolins) took the repairs in hand and it's like new (with braces).

The upper left quilt (pink border) and the upper right (greens and rust) are retired teaching samples and the blue/yellow one is a mash-up of leftover step samples from teaching Storm at Sea.  The new mattress and pillows are done, now to make some "linens" -- sheets and pillowcases.
(And yes, the boy is getting a "stuffed animal" quilt so no one feels left out!)
Number 20 is under the needle and about to the halfway point -- trying for a before-Christmas finish!?!
Number 21 is layered and ready for a quick turn around.
I'm going to make it!!
#quilt21in2021

Now go bake another batch of cookies!!
Mary

P.S. -- send cookies because I don't think I'll have time to bake my own!?!


Friday, December 10, 2021

So Close!!!

 #18 of twenty-one is finished!!  I trimmed and bound it over the past couple days!

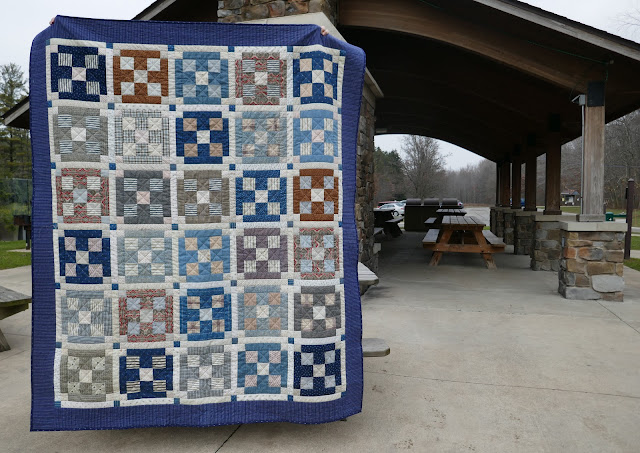
This is an antique quilt top I rescued from 1930's green sashing several years ago.   I bought it at a show in the Columbus, Ohio area because I love shirting prints from the late 1890's and early 1900's, but the green sashing was just not right.

As I quilted the blocks the past couple weeks, I fell in love with the quilt's charm.  It seems to have been pieced from leftover clothing fabrics but as I got my nose into each block I started to appreciate the care that went into the fabric selections. 

I haven't taken the time to search out the name of this traditional block but every single block is set up exactly the same way with three fabrics -- the center square and the corner squares are one fabric, the "sashing" and the four middle squares a second print, and the four 9-patch corners from a third print.  All the stripes are lined up - no helter, skelter placement.  I can see the piecer choosing three fabrics from her scrap bag, cutting out the pieces and taking pleasure in laying out the next block.

The block above is one of my favorites because of those gray/black and white prints.  You can see I kept the quilting simple.  I used a variety of reproduction white and black shirting prints for the new sashing and they are a good fit with the rest of the quilt.  I just have a few threads to bury this evening that I missed while quilting and it will be ready for a gentle washing.

While binding it, I tried out a new tip for joining the binding ends that I've been seeing in Instagram "reels" the past couple weeks.  Of course, now I can't find it to share with you, but following is a series of pics that illustrate it.

Here we go!

I've trimmed the left end of the binding straight about 8" from my starting point.

Then I marked that end's position with the pin but didn't pin the binding down and lapped the right end over the left end.
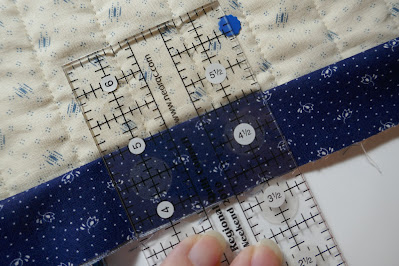
This little ruler is 2 1/2" wide and so is my binding, so I aligned the right side of the ruler with the pin
and drew a line on the left side of the ruler.
The rule of thumb here is that the distance to the "mark" is the width of the binding, so a 2" binding would use a 2" distance to the "mark".
Breathe deeply and cut the excess binding off at the mark.
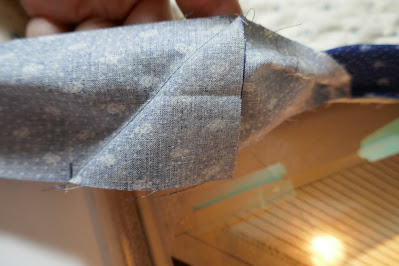
Time to attach the two ends -- quickest way I found was to measure 2 1/2" in from the end of the left side and make a little line
which is aligned with the edge of the bottom layer as they are setup for this diagonal seam.
Stitch the ends together on the diagonal, open it out and check to be sure it worked.
Trim off the triangle, fold the binding back in half
and stitch to the edge of the quilt!
Wa-la, a perfect invisible join!
I used this process about six times (doll quilts and potholders) before doing it with this quilt.
I like it!!  And it's easy to remember.

Speaking of the quilt -- here it is (in the wild)!!
Quilt #18 of twenty-one!!
I'm so pleased with it and have no idea what it's destiny is beyond being admired for now.
Finishing it has inspired me to set my 2022 goal -- dealing with the antique quilt tops I've accumulated over the years.  I might sell some, I might donate some, and I might finish some to keep.
But by the end of 2022, all of them will be in a better place than they are today!

No triplet pictures today because we are hunkered down a bit until the new Covid variant is better understood.  Instead here are triplet hats that I made with a wonderful "new-to-me" pattern from an English designer. It popped up so many times on Instagram over the past month that I had to see what all the fuss was about.  I love it -- so much versatility.  Use any yarn and any needle size because she has size charts based on your personal gauge -- you don't even have to swatch!!
Brilliant!!
It's the Musselburgh hat by Ysolda Teague -- HERE on her website and it's also on Ravelry.
(P.S. -- the yarn has been in my stash for over 10 years so please don't ask.)
If you browse Instagram, check out #musselburghhat to see all the inspiring variations!
(Leftover sock yarn, look out, I'm coming for you!!)

Quilt #19 just came back from the quilter and is waiting for it's binding!
Quilt #20 went "under the needle" this morning -- it's a challenging one but the only way to get to the other side is to start.
Quilt #21 is layered and ready for action!  It simple so I saved it for last because I think I can do it in two days -- one to quilt and one to bind -- hope I'm not being cocky!?!
(Maybe I should plan on three days?)

Finally, a mini-rant.
More than ever we all need to be nice to every person we encounter.  Not just because "it's the season" to be nice, but because we all really need it!!  The emotional exhaustion we are experiencing is creating a social backlash of behaving badly towards others.  As I was checking out at a store last week, I overheard the woman in front of me say to the clerk as she left
 "I hope everyone is nice to you today."
What a lovely thing to say to someone!
Perhaps the customer knew the clerk but I echoed her wish to the clerk as well.
For the rest of my errands, I wished every clerk the same and their reactions were without exception -- a little look of surprise and then a smile.
Those smiles meant I had touched a cord and that made me smile -- win, win!
Don't feel like smiling yourself ?  That's okay.
I'm reminded of a pastor's response to a question about "how to pray"?
 "Fake it until you make", he said.  
We've all heard that expression, but what he meant was to do what you know is right and it will become powerful and meaningful and second nature.  
Let's all be nice more often and spread the smiles and the good feels.

Have a pleasant weekend,
Mary