Showing posts with label binding. Show all posts

Friday, December 10, 2021

So Close!!!

 #18 of twenty-one is finished!!  I trimmed and bound it over the past couple days!

This is an antique quilt top I rescued from 1930's green sashing several years ago.   I bought it at a show in the Columbus, Ohio area because I love shirting prints from the late 1890's and early 1900's, but the green sashing was just not right.

As I quilted the blocks the past couple weeks, I fell in love with the quilt's charm.  It seems to have been pieced from leftover clothing fabrics but as I got my nose into each block I started to appreciate the care that went into the fabric selections. 

I haven't taken the time to search out the name of this traditional block but every single block is set up exactly the same way with three fabrics -- the center square and the corner squares are one fabric, the "sashing" and the four middle squares a second print, and the four 9-patch corners from a third print.  All the stripes are lined up - no helter, skelter placement.  I can see the piecer choosing three fabrics from her scrap bag, cutting out the pieces and taking pleasure in laying out the next block.

The block above is one of my favorites because of those gray/black and white prints.  You can see I kept the quilting simple.  I used a variety of reproduction white and black shirting prints for the new sashing and they are a good fit with the rest of the quilt.  I just have a few threads to bury this evening that I missed while quilting and it will be ready for a gentle washing.

While binding it, I tried out a new tip for joining the binding ends that I've been seeing in Instagram "reels" the past couple weeks.  Of course, now I can't find it to share with you, but following is a series of pics that illustrate it.

Here we go!

I've trimmed the left end of the binding straight about 8" from my starting point.

Then I marked that end's position with the pin but didn't pin the binding down and lapped the right end over the left end.
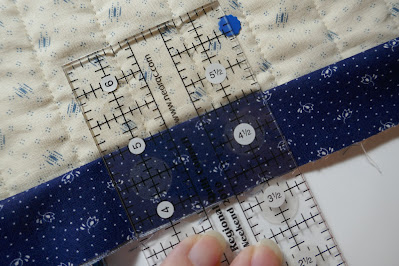
This little ruler is 2 1/2" wide and so is my binding, so I aligned the right side of the ruler with the pin
and drew a line on the left side of the ruler.
The rule of thumb here is that the distance to the "mark" is the width of the binding, so a 2" binding would use a 2" distance to the "mark".
Breathe deeply and cut the excess binding off at the mark.
Time to attach the two ends -- quickest way I found was to measure 2 1/2" in from the end of the left side and make a little line
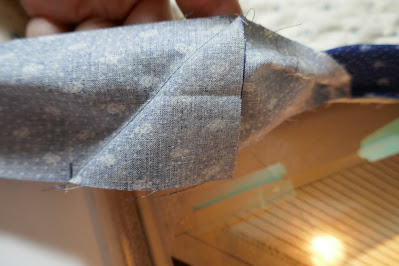
which is aligned with the edge of the bottom layer as they are setup for this diagonal seam.
Stitch the ends together on the diagonal, open it out and check to be sure it worked.
Trim off the triangle, fold the binding back in half
and stitch to the edge of the quilt!
Wa-la, a perfect invisible join!
I used this process about six times (doll quilts and potholders) before doing it with this quilt.
I like it!!  And it's easy to remember.

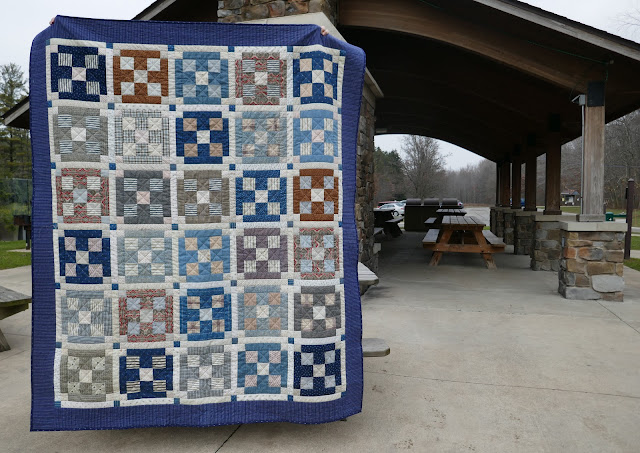
Speaking of the quilt -- here it is (in the wild)!!
Quilt #18 of twenty-one!!
I'm so pleased with it and have no idea what it's destiny is beyond being admired for now.
Finishing it has inspired me to set my 2022 goal -- dealing with the antique quilt tops I've accumulated over the years.  I might sell some, I might donate some, and I might finish some to keep.
But by the end of 2022, all of them will be in a better place than they are today!

No triplet pictures today because we are hunkered down a bit until the new Covid variant is better understood.  Instead here are triplet hats that I made with a wonderful "new-to-me" pattern from an English designer. It popped up so many times on Instagram over the past month that I had to see what all the fuss was about.  I love it -- so much versatility.  Use any yarn and any needle size because she has size charts based on your personal gauge -- you don't even have to swatch!!
Brilliant!!
It's the Musselburgh hat by Ysolda Teague -- HERE on her website and it's also on Ravelry.
(P.S. -- the yarn has been in my stash for over 10 years so please don't ask.)
If you browse Instagram, check out #musselburghhat to see all the inspiring variations!
(Leftover sock yarn, look out, I'm coming for you!!)

Quilt #19 just came back from the quilter and is waiting for it's binding!
Quilt #20 went "under the needle" this morning -- it's a challenging one but the only way to get to the other side is to start.
Quilt #21 is layered and ready for action!  It simple so I saved it for last because I think I can do it in two days -- one to quilt and one to bind -- hope I'm not being cocky!?!
(Maybe I should plan on three days?)

Finally, a mini-rant.
More than ever we all need to be nice to every person we encounter.  Not just because "it's the season" to be nice, but because we all really need it!!  The emotional exhaustion we are experiencing is creating a social backlash of behaving badly towards others.  As I was checking out at a store last week, I overheard the woman in front of me say to the clerk as she left
 "I hope everyone is nice to you today."
What a lovely thing to say to someone!
Perhaps the customer knew the clerk but I echoed her wish to the clerk as well.
For the rest of my errands, I wished every clerk the same and their reactions were without exception -- a little look of surprise and then a smile.
Those smiles meant I had touched a cord and that made me smile -- win, win!
Don't feel like smiling yourself ?  That's okay.
I'm reminded of a pastor's response to a question about "how to pray"?
 "Fake it until you make", he said.  
We've all heard that expression, but what he meant was to do what you know is right and it will become powerful and meaningful and second nature.  
Let's all be nice more often and spread the smiles and the good feels.

Have a pleasant weekend,
Mary


Tuesday, March 16, 2021

Turning A Corner -- Tips for Better Bindings

Number five is finished!! 
#quilt21in2021
I was concerned about too little quilting but I washed it and dried it on low and it's fine!!
Soft and cozy.
The simple quilting made for an easy and quick finish and once again, I'm wondering why I've left this top laying around for over twenty years?
As I was binding it yesterday, I thought perhaps my readers are getting a bit tired of me raving about all my finishes so today I'm revisiting a post I wrote a few years ago on how to turn a better binding corner . . . . except that for some reason, I apparently deleted the post???
Arrggghhhh!!
Happily the photos were still archived and so while I have to write the words again, I don't have to  take new photos, so here we go.
Generally, I run a wide long zigzag around the outside edge of a finished quilt before adding the binding.  I believe it helps flatten the edges and eliminates most of the waviness that sometimes occurs during the quilting process.
I cut my binding strips on the cross grain most of the time but if I have curved edges or want a special effect (diagonal stripes), I cut the binding on the bias.  I cut 2 1/2" wide strips for a completely machine bound quilt and 2 1/4" for one where I'm going to wrap and stitch the binding to the back by hand.

I have stopped pressing the binding in half lengthwise before applying it to the quilt -- now lets see if I can find the video that sold me on that idea?

Well, I found the person, but not the video -- maybe it was a blogpost not a video?  
I'll try to explain -- if you press a crease down the center of the binding, after you've stitched it to the quilt and are ready to fold it to the other side for the second stitching, less fabric is needed on the "inside" of the doubled strip than is needed on the "outside" which means the crease can interfere with it laying smoothly.  Don't understand?  Don't worry, just try it.
Besides, I like one less task!

I apply the binding with a walking foot.  The seam depth is more than 1/4" from the needle to the edge of the foot so sometimes I adjust the needle position.  The thickness of the batting is my guide for this.  The thicker the batting, the narrower the seam needs to be (though not less than 1/4") so there is more binding to roll over the edge.
When I'm two or three inches from a corner, I fold the binding strip on a diagonal so it extends to the right of my presser foot and finger press the fold.  My diagonal fold intersects the corner of the quilt as perfectly as I can make it line up.
Then I use a colored pencil to mark a line in that crease when I unfold it.  
Now I'll stop stitching when I get to that diagonal line. . . . .
drop my needle into the fabric, lift the presser foot and pivot to stitch down the diagonal line to the edge of the quilt.  This secures the end of the stitching but doesn't interfere with the turning of the corner.
Flip the binding off the quilt so the raw edges are a continuous straight line with the next side of the quilt.  The diagonal stitching provides a firm stop line for the fold.
Now bring the binding back onto the quilt.  The key to a crisp miter happens right here!
The fold I'm point to with my scissor tip must be lined up exactly with the edge of the first side of the binding.  If it extends beyond the edge or falls short of the edge - you are already doomed.
Second, the folded edges where I'm pointing the scissor tip in the picture below must be aligned perfectly.  If the folds are cockeyed, the corner will be a mess.
To stitch down the second side, I start far enough in from the edge to secure the diagonal folds underneath but don't stitch all the way to the edge.
I do one final little step as I turn each corner.
I trim off the corner of the quilt, not the binding to reduce bulk in the corner.
This picture is from another post I wrote about binding and you may want to check it out HERE for an overview of how I handle doing the second side by machine.
If doing the second side by hand, I've learned that stitching the folded edge all the way into the corner gives me better results.
Square as square can be with a perfect little miter!
I hope these tips are helpful to you next time you bind a quilt!
I found the inspiration and courage to start quilting my birth year temperature quilt over the weekend.  I'm about one third of the way along with free motion "breezes" blowing across the surface.
Yes, I have a pot of amaryllis on my machine table!  
Plenty of sunlight and a cheery companion! 
We've had good news here in Ohio -- 40 year old's and over are eligible for the vaccine beginning this coming Friday!  That means my children are eligible.  I hope your part of the world is making good progress with this as well, too!

Wishing you lots of sunshine this week!!
Mary


Monday, December 22, 2014

Binding in a Hurry!!

I am D-O-N-E with the six quilts I'm giving to my children and grandchildren for Christmas!!  I'll show them off to you after Christmas -- doesn't seem right to show them to the world first.

Last Thursday, Nathalie at Les Ouvrages de Nat asked me how I do my binding, by hand or machine.  I do both and which I use depends on how close the "deadline" is looming. 

The deadline was looming last evening!!

So this one received the full machine treatment and I took some pictures to share with you!
 I use 2 1/2" wide strips folded in half cut on the crosswise grain or bias depending on the fabric (I use stripes on the bias).    If I'm doing the second side by hand, I use 2 1/4" strips, but for an all-machine, I want the binding to be a bit wider on the top. 

I put the walking foot on my machine and use a size 80 denim needle (because it has a sharper point).

Several years ago, I decided or realized it was easier to keep the top side of the quilt looking good if I stitched the binding to the back side first. 
 I push the needle position all the way to the right for this seam, taking a seam allowance that will give me a slightly wider binding on the front than on the back.  You will have to experiment with the best position for your walking foot.
Before stitching the second side, I trim JUST the corners of the quilt, NOT the binding, to eliminate some bulk at the corners. 
Now I move the needle to the left of center, one position -- not all the way to the left.
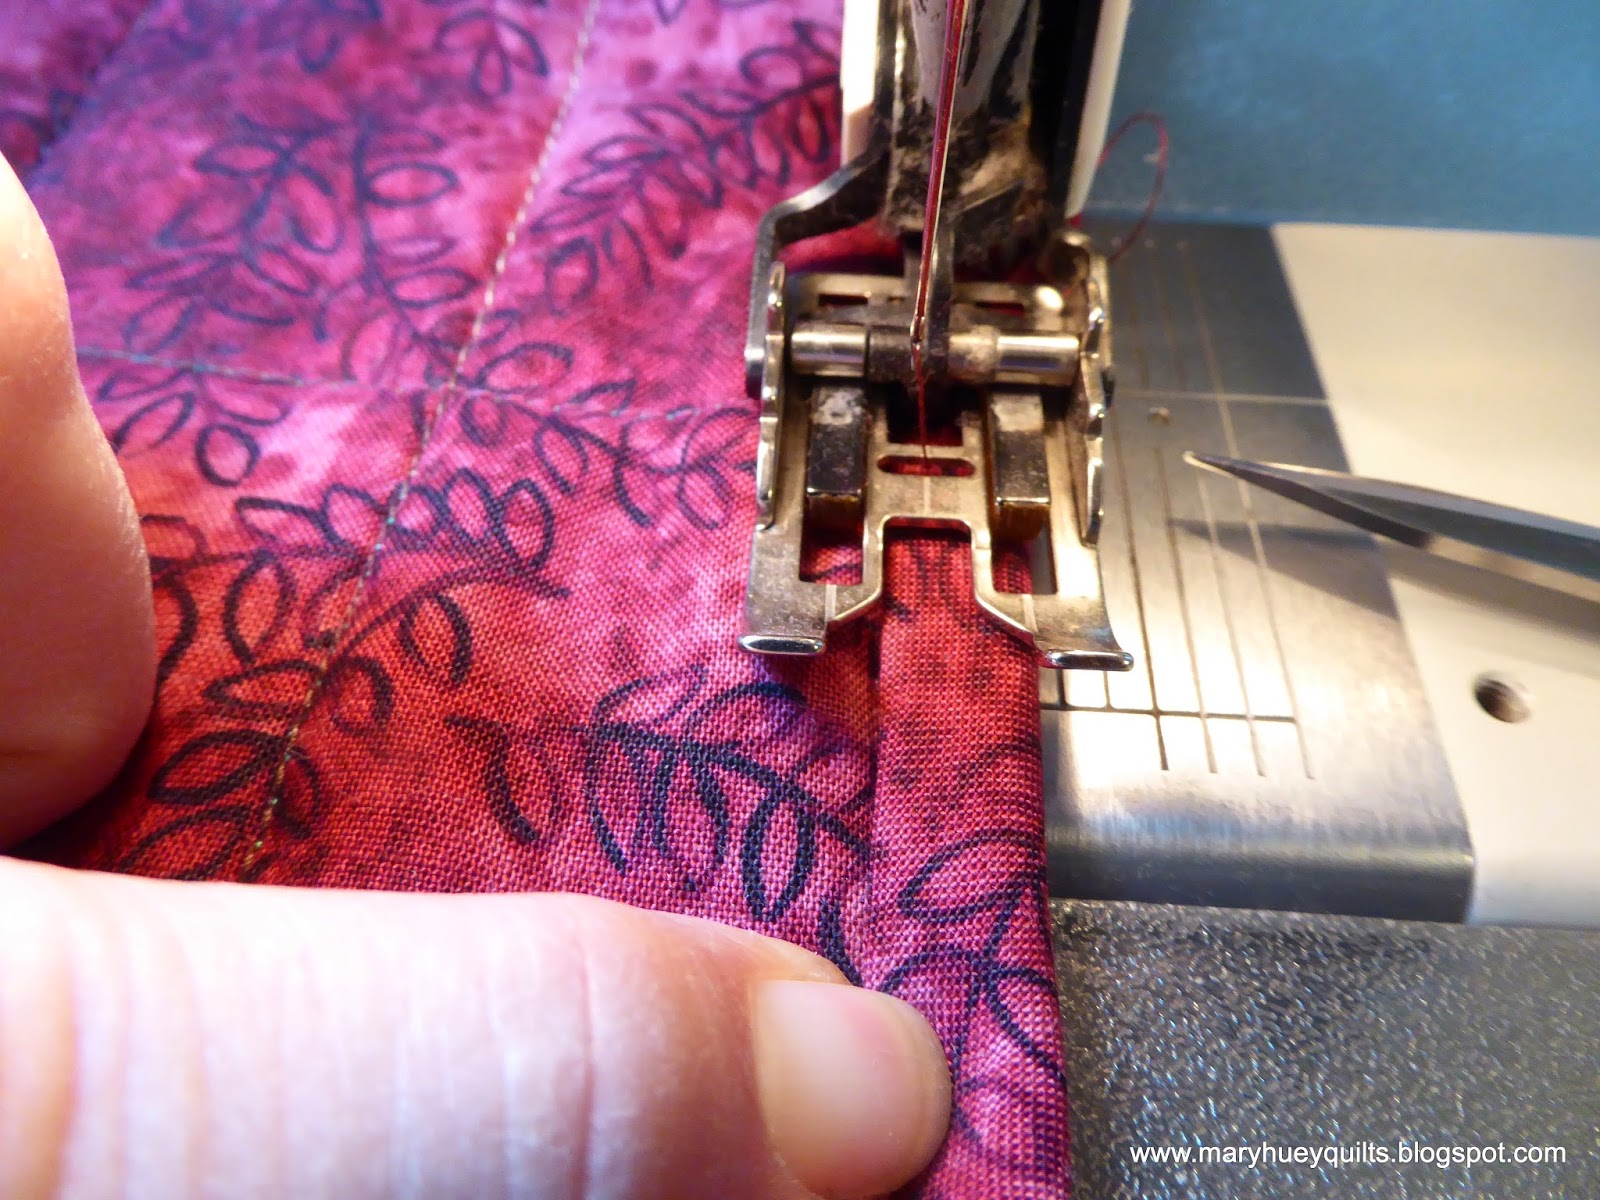
I don't pin, but if you prefer to pin, I suggest "aiming" the pins towards the presser foot so they are easier to pull out as you get to them.  Notice I am following the fold of the binding with the inside edge of the walking foot's left side toe (as you look at it).
When I'm about 2" from a corner, I begin to organize the pivot by folding up the next edge first.
Then I fold in the binding on the edge I'm currently stitching to create the miter and secure it with a pin. 
 At this point, I'm taking one stitch at a time until I get to the corner.  I stop with the needle down.
Now I lift the presser foot, turn the corner (don't break the thread here) and keep going.  If the walking foot doesn't seem to be moving forward, just stop with the needle down.  Lift the presser foot to release the back edge of the foot which can get caught hanging off the edge of the quilt behind the presser foot. 
This is what I want to see on the top of the quilt when I'm finished -- an even line of stitching that is a uniform distance from the edge of the binding.
When the binding is a bit wider on the front side, the stitching on the back side falls just off the edge of the binding strip as show in the picture below.  That means the thread on the top is chosen to match the binding and the bobbin thread matches the backing of the quilt.
Sometimes my stitching slips onto the binding and then I need to make a decision whether to go back and fix it or just move on to the label.  Since the person who is getting this one doesn't quilt -- (-; -- I moved on!!  Sometimes we have to remember that other folks can't get past the fact that we cut all this stuff up and sew it back together (really???), so they don't notice the tiny defects that often intimidate us into downgrading our work.
This is a large laprobe (56" by 78") and the binding was finished in one hour -- it may take you longer the first time you try it but I've been doing this for 15 years so I'm fast. 

Hooray, there will be no unfinished Christmas gifts this year (even though my children will miss them).

Thanks to all of you who have started reading and following for helping me grow my blog this year -- I'm enjoying all the sharing and exchange involved in being a "blogger"!

Merry Christmas!!

Mary Huey