Wednesday, April 25, 2018

A Scrappy Pineapple Quilt!

I just finished quilting this scrappy pineapple lap size quilt -- doesn't it look great.
It began life as a demonstration/teaching sample for Marti Michell's 1" Pineapple Set and I recently finished the piecing and decided to gift it to one of my nephews.
This is the third pineapple quilt I've made using Marti's templates -- the best part is once the pieces are cut, there is no trimming, no paper to remove, and the blocks are consistent in size!
I was feeling intimidated about the "how" of quilting it, but I'm pretty happy with the design that evolved.  It's hard to photograph clearly but I used a series of simple edge-to-edge lines so I'm going to try to share that process here (partly, so I'll remember how I did it!!).

The first set of lines started at the outer edge of the quilt and worked through the dark areas of each block.  I'm pointing to the spot where I entered each block.
Using a straight guiding ruler, I stitched across the dark pieces to the corner of the center square. 
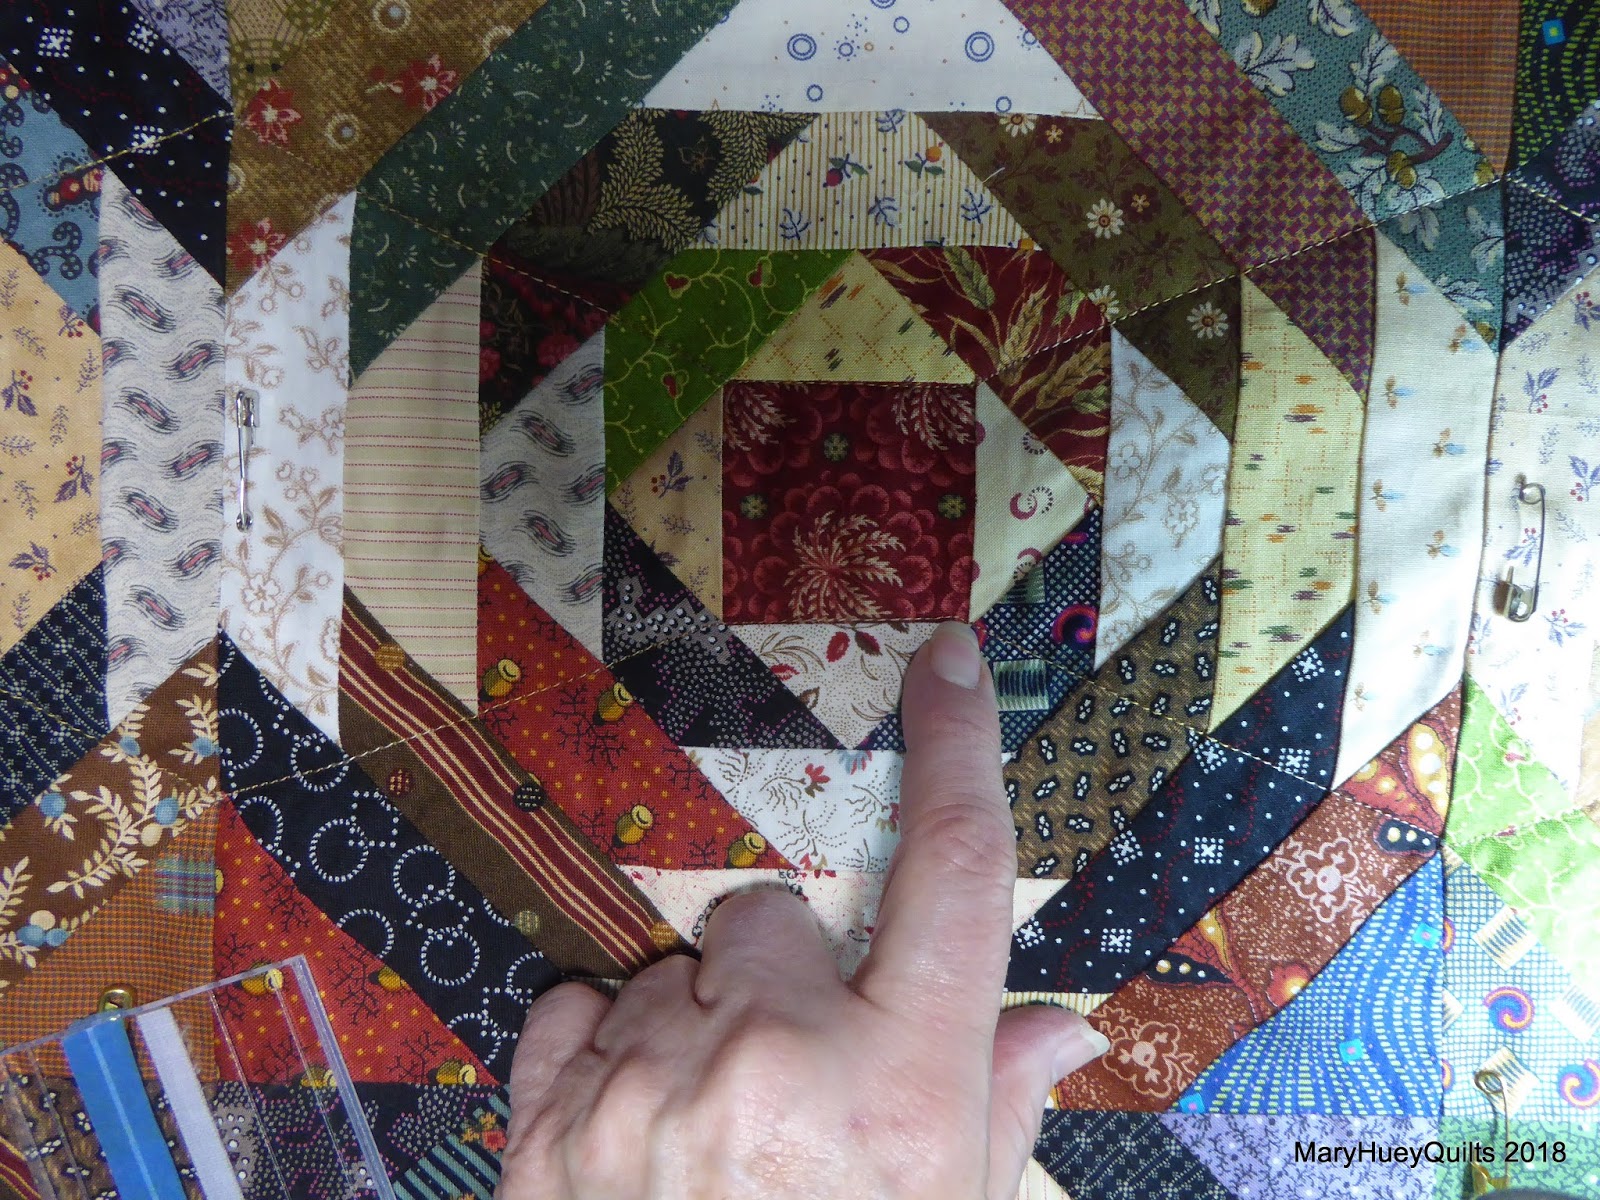
Then "in the ditch" along one edge of the square. 
And from there, back along the "points" to the next block. 
By repeating that pathway up and down and across the quilt, until all the blocks were stitched, I created these 4-pointed star like shapes and there were no threads to bury since every line went edge-to-edge on the quilt. 
After finishing this step, there was too much open space so after several days of contemplation, I stitched a second set of lines through the light areas of the blocks.  These lines went across the "ditch" along the outer edge of the first round of triangles -- from the needle to my finger in this picture.
From that point, I stitched over into the light sections going along the ends of the points (from the needle on the right to my finger on the left). 
Then continuing from that stopping point across to my finger -- this part of the line ends at the adjacent blocks center,  
but I ignored that for the moment and traveled back to the right. 
Follow the finger -- back to the beginning of that section. 
To move down to the next area, I stitched "in the ditch" to the next corner of the center of the block. 
Marti includes a line drawing in the instruction booklet which I copied out and drew colored lines to help me recall this stitching plan in the future.
The first set of lines are green in my diagram and I stitched them up and down, left and right across the entire quilt.
The next set of lines I stitched are red -- these only need to be done up and down.  
The first line zigs over to the left as I moved down the quilt and catches the horizontal light sections.  
Then a second line (not draw out in the diagram) just moved down the quilt vertically because the third line (a repeat of the red line drawn) will zig to the left and catch all the remaining light areas of that row of blocks.
I was still not satisfied with the density of the quilting, so after more contemplation and a couple false starts, I echoed each 4 point star 1/2" inside the first lines (blue lines above).
Each of these were stitched separately and were the only threads that needed tied off!!
Now it's all washed and ready to go!!
It's five by seven blocks (50" by 70") and used lots of reproduction prints.  I did lots of the piecing as "leaders and enders" while working on other projects! 
The quilting is simple and was easy for me to manage with my APQS George -- all straight lines!!

This is my first finish for the second quarter Finish Along 2018 -- yea!!
Another UFO out the door!!

Have a great week!
Mary


Wednesday, April 18, 2018

Fussy Cutting Challenge

Most of you have done some fussy cutting at least once I imagine.
Early in December, I shared a group of hexie flowers here that I pieced along with Naomi's #fussycuttingsewalong for the Christmas season.
She started a year long group in January with changing monthly themes and each week, we have the opportunity to stash dive and create another hexie flower.
I really wondered about the "why" of  the "pattern matching" exercises but I'm to the point now where it's pretty easy.  I think it's easier for me since I'm machine piecing (another opportunity to show off the Set-In Piecing Simplified technique) than it would be to do traditional English paper piecing -- if one doesn't get it basted just right, matching the hexies back together with the pattern of the print aligning perfectly would be a real challenge.

I've made myself an auditioning window the finished size of a hexie flower.  I move it around until I find a motif I like then I check to see how many complete motifs I have on the fabric.
One needs three complete motifs to cut up to make one hexie flower.
I liked this one, but only had one repeat of it.
Happily I did have three of this simpler motif -- and there is a bird in it!! 
Step one is to cut out the center hexagon (thereby rendering that complete motif useless) -- I'm using the 1" template from Marti Michell's Set G. 
Then I center that cut out hexagon onto the wrong side of the fabric aligning it as perfectly as possible with the second complete motif.
Once I'm satisfied with the alignment, I put the template on top of it and trace around the outside with a pencil.
I lift away the template and the first hexagon, then recenter the template and mark all six of the dots (pencil through the holes at each corner) onto the fabric.
You can see the dot in the upper right corner the easiest in the picture below. 
The purpose of the dots is so I can line up the template as I cut three hexagons from that motif.
One has been cut and I've moved the template to the top of the hexagon outline and lined up the dots.
This guarantees that I will have the correct amount of seam allowance and simplifies the matching.
Two cut out and the third lined up. 
Nothing here except holes!! 
The center hexagon and the first three hexagons. 
I repeat the process and cut the remaining three hexagons needed from a third motif of the fabric.
Then it's off to the sewing machine!
I do all the cutting on the wrong side and keep the hexagons laid out that way to avoid putting them in the wrong place. 
Naomi has given us a "pattern matching" assignment every month -- so here are my four so far!
If you are curious about the group, it's all on Instagram.
Naomi's name is @naomialicec or search for the #fussycuttingsewalong hashtag.
It's only one hexie flower a week, you can choose your own size and fabric style and most of the gals are doing it English paper piecing style.

Back to the sewing machine!!
Mary

Friday, April 13, 2018

Second Quarter Finish Along Goals!

Spring here in Northeast Ohio is always full of outdoor distractions for me -- I don't want to miss any of the "firsts" -- first blooms, first toads singing, first sightings of birds as they migrate through or return to this region!
 A couple of horned grebes enjoying a feeding stopover at Presque Isle, Pennsylvania a couple days ago were a delight to find as I traveled home on Tuesday!!
And yesterday, I hung laundry outside to dry for the first time this year and as I walked back up through my garden, this freshly emerged Eastern comma butterfly was enjoying the sunshine and taking advantage of the fully open crocus! 
So I'm going to keep my list for the second quarter short!
First up is a rollover from the first quarter -- I made a good start on the quilting but need another week's work to finish it!
I want to finish this scrappy tumbling block lap quilt as a retirement gift so there is a specific deadline!!  That is always a great motivator for me!!
The top is ready for borders and once I organize a backing, the quilting can commence.
Plus it's one of my borderline ancient UFO's -- good to get it out of the stacks!!
Finally, this may not get finished, finished -- but I want to at least get it assembled.   It's my version of Zen Chic's Bernina Triangle QAL.  It's taken several days to organize this on the design wall -- so if I want to use the design wall for anything, this needs to be assembled!  I don't want to take down over 200 triangles and have to start again!  It's very subdued and I'm trying to use up all of the Down By the River collection by Lewis and Irene that I bought last fall!
It's a springy looking quilt so I hope that keeps me engaged!!
It will be a challenge for sure with new birds arriving everyday.
This kingfisher has already claimed her summer territory!
How about you?  Do you set spring sewing goals?
Hope you enjoy the change of seasons this weekend!
Mary


Friday, April 6, 2018

My #The100DayProject Plan

Spring is arriving in spite of all the confusing weather many of us are experiencing. 
  This morning we had snow and this afternoon we had sunshine.
I do enjoy a slow spring though -- the flowers last longer!!
After lots of mental waffling, I decided to join the #The100DayProject which began on April 3 -- it's a global movement to promote building a daily creative habit by "doing every day".
There are lots of artists and writers participating and a fair number of quilters.
Anyone can participate and most of it happens on Instagam.

Because my studio continues to be clogged with lots of UFO's, at the last minute I decided to focus a bit harder on finishing or eliminating or repurposing as many UFO's as possible during the 100 days.
(I might even try not to start anything new, but that's going to be tricky.)
There's a pile of projects down there at the lower right corner of the design wall, so on Day 1, I pulled out this set of eight 6" blocks that I made in 2014 (during QCQAL led by Alison at Little Bunny Quilts) with the plan to finish them into a child size quilt to be donated once it's finished.
6" blocks and only eight -- so the first step was to frame all of them up with triangles (square in a square style) bringing them up to 9 1/2" blocks! 
Sashing will also grow the size of the quilt quickly.  I always start a sashed setting by adding the two sashing stripes and one cornerstone to each block.
End of Day 1!
On Day 2, I laid them out on the floor (design wall is busy) and added some setting triangles of this cute black and white cat print (it's old).  I made quilt a few cutting errors -- directional fabric!?!
And then when I finally got everything cut, I realized I had cut them "too small" -- arghhh.
Not enough fabric to recut, of course.
No worries -- just another opportunity to be creative!
Black polka dot to the rescue!!
I added a strip of the polka dot to the outside of each setting triangle!
Clever, huh -- it will make a border and no one will know I made a cutting mistake!!
(You, of course, are sworn to discreet secrecy by virtue of reading it.)
End of Day 2!
Eager to get back at it, I planned to assemble the blocks and setting triangles on day 3.
I started with the lower left corner block and the three setting triangles -- do you see what I saw?
The corner setting triangle units are too small . . . or are the side units too large?
Either way, it's not going to work without a fix of some sort!!
No more cat fabric, no more black polka dot!?!
I decided the side units could be trimmed down a bit without effecting the finished setting (whew!!).
And no math brain was required, thanks to my Marti Michell Diagonal Setting ruler!!
Here's where I made the mistake -- I measured the size of my blocks with sashing on one side and used that to choose the cutting size for the side units, but I forgot to add the second sashing when choosing the cutting size for the corner units, so they technically were too small.
Study the picture above for a minute -- does that make sense?
Marti's tool eliminates the "math" and only requires one to measure the blocks (preferably correctly).
Once I figured all this out and trimmed the side units, the next challenge was to determine the most sensible order of assembly -- here's how I organized the sections of the quilt.
(View from the sewing machine of my design floor area.)
Opposite corner sections went together first -- notice there are more sashing pieces included on the upper left corner unit than the lower right one.
Then I added the center rows to the finished corner sections.
Once that long seam was sewn, the final two corner units can be added. 
End of Day 3 -- a completely assembled quilt center -- time to pause and think about a border.
Before I left the studio, I did some #stashdiving (love this hashtag!!) and found three possible fabrics to pin up along the quilt top hoping that when I returned the next morning my intuition would quickly choose one to use. 
Happily, my intuition never lets me down!
Borders!!
End of Day 4 -- ready for a backing and some quilting!! 
I love this diagonal setting with sashing but given all the goofs I made during the assembly process and because this is the second time I've floundered through it in the past month, I created a cheat sheet with some notations for future use.  I'm sharing it here -- partially for your benefit and partially so I don't lose it!!
I laid out the setting in Electric Quilt and printed it out.
Then I trimmed it and cut off the corners so I'll know in the future to put those on last!
Finally I cut it into rows with the setting triangles included.
Notice that the sashing is on both sides of just one row -- that eliminates potential "partial seam" situations that can occur when adding the setting triangles -- you don't need to test that theory, I already have and believe me, it happens! 
Now I never have to figure out "how to proceed" -- I can just proceed!!
I pasted all the sections on a fresh sheet, added notes to the back to remind me to measure the edge setting triangles with one sashing piece included and to measure the corner setting triangles with both sashings pieces included.  It's in a protective sleeve and will live with my Diagonal Setting rulers!

I still need to organize a backing and then it goes into the quilting queue for a week while I finish the quilting of another UFO!  It's been an energizing four days and I hope I can maintain my momentum.  With over 80 UFO's, I need it!!

Enjoy a stitchy weekend!!

Mary