Showing posts with label log cabin. Show all posts

Wednesday, April 25, 2018

A Scrappy Pineapple Quilt!

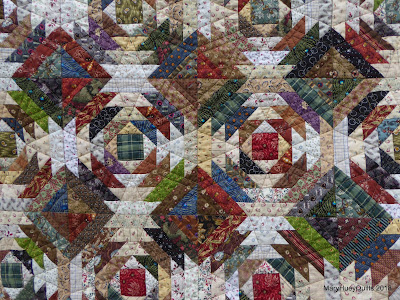
I just finished quilting this scrappy pineapple lap size quilt -- doesn't it look great.
It began life as a demonstration/teaching sample for Marti Michell's 1" Pineapple Set*** and I recently finished the piecing and decided to gift it to one of my nephews.
This is the third pineapple quilt I've made using Marti's templates -- the best part is once the pieces are cut, there is no trimming, no paper to remove, and the blocks are consistent in size!
I was feeling intimidated about the "how" of quilting it, but I'm pretty happy with the design that evolved.  It's hard to photograph clearly but I used a series of simple edge-to-edge lines so I'm going to try to share that process here (partly, so I'll remember how I did it!!).

The first set of lines started at the outer edge of the quilt and worked through the dark areas of each block.  I'm pointing to the spot where I entered each block.
Using a straight guiding ruler, I stitched across the dark pieces to the corner of the center square. 
Then "in the ditch" along one edge of the square. 
And from there, back along the "points" to the next block. 
By repeating that pathway up and down and across the quilt, until all the blocks were stitched, I created these 4-pointed star like shapes and there were no threads to bury since every line went edge-to-edge on the quilt. 
After finishing this step, there was too much open space so after several days of contemplation, I stitched a second set of lines through the light areas of the blocks.  These lines went across the "ditch" along the outer edge of the first round of triangles -- from the needle to my finger in this picture.
From that point, I stitched over into the light sections going along the ends of the points (from the needle on the right to my finger on the left). 
Then continuing from that stopping point across to my finger -- this part of the line ends at the adjacent blocks center,  
but I ignored that for the moment and traveled back to the right. 
Follow the finger -- back to the beginning of that section. 
To move down to the next area, I stitched "in the ditch" to the next corner of the center of the block. 
Marti includes a line drawing in the instruction booklet which I copied out and drew colored lines to help me recall this stitching plan in the future.
The first set of lines are green in my diagram and I stitched them up and down, left and right across the entire quilt.
The next set of lines I stitched are red -- these only need to be done up and down.  
The first line zigs over to the left as I moved down the quilt and catches the horizontal light sections.  
Then a second line (not draw out in the diagram) just moved down the quilt vertically because the third line (a repeat of the red line drawn) will zig to the left and catch all the remaining light areas of that row of blocks.
I was still not satisfied with the density of the quilting, so after more contemplation and a couple false starts, I echoed each 4 point star 1/2" inside the first lines (blue lines above).
Each of these were stitched separately and were the only threads that needed tied off!!
Now it's all washed and ready to go!!
It's five by seven blocks (50" by 70") and used lots of reproduction prints.  I did lots of the piecing as "leaders and enders" while working on other projects! 
The quilting is simple and was easy for me to manage with my APQS George -- all straight lines!!

This is my first finish for the second quarter Finish Along 2018 -- yea!!
Another UFO out the door!!

Have a great week!
Mary


***EDIT April 2025
Marti Michel closed her business in late in 2024 and while some shops may still have a stock of her templates, you can also find them on Ebay and Etsy.  


Friday, May 15, 2015

Quandries?

Do you suffer from quandaries?
  I do!! 
 It's the result of having "too many oars out of the boat" most of the time. 
There are so many opportunities everyday and deciding on one or two to occupy me is a real challenge on the days I don't have deadlines looming. 
Today was one of those days.  The morning rain and the middle of May found me debating whether to start the May SewMyStash charity quilt top and tidy up the blue shelf . . . . .
. . . . . or at least finish the top for the April SewMyStash charity quilt.  After all almost everything is cut and sorted and the piecing goes quickly. 
Finishing the top would enable me to put the fabric away I've been using. 
Aaaannnnnddddd, it's my game with my rules, so I could skip the May quilt and catch up with myself. 
The morning was wasting and the fact that I have too many ideas for the blue quilt pushed me to sit down and work on the April quilt (you can see the beginning of it HERE).  Plus I'm pretty anxious to see how this updated fabric version of my pattern, Courthouse Stars, looks!!

I have quite a few flying geese to make in two sizes and so I started with one of the four sets.  I use the "fast and easy" technique.  I love Joan Hawley's Flying Geese X 4 tool because I don't have to do any math.  I've used it in my patterns for over ten years -- if you know the finished size of the unit you need to make, the tool gives you the cutting sizes for the squares needed.

At this point, there are quite a few tutorials for the technique floating around so I won't bore you with that, but I want to share some tips that I've found help my students when using this technique.

When marking the diagonal lines on the small squares, work on a "sticky" surface like your rotary cutting mat or a sandpaper board to prevent the corners from stretching when you draw the lines.
Any ruler works to set up the line. 
But be sure to back it up just a smidge from the corner so that your marking pencil begins the line in the exact corner.  If I had kept the ruler in the position shown above, the line would have been off-center and that sets you up for problems from the start. 
When I work with directional prints, I draw two lines from the upper left to the lower right and the other two are vice versa. 
My finished results are better if I draw the lines on the small squares first and then position them on the large square.  I tried putting the small squares down on the large square and then drawing the line but I soon discovered that the finished flying geese units are askew when I do it that way.  It's important for the corner of the top small square to be aligned perfectly on the small square underneath and the only way to accomplish that is to draw the lines first. 
When I stitch the first set of small directional print squares to the large one , I use two with a line going the same direction.   
This enables me to manage the direction of the print so that both of the small triangles are the same. 
That's a center square that disappeared while I was mass producing the twelve sets I needed -- grrrr!!  But I'm glad I discovered it before I cut down the middle!!! 
By the time my session was over, I had the first step completed for all twelve sets and they are waiting for my return later this afternoon.  No need to think, just sit down and stitch!! 
I find that's an important strategy for me to maintain momentum -- leaving everything ready for the next stitching session whether it's at my sewing machine or on the couch in the living room enables me to sit and stitch without dealing with yet another quandary!!

How do you push through your quandaries?

Mary Huey


Friday, February 20, 2015

4 X 7 Week 3 -- still going strong!!

Greetings from a very cold Northeast Ohio this morning!!  As I begin today's post it's up to -5 degrees F  -- yes I said "up".  It was -18 at 6 a.m. and a friend about 30 miles from here was saying it was -25 out in the country.  But the sun is shining and there's not a cloud in the very blue sky so at least it looks cheerful out my office window!!
 
The colder than usual weather this week has kept me close to home and made it easy to achieve more than 30 minutes of stitching every day.  I'd say I've averaged about 3 hours a day in my studio in addition to my daily evening hand work session.  I wish every week was so focused and productive!!
 
I took the week off from my hexagon push and focused on my monthly charity quilt goal -- you can read about the January one HERE.  My idea for February was triggered by Nathalie at Les Ouvrages de Nat -- she shared her Fat Quarter Log Cabin project earlier in the month and I recalled that I had cut two sets in pinks a couple years ago.  Pink seems to be a good focus color for February and so I tidied up the pink shelf pulling fabric for four more sets of blocks for this month's quilt.
 
The pattern comes from Marti Michell's Log Cabin ABC's but is also a separate pattern (which you can find at Marti & Me Club shops).
Marti's cutting formula for this quilt uses her Log Cabin Ruler #8038 for 1" or 2" finished strips.  I spent a happy afternoon in my studio, cutting and watching an old movie. 
If you aren't familiar with Marti's Log Cabin rulers and you are thinking, why do I need a special ruler? -- I can relate -- it was exactly my reaction when the tools were first introduced. 
BUT, being able to cut everything for 24 blocks in two hours is wonderful!!  I even cut the "leftovers" at the ends of the strip into little squares which are becoming 4-patches for something in the future. 
So here's my stacks for 6 sets of log cabin blocks -- 4 blocks will come from each stack.
Do you notice anything that might be a problem?
Yep, it's the two stacks on the right -- those are the ones I cut two years ago and apparently I was cutting with wider strips. 
This calls for a "cuppa tea" and one of those scones that I hoarded in the freezer. 
A decision needed to be made. 
Do I make the blocks as they are cut and hope no one notices that 8 of them use different size strips (the finished blocks would all be 13")?
Do I make two smaller quilts?
Do I pull out two more sets of fabrics and cut from scratch?
Do I trim down the wider sets?
Which would you have done?
 
Well, I trimmed the strips down and had to rummage around to add a few strips since the newly cut sets used more strips.  In the end, I had my piecing tray all set up with the strips ready to stitch the blocks.  I chain piece my way through one stack making four blocks at a time.  Because all the strips have been precut to the exact length needed, the finished blocks are very consistent in size.  I also don't have to trim or square up the blocks as I go.  Two more reasons to love this tool!! 
The first two sets are on the work wall - looks pretty good, doesn't it?
The plan is for a twin size quilt and it's going to be charming.  It will reduce my stash by 12 yards by the time I get the top and back organized - a very good thing! 
 Two months and two shelves down -- ten to go!?! 
I also had a finish this week -- this is a new sample for a Rose Star Workshop that I'll be teaching at Mercantile on Main in Coshocton, Ohio on Friday, March 20, 2015.  It took a couple sessions to get the fabrics arranged but once that hurdle was cleared, the piecing took just 90 minutes.  The chain-piecing technique from my DVD, Set-In Piecing Simplified really streamlines those y-seams!!
And it's on sale through 2/28/2015!!
I love the mixture of batiks and prints that I finally achieved!  And this will be a lovely gift for someone in the future.  It's cut with Marti Michell's new 3" Kite and Crown template set.
If you can't find this tool set locally, I usually have some in stock -- e-mail me at maryhueyquilts@hotmail.com
 
Yesterday brought a large squishy envelope in the mail -- it is the selvedge zipper bag I won from Julie at www.pinkdoxies.blogspot.com during the Grow Your Blog Hop -- what fun!!
I hope you are coming off a productive week, too!!  It's feel so good!
More sunshine and cold on tap here, so I'm confident I'll be in the studio a lot again in the coming week!!
 
Mary Huey


Friday, July 25, 2014

Another Log Cabin interpretation and a FABRIC GIVE AWAY!

Recently I shared a Log Cabin quilt that used a traditional quilt block as the setting design.  I thought you might enjoy seeing another version using the same concept.  A friend/student, Laura, gave this quilt top to me a few years ago.  Isn't it great?  She made this 4-patch basket with a very special group of fabrics and when she was clearing out some of her UFQ's, the sly fox gave it to me.  (Yes, it's on my UFQ list of unquilted tops). 
 Here's a closer look at the six color ways of this lovely floral print from King's Road Imports that
was released in the late 1990's. 
I carried all six of them in my shop for a very particular reason.
That's my name!! 
 And it's not referring to one of the other 57 Mary Huey's in the USA -- it's me!!
The blue and yellow color way was my favorite and the best seller overall.

This cheerful color way matches the original painting of the design which the printer used to set up the production.  I have the painting framed and hanging in my studio.
I chose the design from King's Road's library of designs which they buy from independent artists who specialize in textile design.  I might have been ahead of my time with this aqua?
Then I spent a stressful week figuring out six different color schemes with a Pantone fan of every color available for printing fabric.  Each color way used seventeen different chips between the colors and their shades and tints.
It was my first and last foray into "fabric" on that level.  It was exciting and I'm glad I did it, but the pressure of coming up with something that would sell well convinced me to stay with selling fabric in my shop a while longer! 

This was the bomb of the group -- during the couple years after the print was released, this was the one that was on my clearance table as well as some other shops I visited.  I still have a hunk of it and think it would work great with the current variety of grays on the market.
This is the sixth color way -- it didn't do very well either but it's the one that I have in a finished quilt.  I must have been trying to convince quilters to invest in it.
The master plan of the day was to make six small quilts out of the six color ways and keep them to give to my six grandchildren.  See how far I got . . . . . .
. . . . . a stack of 5 quilt tops on my UFQ "ready-to-quilt" shelf.   Since I have two grandchildren,  there isn't much pressure.  Maybe I'll quilt them this fall?

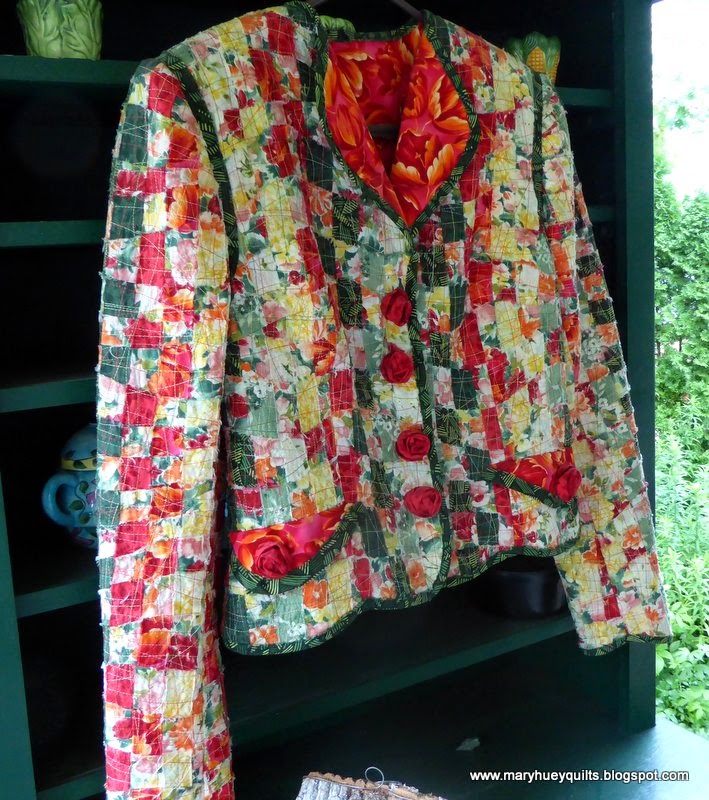
There is also a jacket made using the orange/green color way and an assortment of prints from that season's line. 
It's no ordinary jacket!!  I created the "fabric" by tearing strips, weaving them together, and stitching them to a base with miles of thread.  The fabric was then washed and dried and sent off to an amazing designer/dressmaker who specialized in wedding dresses. 
He created the fitted jacket design with a scalloped hemline and it was executed by his staff -- those handmade roses are made from one of the cottons I used and "cover" the large snaps down the front and embellish the sleeves and the pockets.   
It's too small for me, so it hangs in my closet and I get it out and gaze (sadly) at it every now and then.  It's for sale -- seems a crime to have such a beautiful jacket living in a closet.  If it catches your fancy, contact me at maryhueyquilts@hotmail.com and we'll talk! 

Well, that was a fun reminiscence!  

Thanks for visiting today!!

Mary Huey