Tuesday, November 27, 2018

Focused on Finishing

 This week, I'm focused on finishing some quilts! 
That's a good thing!!
As usual, there are deadlines involved -- what would we do without those?!?
I just wandered back through my posts to figure out when I pieced Jessie's Fierce Feathered Star.  I was part of her test team before she released the pattern late in 2016.
You can read my post about it HERE.
It was a great make -- I love the size of it -- 36" square!!
Recently, when a birding friend announced her retirement, I dove into my stash of quilt tops to see if I had anything that might be a good gift for her -- there it was!!  
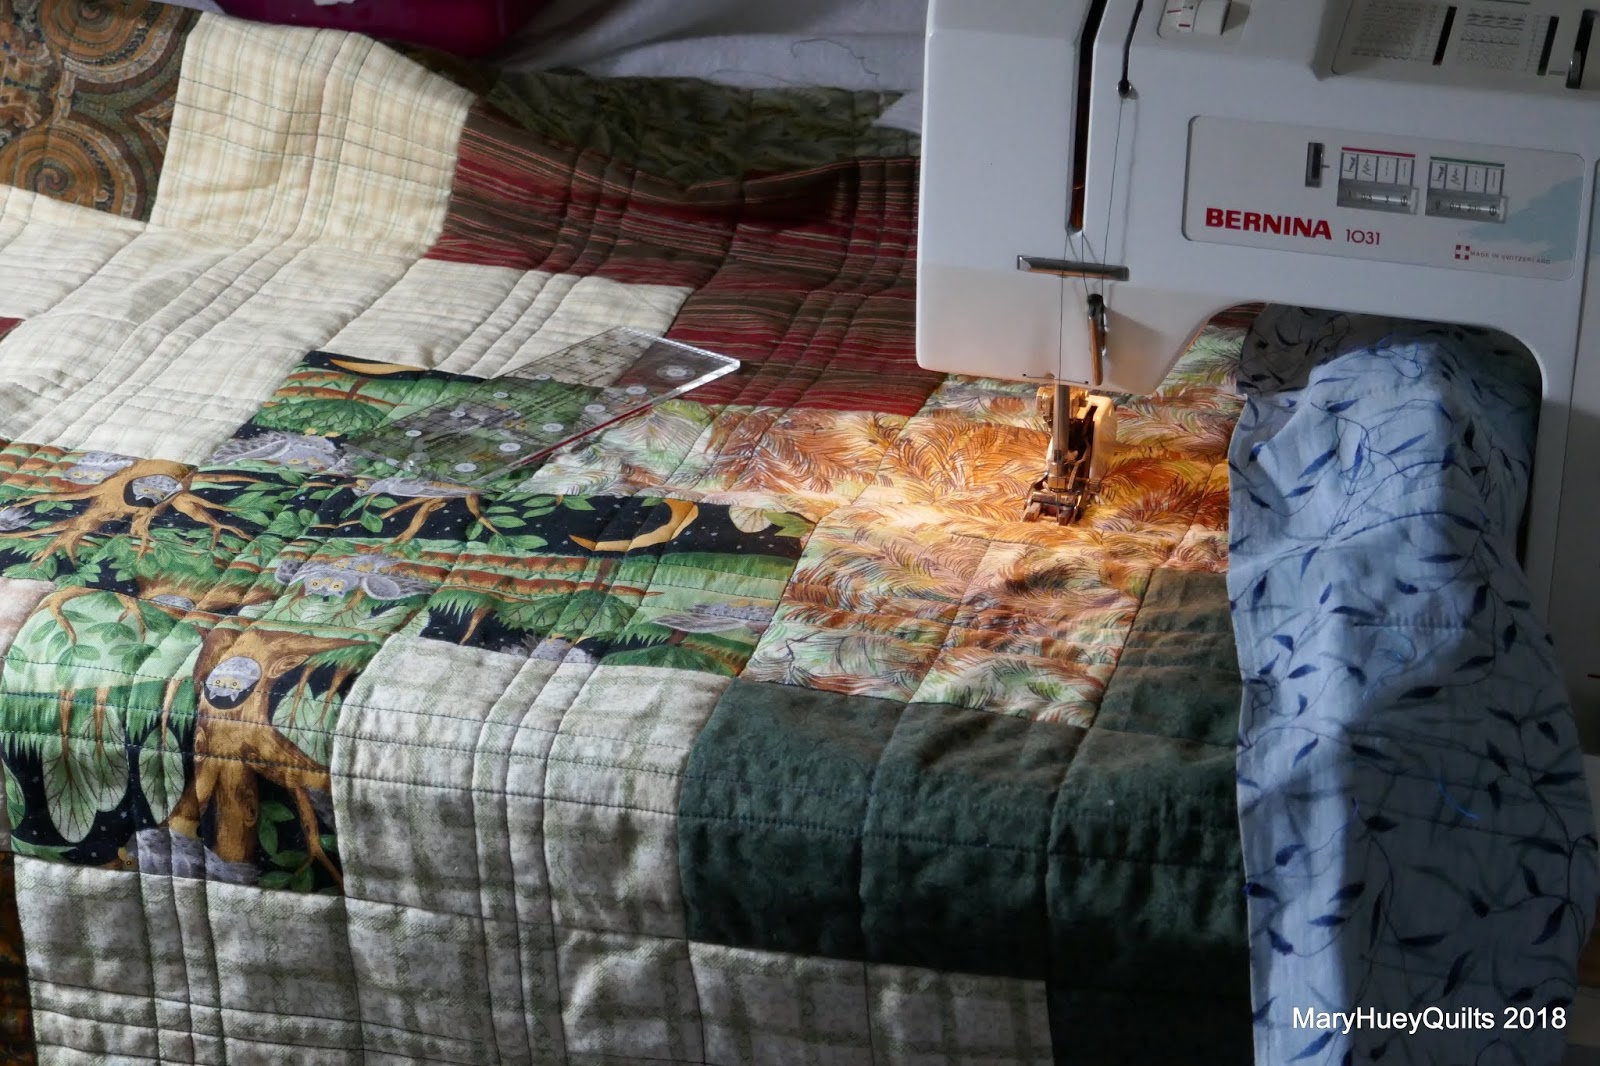
The bird house print is so delightful -- especially since the birds in it are "true to life".
For some reason, that is very important to me?!?
And better yet, the backing and the binding were ready to go.
Layer and quilt!! 
I chose to do a Baptist Fan quilting design -- since I figured out how to travel through this design with hardly any threads to tie off,  it has been a regular "go-to" quilting solution for me!!
You can visit my post complete with diagrams about how to travel through the motifs HERE.
Since writing that post, I've discovered the Westalee Ruler Foot Echo Guide Disks which make it even easier -- I wrote about using those HERE.
I lost one of my machine quilting gloves this fall -- sure hope it's not stitched to the back of something?  So in a pinch, I grabbed a pair of my lightweight outdoor gloves.
Well, gloves are gloves . . . . . right???
Looks a bit odd, but my arthritic hands love being snuggly warm in them.
The only drawback is that all the stray threads and trimmings cling to them.
I trimmed the finished quilt up yesterday!!
Do you pitch your trimmings or keep them?
Inquiring minds want to know.
I have this predisposition to hoard bits "just in case" but as the era of "downsizing" looms in my future, I'm working to loosen up and let go.
I did keep some of this wad but only for the purpose of tying up downed tree branches and garden trimming for the trash man.
As I finish writing this, the quilt is drying on the rack in the basement.
We had our first snow of the season last night, so it's photo session on the laundry lines has a very pretty backdrop.
Now I'm focused on finishing up a few charity quilts for holiday give aways and my annual sock knitting frenzy is under way.  I've moved my knitting chair to the back windows of the house so I can enjoy this crew who have been flocking to my feeders for the past two weeks -- pine siskins!!
They are a more northern finch that is not common here every year -- the strippy ones in this picture (upper right and lower left birds) co-feeding with the local plainer goldfinches.
Very exciting even though they are burning through finch mix like power vacuums!!
If you are looking for the Fierce Feathered Star pattern, it's a PDF download which you can buy the designer, HERE.  It includes both the 36" star that I made and a 20" star!
Jessie at Threaded Quilting Studio

This finish brings me halfway to my fourth quarter goals for the 2018 Finish Along!!
Yea!!

Mary


Tuesday, November 20, 2018

A Fun Make!

This Friday when I head over the the Kirtland Library's Community Room for the Blow-off Black Friday Stitching event I've organized, this fun #undercovermakermat will be going along!
I'm a fan of @lillyellasworld on Instagram and this is one of her free patterns.
During November, she has been hosting a "sew-along" on Instagram to make this and what fun I've had pulling it together.  I simplified it using only one pieced unit (the wonky bird) for the front pocket panel, but  her original version includes a paper pieced butterfly and selvedge pockets!

My color inspiration came from that fragment of Laurel Burch dogs and cats (second from the left).
That is literally all I have of it and rather than toss it into the scrap bag, I used it!!
Then of course, lots of bird stuff happened.  There's that wonky bird again
The black and white bird print wasn't quite enough for the width needed, so I used my new Small Flying Geese tool from Marti Michell to add a row of flying geese.
One of the benefits of cutting pieces with a template is that everything is the same size to begin and I never, ever, never have to trim triangles.
I know lots of you trim triangle units to "the perfect size" but I would have quit piecing a long time ago if that was necessary to get good results. 
The more 1/4" seams one stitches, the more accurate one becomes at it.
Truth!!
No points were harmed in the construction of this flock of geese!! 
It was fun to comb through my box of trims, looking for just the right touches.
Bonus -- I tidied the box up and culled a few things I'll never use at the same time!!
This six inch long piece of hand-loomed trim from South America has been malingering in that box for too long but I could never throw it away. 
Now it is a needle cushion on the front of one of the pocket sections -- since this will be a traveling mat, having a place to stick a self-threading needle for tie-offs is perfect!
And the green half pocket is just right for carrying along a few Clover clips!
I have a stash of machine quilting threads that my APQS George doesn't prefer. . . . . 
but since I did the quilting with the walking foot on my Bernina 1031, I got to use a happy multi-color thread!
The multi-color stripe is perfect for the binding and check out that ABC ribbon I used for the pocket divisions -- left over from when my kids were littles -- long time!
Since my "go-to" machine lives in a cabinet, the mat will be my travel companion.
It will keep all the most important supplies at my fingertips while creating a cheerful habitat when I'm away from my studio! 
The best part of this make (aside from the ease of construction) was the opportunity to let the fabric combination evolve as I went along -- being spontaneous is such a burst of joy!

If you live in Northeast Ohio and hate black Friday, think about joining us at the sew-in!
All the details of where and what to bring are in my post from last week -- just keep scrolling down.
And if you live too far away, grab a friend and have your own sew-in.
The pattern is a free download PDF -- if you haven't already grabbed it, here's the link again!
(If you can't get it to download and print, send me an e-mail -- maryhueyquilts at hotmail dot com -- and I'll send it directly to you).
Heck, grab the kids and get them involved!
It's an easy make and it will be appreciated by young parents in a difficult situation!

Happy Thanksgiving to everyone, even if you aren't eating turkey Thursday!

Mary

If you don't follow Nicole at @lillyellasworld -- you should!!
There's a new charm size set of moth blocks coming this Friday!!


Thursday, November 15, 2018

Join Me at a Blow Off Black Friday Sew-In

Number three is finished!!
Our weather today is "home-confining", so I plan to cut out (and maybe stitch up) number four.

I'm organizing a "sew-in" on Friday afternoon, 11/23, from 1 to 4 p.m. to make more of these baby isolette Plus quilts to donate to the Baptist Health Hospital NICU in Lexington, KY.  Being the nearest large city to Appalachia region of Eastern Kentucky where I learned to be an enthusiastic mission worker, I have a heart for the people of that region and an Instagram conversation with a nurse has led me to work out a plan for using the popular PLUS quilt idea to make a simple and charming small quilt.  

It's easy to cut (based on 5 1/2" squares), simple to piece (under an hour with only 4 seam intersections that need to match), and with simple modern style machine quilting and machine binding, the complete make is under 6 hours!!  

I'm inviting my local followers (Lake, Geauga, Cuyahoga, and Ashtabula counties in Northeast Ohio) to dig out an assortment of quarter yards (12 to 14 prints) from your stash and join me for a friendly afternoon of piecing.  My  goal for each participant is to cut, piece, and layer a quilt (it's 35" by 40") to take home to machine quilt and send off to the nursing staff at the hospital during the coming month.  

Join me at Kirtland Library Community Room, 
9267 Chillicothe Rd. (Rt. 306), Kirtland, Ohio 44094.   

I have some kits available if you don't have enough in your stash, but pulling from your stash gives you a good color exercise and it is always feels good to use some of it up (as you know).  I'll also show you how to expand this quilt for larger sizes -- it's a great "show-off the fabric" project and if you are interested, at the end of the afternoon, I'll be prepared to do a demo how I do a 100% machine stitched binding.

Following is a supply list:

12 to 14 pieces of fabric (at least 6" by 35" in case you want to purge small bits) -- the quilt only uses 11, but as you know by now, more is easier and your extras might be the "perfect save" for someone else's project!! Pick out some from two color families or pick an assortment of lights, mediums, and darks -- I'll help you figure out placement!!
1 1/4 yard of fabric for backing
3/8 yard (12") of fabric for binding (might as well get that prepped while you are here!)
40" by 45" piece of cotton batting (it's okay to patch leftovers together -- I'll have fusible batting tape with me to help with that process) and 50 safety pins for basting the layers.
sewing machine and rotary cutting supplies (6" by 18" rotary ruler at least)


I'll have copies of the pattern for everyone and a couple ironing stations set up so you can leave that bag at home.  There will be light snacks and hot beverage makings.  
Please bring your travel mug as I won't provide throw away cups.

Finally, please press all your fabrics before coming so you can get a faster start!

If you have friends who might be interested, please share this invitation!  
Questions?  E-mail me at maryhueyquilts at hotmail dot com.

If you live too far away to make the commute -- you can download the instruction PDF from a link in the last two posts.  Then invite a friend to join you and sew along with us that afternoon -- post progress pics on Instagram with #shareaquilt #plusquilt and #quiltsforlexington


Mary 


Monday, November 12, 2018

Why I Make Quilts to Share

I'm having fun this morning quilting another little plus quilt for my November #shareaquilt campaign.   George is helping on this one and we are making cascades of hearts raining down over the quilt.  It's such a quick and cute make that I've committed (outloud) to making one a week during November!
I've figured out that an hour or so for five days is all I need to complete one of these quilts so I'm feeling confident about reaching that goal.  As I've worked this morning, I've been thinking about why I do this.  My "way back" memory is a bit fuzzy but I can recall struggling with some guilt about having such an enjoyable career (owning a quilt shop and teaching quilt making) while participating in a long term Bible study group where several people were unhappy in their careers.  

I came through that personal struggle determined to use my skills as a quiltmaker to bless others.  As a result in the past 25 or so years, I've organized local events and groups to produce lots of quilts to share.  While I had the shop, I donated 500 yards of fabric annually to area quilt guilds to support their efforts to make quilts to share.  Since closing the shop, I've pushed and prodded a small dedicated group of friends to make 25 to 30 quilts annually that we give to three different groups in our area.  

Motivating a wider audience to participate in making isolette size quilts is a big step for me but the inspiration for the plus quilt came to me so quickly and so clearly that I have to believe I'm suppose to be doing it!  So, I hope you'll catch some of that desire to #shareaquilt and download the PDF for this simple make and share it with the NICU at Lexington, Kentucky's Baptist Health Hospital.
If the link doesn't work - just e-mail me and I'll send it -- maryhueyquilts at hotmail dot com)

If you follow me on Instagram, you might have seen a photo of an ugly stack of quilt blocks that were given to me.  My group has made a commitment to provide twin size quilts for a local transitional home.  We piece them, make the backing, and provide the batting for another friend who works them into her longarm schedule.  She called the other day to say she has one ready for us to bind so I set assembling this stack of blocks into a quilt top as my November One Monthly Goal so I could drop it off when I made the pick-up. 
I've had the blocks since March and a setting plan since June, so there wasn't much thinking to be done -- just some stitching!!

The setting plan is brilliant and a complete accident!
Wanna' see?
I decided the blocks needed to be sashed as the sizes were inconsistent and would need trimmed.
Using my Electric Quilt program to organize the plan, I had a lazy moment and instead of opening up a new file, used a layout for a plus quilt that was already up on the screen.
When I added sashing to the setting, this happened!!
(At this point, you can "role play" my reaction by "gasping".)
Of course, everything was dropped at once while I rushed to the living room (the only available empty flat space) and began to layout the blocks.  There were four blocks of each colorway.
Following the dark versus medium clues from the layout diagram, I organized the dark and light blocks to create the "arms" of the pluses and used the medium colors to fill in the centers of the pluses and the gaps around the outside edges.
I liked the green of my rug with the blocks (it's my main neutral these days) so cut the sashing from a pea-green solid with some raspberry scraps for the corner stones.
For a sashed setting, I usually add the sashing and cornerstones to every block so I can treat the complete unit as a block for the final assembly.  It also usually enables me to trim the unsashed edges to get uniformity without compromising the blocks too much.
I posted a tutorial several years ago of this approach HERE.
Last week, I worked for an hour every day, sashing the blocks and assembling the rows.
It was just as exciting to see the setting evolve on the studio floor as it was to see it pop up on my computer screen. 
Of course, I had to flap it across a bed to bask in the glow once the top was complete.
The big pluses are subtle and non-quilters might miss it altogether, but I love it!!
For the backing, I split a hunk of stripped fabric that was donated to our group and inserted a wide pieced band of color -- more donated fabric cut in odd sizes.
I've since handed the entire package -- top, backing, and batting -- off to our quilting partner.
The challenge of making these twin size quilts has been to produce "manly" color and fabric themes.  It's made me realize how "feminine" most of my quilt making tends to be.

So to #shareaquilt seems to be becoming my new purpose as I step away from teaching to keep me active as a quiltmaker. 
 I love using up the stuff. 
I love the challenges of transforming cast-offs into attractive quilts. 
 I love the machine quilting confidence I've gained as a result of finishing these projects. 
And then there's all the happy faces at the end of process!!

Why do you make quilts to share?

Mary

P.S.  Did you "gasp" when you saw that setting?  Feel free to copy the idea!!


Wednesday, November 7, 2018

Up For a Little Challenge?

A month or so ago, an Instagram post of mine sparked a conversation with an NICU nurse, Jeri in Lexington, Kentucky.  When she shared that her unit cares for an average of 20 patients every month I was inspired to plot out three sizes of small quilts using the popular PLUS pattern.  Marsha and Mary Ann (charity quilting sidekicks) joined me in stitching each size up and we sent them off to Jeri for a test run to see which size would be perfect!
Now I invite you to join together in a campaign to stock up the staff at Lexington, Kentucky's Baptist Health Hospital with quilts for the NICU department by making one of these little cuties and sending it off to them during November as a gesture of thankfulness and encouragement!
It's an easy make -- my second one from start to finish took under 6 hours!?!
I've written a guide for the size (35" by 40") that works best and you can download that PDF by clicking HERE
(If the link doesn't work - just e-mail me and I'll send it -- maryhueyquilts at hotmail dot com)

The rest of this post takes you along with me last week as I made a second one.

First, choose fabric -- that's fun!!
I started with this cute owl print and pulled greens and browns from my stash.
The minimum needed for each print is 6" by 35" so a quarter yard works.
I use 11 prints but repeating a couple prints works, too so if you can only get to 9, that's fine.
I lay them out in a rough draft by following the numbered diagram in the PDF to see how they might work. Once this draft arrangement is pleasing, I number each fabric before I start cutting.
When you print out the PDF, you'll see that it specifies the initial placement of lights, mediums, and darks.  The arrangement is an easy starting point and as you will see, it is flexible as you work on the layout.
Be sure to label each print with it's number as you cut -- easy cutting -- it's all rectangles and squares!!
This might be a good project to invite a new stitcher or wanna-be-quilter to join along!!
I hope to get my granddaughter on board -- what a great Advent project for the two of us!!
Once everything is cut, I lay out the pieces according to the numbered diagram with the PDF.
You'll notice that there are six squares on the diagram with a "?" -- use the extra 5 1/2" squares to fill in those blanks after all the pluses are in position. 
Once the layout is complete, feel free to move fabric around -- notice below, that I shifted three of the lights prints around a bit for better contrast.   
Ready to stitch!
The rows are assembled horizontally and I suggest alternating the pressing of the seams -- to the right in the first row, to the left in the second row and so on.  There aren't many seam junctions, but this pressing strategy assures you of opposing seams when there is a junction.
With so few seam junctions, a beginner won't get discouraged.
The piecing takes about an hour to an hour and a half so if you are using the project to introduce someone to piecing, they will be encouraged by the fast results!
Top done and ready to layer!
I pinned every 5" and I wish all my quilts were this quick to layer -- 15 minutes!?!
I kept my quilting simple -- used a walking foot -- ditched and stitched a 5" grid.
Then added a set of 3 parallel lines through the center of each 5" square. 
It took longer to quilt the piece than it did to cut, layout, and stitch the top together. 
Marsha quilted her version with a diagonal grid.
And Mary Ann used a straight grid of wavy lines.
My second one is already in service locally with a young friend and her first child who was born prematurely.
My living room floor is littered with "kits" for twelve more quilts because I'm hoping to organize a couple "sew-ins" locally -- perhaps as a "blow-off black Friday" gesture?!?
So what do you say?
Will you join me and #shareaquilt in November?
Mailing instructions are included in the PDF and my goal is to motivate 25 of you give up a couple yards of fabric and a few hours to send Jeri and her co-workers a quilt before the winter holidays!

For my local peeps (Northeast Ohio), watch my Instagram feed - @hueymary - for updates on when and where I'll be cutting and stitching.

Or how about organizing a few of your stitching friends and do your own local gathering?
How about a winter reunion for your 4-H club?

Don't want to send them to Lexington -- I'm sure there is a NICU near your hometown that would welcome the attention, too!

The pattern guide is my holiday gift to you and I hope it inspires your own commitment to spread loving kindness.

If you have questions, just leave a comment here and be sure I can reply to you!!
Or message me via Instragram.
Thanks for anything you can do to make this idea work!!

Mary