Showing posts with label plus quilt. Show all posts

Thursday, March 28, 2019

Signs of Spring

It's a sunny day here in Northeast Ohio so I had a wander around the yard and my favorite park looking for signs of spring.  
I had to push back some leaf litter to get the full view of these charming crocus -- love that yellow cup at the base of each flower!  I'll have to mark this clump and dig it up for separating later this spring -- spread that loveliness around a bit! 
The hellebore feel late but they are coming along and should be in full bloom in another week!
Love snowdrops and have been working for years to plant them all over my gardens -- think this clump might get spread around later this spring, too.
These two iris blooms -- look how determined they are to push through the leaf litter!?!
That pop of color makes me smile!
The pond is already growing algae and looking pretty murky but I'll leave it that way in hopes that an American toad will use it again this year for a breeding ground and tadpole nursery.
I'm very pleased to see these little red shoots -- it means the peonies I transplanted at the wrong time of the year last summer came through the winter!
 I groomed my raised planting trough and planted peas in there -- fingers crossed that they will love it and I'll have fresh peas by the end of May!!
I also set out the straw bales rescued from the trash pickup after Halloween -- they have been fertilized and the April rains will start the rotting process that makes them a good place to plant stuff!!
Curious?  Google "straw bale gardening", because it's a "thing"!
I even hung laundry outside -- it will take all day to dry but ohhhh, the scent when I bring them inside!!
I did a bit of very early plant shopping while visiting family in southeastern Pennsylvania over the weekend and this tray followed me home -- for now, they will just be outside on mild sunny days, but soon, soon -- real dirt!
I'm slowly redecorating my dining room and hallways so the stitching is slow, but I did finish assembling this plus quilt.  The strips were cut 4 1/2" wide and come from a big ugly pile of unwanted solids -- all the greens and blues.
Let me tell you, they look lots better in this quilt than they did on the cutting table!
All of them date from the 1980's and have a gray cast.
I wish I had taken a picture before the cutting started.
It is twin size and will be finished into a quilt to be donated to a resident of a local transitional home.  There's another pile of ugly solids -- all the reds and pinks -- that might have the same destiny!
The woods are still so brown here after a long winter with very little snow -- the only color are the subtle greens of lichen and mosses.
And of course the bird color! 
There are so many bluebirds around this spring -- seems like I see them on every walk and in the most surprising places!  All those nest boxes in the parks have brought them back in force!
Now this guy just got back from the south!!
A rufous sided towhee -- he's a bit early but seems happy to be the first one in the park which means he can secure the same ideal territory he used last summer!!
Now I need to spend the rest of the morning finishing my tax appointment preparations -- necessary!!
I hope you are enjoying the change of seasons in your part of the world.

Wednesday, February 20, 2019

More Isolette Plus Quilts

My loyal gang of quilters has been working since the first of the year on more of those isolette baby plus quilts I shared with you HERE in November.  At this point, most of the bundles that we collected together in this tub have been turned into quilts to be donated to the NICU at a Lexington, KY hospital.
We get together every couple weeks for an afternoon of stitching and in spite of the weather have managed to turn out a couple dozen quilts
It's interesting to listen to everyone as they lay out the pattern -- we run the gamit from "slap-dash" to "very particular". 
One of the gals is so in love with this simple make that she has made close to a dozen herself since the first of the year. 
Bright and cheery, 
or subtle and understated -- they all look great! 
I've started to add a little heart into the one's I'm piecing.  It's a simple block in a range of sizes from a tutorial by Cluck, Cluck, Sew.   The 5" finished size fits perfectly!
And look at this cute backing -- couldn't  cut it up, but it's perfect for this! 
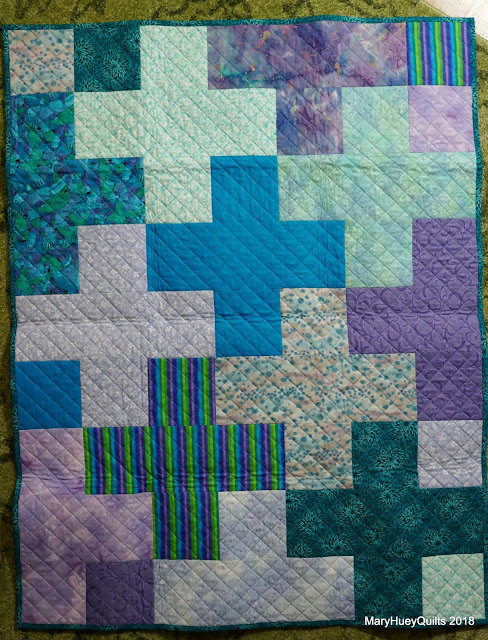
I started on this one today -- smaller scale pluses for a twin size quilt that will be donated to a local men's transitional home -- manly fabric pull that uses a stack of aging solids from my stash!
One of my friends cut the entire stack into rectangles and squares this past week so I could get right into the layout and stitching!
Win, win!! 
If you'd like the pattern for the isolette cover (35" by 40"), send me an e-mail (maryhueyquilts at hotmail dot com) and I'll share the PDF with you!
It's a great beginner's project if you are teaching a non-sewer to piece -- very few seams to match!

Time for tea!!
Mary

Thursday, November 15, 2018

Join Me at a Blow Off Black Friday Sew-In

Number three is finished!!
Our weather today is "home-confining", so I plan to cut out (and maybe stitch up) number four.

I'm organizing a "sew-in" on Friday afternoon, 11/23, from 1 to 4 p.m. to make more of these baby isolette Plus quilts to donate to the Baptist Health Hospital NICU in Lexington, KY.  Being the nearest large city to Appalachia region of Eastern Kentucky where I learned to be an enthusiastic mission worker, I have a heart for the people of that region and an Instagram conversation with a nurse has led me to work out a plan for using the popular PLUS quilt idea to make a simple and charming small quilt.  

It's easy to cut (based on 5 1/2" squares), simple to piece (under an hour with only 4 seam intersections that need to match), and with simple modern style machine quilting and machine binding, the complete make is under 6 hours!!  

I'm inviting my local followers (Lake, Geauga, Cuyahoga, and Ashtabula counties in Northeast Ohio) to dig out an assortment of quarter yards (12 to 14 prints) from your stash and join me for a friendly afternoon of piecing.  My  goal for each participant is to cut, piece, and layer a quilt (it's 35" by 40") to take home to machine quilt and send off to the nursing staff at the hospital during the coming month.  

Join me at Kirtland Library Community Room, 
9267 Chillicothe Rd. (Rt. 306), Kirtland, Ohio 44094.   

I have some kits available if you don't have enough in your stash, but pulling from your stash gives you a good color exercise and it is always feels good to use some of it up (as you know).  I'll also show you how to expand this quilt for larger sizes -- it's a great "show-off the fabric" project and if you are interested, at the end of the afternoon, I'll be prepared to do a demo how I do a 100% machine stitched binding.

Following is a supply list:

12 to 14 pieces of fabric (at least 6" by 35" in case you want to purge small bits) -- the quilt only uses 11, but as you know by now, more is easier and your extras might be the "perfect save" for someone else's project!! Pick out some from two color families or pick an assortment of lights, mediums, and darks -- I'll help you figure out placement!!
1 1/4 yard of fabric for backing
3/8 yard (12") of fabric for binding (might as well get that prepped while you are here!)
40" by 45" piece of cotton batting (it's okay to patch leftovers together -- I'll have fusible batting tape with me to help with that process) and 50 safety pins for basting the layers.
sewing machine and rotary cutting supplies (6" by 18" rotary ruler at least)


I'll have copies of the pattern for everyone and a couple ironing stations set up so you can leave that bag at home.  There will be light snacks and hot beverage makings.  
Please bring your travel mug as I won't provide throw away cups.

Finally, please press all your fabrics before coming so you can get a faster start!

If you have friends who might be interested, please share this invitation!  
Questions?  E-mail me at maryhueyquilts at hotmail dot com.

If you live too far away to make the commute -- you can download the instruction PDF from a link in the last two posts.  Then invite a friend to join you and sew along with us that afternoon -- post progress pics on Instagram with #shareaquilt #plusquilt and #quiltsforlexington


Mary 


Wednesday, November 7, 2018

Up For a Little Challenge?

A month or so ago, an Instagram post of mine sparked a conversation with an NICU nurse, Jeri in Lexington, Kentucky.  When she shared that her unit cares for an average of 20 patients every month I was inspired to plot out three sizes of small quilts using the popular PLUS pattern.  Marsha and Mary Ann (charity quilting sidekicks) joined me in stitching each size up and we sent them off to Jeri for a test run to see which size would be perfect!
Now I invite you to join together in a campaign to stock up the staff at Lexington, Kentucky's Baptist Health Hospital with quilts for the NICU department by making one of these little cuties and sending it off to them during November as a gesture of thankfulness and encouragement!
It's an easy make -- my second one from start to finish took under 6 hours!?!
I've written a guide for the size (35" by 40") that works best and you can download that PDF by clicking HERE
(If the link doesn't work - just e-mail me and I'll send it -- maryhueyquilts at hotmail dot com)

The rest of this post takes you along with me last week as I made a second one.

First, choose fabric -- that's fun!!
I started with this cute owl print and pulled greens and browns from my stash.
The minimum needed for each print is 6" by 35" so a quarter yard works.
I use 11 prints but repeating a couple prints works, too so if you can only get to 9, that's fine.
I lay them out in a rough draft by following the numbered diagram in the PDF to see how they might work. Once this draft arrangement is pleasing, I number each fabric before I start cutting.
When you print out the PDF, you'll see that it specifies the initial placement of lights, mediums, and darks.  The arrangement is an easy starting point and as you will see, it is flexible as you work on the layout.
Be sure to label each print with it's number as you cut -- easy cutting -- it's all rectangles and squares!!
This might be a good project to invite a new stitcher or wanna-be-quilter to join along!!
I hope to get my granddaughter on board -- what a great Advent project for the two of us!!
Once everything is cut, I lay out the pieces according to the numbered diagram with the PDF.
You'll notice that there are six squares on the diagram with a "?" -- use the extra 5 1/2" squares to fill in those blanks after all the pluses are in position. 
Once the layout is complete, feel free to move fabric around -- notice below, that I shifted three of the lights prints around a bit for better contrast.   
Ready to stitch!
The rows are assembled horizontally and I suggest alternating the pressing of the seams -- to the right in the first row, to the left in the second row and so on.  There aren't many seam junctions, but this pressing strategy assures you of opposing seams when there is a junction.
With so few seam junctions, a beginner won't get discouraged.
The piecing takes about an hour to an hour and a half so if you are using the project to introduce someone to piecing, they will be encouraged by the fast results!
Top done and ready to layer!
I pinned every 5" and I wish all my quilts were this quick to layer -- 15 minutes!?!
I kept my quilting simple -- used a walking foot -- ditched and stitched a 5" grid.
Then added a set of 3 parallel lines through the center of each 5" square. 
It took longer to quilt the piece than it did to cut, layout, and stitch the top together. 
Marsha quilted her version with a diagonal grid.
And Mary Ann used a straight grid of wavy lines.
My second one is already in service locally with a young friend and her first child who was born prematurely.
My living room floor is littered with "kits" for twelve more quilts because I'm hoping to organize a couple "sew-ins" locally -- perhaps as a "blow-off black Friday" gesture?!?
So what do you say?
Will you join me and #shareaquilt in November?
Mailing instructions are included in the PDF and my goal is to motivate 25 of you give up a couple yards of fabric and a few hours to send Jeri and her co-workers a quilt before the winter holidays!

For my local peeps (Northeast Ohio), watch my Instagram feed - @hueymary - for updates on when and where I'll be cutting and stitching.

Or how about organizing a few of your stitching friends and do your own local gathering?
How about a winter reunion for your 4-H club?

Don't want to send them to Lexington -- I'm sure there is a NICU near your hometown that would welcome the attention, too!

The pattern guide is my holiday gift to you and I hope it inspires your own commitment to spread loving kindness.

If you have questions, just leave a comment here and be sure I can reply to you!!
Or message me via Instragram.
Thanks for anything you can do to make this idea work!!

Mary


Tuesday, March 14, 2017

2017 Finish-Along -- #3 is DONE!

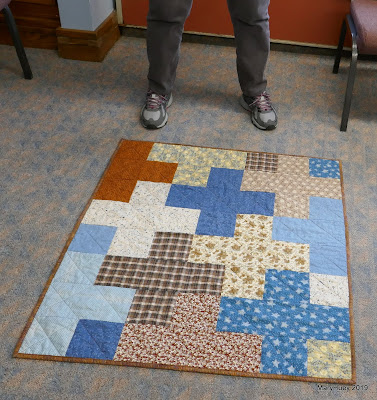
My first plus quilt -- scrappy blues from my diverse stash!
Made for a special young man who has been my "yard boy" for the past 5 years!
He graduates from high school this year and I'm going to have to find another young man in the neighborhood to train as my gardening sidekick!!
I committed to quilting it this winter to be sure it was ready for his summer graduation celebrations!  Layering with a good movie seems to be a key to success for me.
It was Woman in Gold this time -- fascinating story and such a timely perspective in these days of international refuge crisis.
As I sat down with George to contemplate the quilting, my intention was to use straight lines (matchstick quilting) but as I pondered the best spacing I found myself thinking about the "maze" that was used as an event ice breaker a couple weeks ago. 

Could I quilt a maze?
How appropriate to use that for a graduation quilt? 
You know, "life is a maze" with lots of choices and paths that can lead to so many outcomes?!?

I started sketching out ideas and realized I have no idea how to create a maze.
Of course, that's "google-able".
I thought the explanation HERE was interesting.  It didn't completely solve my "how-to" problem, but it helped me understand the mechanics of making one which enabled me to commence stitching.

The first few lines were intimidating as always -- but after working across one corner of the quilt, I was able to find a rhythm of spacing the lines and building the channels. 
I worked from side to side across four to five rows of the squares at a time and it took about four sessions to finish the lap size quilt.
I have been thinking about how to explain my "process" but can't come up with much more than stitch for a ways, make a right angle turn and stitch some more, repeat, repeat, repeat.
I like the texture it adds to the quilt.  I took quite a few pictures to remind me "how" I quilted this one as it will be a good strategy in the future. 

The cold weather has been scarce here this winter but it's back now that the daffodils are blooming?!?  My daughter graciously consented to hold up the finished quilt outside.
It's 44" by 58" and you can read about my piecing strategy HERE.
So that's three finishes for the first quarter -- wahoo!!
One more to go and it's been on the design wall simmering for a couple weeks so I might be ready for the "full steam ahead" stage!!

Some of you may recall my story about finding "my" downy woodpecker under my feeder in late January (see my January 30 post). 
Good news!!
One March 8, I headed back out to the rehab center to pick him up!!  He was much admired by the center's staff for his feisty resilience and making such a good recovery!  I released him back into "his" yard and waited for 36 hours to catch a sight of him. 
At 8:30 a.m. on March 10, I was delighted to see him land on the finch feeder for a quick feed!!
Yea!!!

To the studio!!
Mary