Saturday, December 23, 2023

Holiday Blessings!!

Just popping in quickly in the midst of some pre-holiday cleaning to wish each of you a holiday full of peace and contentment!!  Some are celebrate Christmas, some Hanukah, some the Solstice and some Kwanzaa during the month of December but no matter what our celebration, it gets hectic and hard to recall the "reason for our season".   We all want and need to celebrate remembrance and forward looking hope at this time of year regardless of our spiritual foundation.

So blessings to each of you!

Pass it on!!

Mary 

Thursday, December 7, 2023

Blog Lazy?!?

Hey there!  I'm still feeling blog-lazy and so another month passed with nary a peep from me.  But I've been stitching and knitting in the background.   

There's been a new Covid outbreak in my realm and even though I've had a booster this fall, I find myself battling "social reluctance" again.  A couple days of not speaking to anyone (but the cat) are becoming a regular feature of the average week again and while it seems to suit me, I know it's not a good habit.  Perhaps you are experiencing the same thing in your corner of the world?

 Over the past month, I've finished a couple of this year's quilt tops which is amazing to me!  "Amazing? Why?" you ask.  My MO has always been "finish the top and put it into a pile".  That drive back in 2021 to quilt twenty-one UFO's seems to still be having a positive impact on my finishing record.  I think this makes six or seven quilts I've made this year from start to finish!  A record for me.

Here's the Dresden Stars quilt I made this summer as part of the tutorial series on the blog.  In the last post of that series, I wrote about how I quilted the first one and my intention at that time was to just copy the designs I used onto this quilt top.  But once I "outlined" the star blocks, everything changed.  What I think precipitated those changes was using a puffier batting and wanting less dense quilting to highlight the loft.

The backing fabric is another long-stashed beauty that I was never going to be able to bring myself to cut up so I split it  lengthwise (the aqua band) and crosswise (a favorite remnant of a dotty print) and made it large enough to back this quilt.
My favorite part of the quilting was creating this design for the border -- I even had the patience to go around the entire quilt and make reference dots for stopping and starting before I started stitching!?!  The looped motif is repeated all the way around the quilt and was easy once I did the marking.
Once that quilt was finished, I layered up the "mini-plaidish" top made earlier in the year and went to work on it.  It took about a week of mini-sessions -- 30 to 45 minutes -- straight lines from edge to edge (so there were only three sets of threads to bury for bobbin changes) to reinforce the "plaid" motif of the piecing.

When I posted the picture below on my Instagram feed, a friend in Maryland commented that she started one from her scraps and got rid of it because she didn't like it.  As I was reading her comment, I realized, I had some moments of "not liking" my version, too.  I find that is often the case with a truly scrappy quilt.  We are so programmed to coordinated fabric palettes for our quilts that it feels wrong if the fabric style or the color palette isn't perfectly coordinated.  And yet when I push through to the end of a scrappy project, the response to it is almost universally positive.   True scrap quilts that have no coordination outside of the "value" of the colors -- light, medium, or dark -- never look good until they are finished in my opinion.


Now I've started a big knitting project -- new cardigan sweaters for the my toddler triplet grandchildren!  Two are finished and one is at the halfway point so unless finding buttons for each one becomes a problem, I'll be finished in plenty of time for Christmas.   But that effort has cut into my stitching time and I'm a bit behind on my year long applique BOM.  This evening, I'll applique the last three pieces to Block #11 (below) putting me just one block from "the end"!!  The "staying" power I've experienced with this project has surprised me -- again not my typical MO.  Too often in the past, I've dropped a project and headed down another appealing path with a new project.  There is still a long way to go -- the top has to be assembled, then conquer my fear of quilting (what if I ruin it at that stage), and doing the actual quilting.
While I was in the sewing room prepping the last few pieces for #11 this afternoon, I pulled the pattern for #12 out -- lots of little pieces!!
But since we sold the patterns with a fabric kit, everything is ready for me to match the fabrics from the kit to the picture and keep moving along.  I'll have this block done by the end of the month!
I'll be winding down my quilting goals for 2023 this month, too.  Some I've met with great success and others . . . . not so much, but there's always next year!  The rest of the month is filled with Christmas Bird Counts, tidying up the house for holiday visiting, and a bit of baking so I can be sure to put on a winter's worth of 5 pounds of scones and biscotti?!?
Check out these yummy, sourdough scones!  The basic recipe is from farmhouseonboone.com -- decked this batch out with a cup of raw chopped cranberries and a dash of Fiori di Sicilia (orange/vanilla flavoring I get from King Arthur Baking).  I'm enjoying this recipe because I can mix the batter up in the evening, shape the scones and put it in the fridge overnight for a "first thing in the morning" bake!!

Hope you make good progress on any holiday gift sewing you need to finish.
Mary


Thursday, November 9, 2023

Basics of a Successful UFO Assault Strategy

 It's that time of year again when I'm torn between reaching my annual goals and creating gifts.  This produces an element of self-inflicted stress so I was happy to run across a little handout I created perhaps 15 years ago as part of my curriculum for lectures and workshops helping quilters deal with UFO's.  I listed three points that made a difference in my personal quest and as I read through my handout, I realized that, thank goodness, these are now regular habits for me.  So I decided to review them with you in this month's post with some illustrations of how I am currently deploying these strategies.  

Perhaps one of them will strike a chord for you?

First, change your viewpoint about your UFO's -- think of them as a resource instead of a burden.  If you haven't already noticed in reading my posts, I know what UFO's I have and they are organized for easy access.  As I review my UFO stock regularly, I have found that the older something gets, the easier it is for me to redirect it!  So let's repurpose!!

Case in point -- that 5" charm pak of Christmas fabric that has been laying on the "reserved-for-something-wonderful" shelf (since 2019) has lost it's inspiration -- what was I going to do with it?

Since I had no clue, last week it became 5 potholders -- quick and easy project -- 4 squares for the backs, 4 more squares cut into 2 1/2" squares for the fronts.  They will be offered for sale at a little holiday boutique next week and if they don't sell -- they will become holiday gifts. (Or worse case scenario, they will refresh my kitchen's supply.)  And that charm pak can never trigger guilt again!!

Second, figure out why you stopped working on it!  Understanding that helps me get back to work on a project.  It has become an avenue for perfecting my skills and expanding my creativity, especially when I'm able to repurpose a UFO into something easier to finish while still being useful.

Case in point -- I'm currently tidying up flat surfaces all around the house and in the process of dealing with a small tabletop behind my sewing machine I found a few blocks of a forgotten teaching sample with a stack of matching fabric (to make a bigger quilt?).  
 Realizing how little progress I've made on that goal (the bigger quilt) in 15 years, I spent an afternoon piecing the blocks that were already cut and playing with them until I found an arrangement I like for a small quilt top that will be a quick finish.  And bonus!!  The stack of fabric is back on the stash shelves where it has a better chance of being used!!
Confession -- this is also a fine example of "productive procrastination" as I was suppose to be doing "something else"? . . . . but gosh, it's going to be cute and those blocks have moved OUT of the UFO stash.

Third, work at your craft every day!  20 minutes a day equals 2 hours a week and 30 minutes a day equals 3 1/2 hours a week!  Daily bursts of work were critical when I was working full time and that habit continues to move me forward faster than trying to find big blocks of time.
  (Plus now that I'm retired, 20 minutes usually stretches into 45 minutes.)

How do you think I get so many quilts finished in the course of a year?  Not by spending long hours at the machine.  Currently, I'm trying to knock-off a few tops I've pieced this year so they don't become UFO's!    Most mornings, I begin with 30 minutes of machine quilting.  That's about 15 minutes less time than it takes for my shoulders or neck to start aching.  
The Dresden Stars quilt top I made this summer for the sew-along is my current project and coming along nicely.  Tomorrow I'll start quilting the borders and it should be ready to bind in three or four days.   That means it is time to revisit the "to be quilted" stack and layer up a couple more tops so I don't lose momentum!?! 

Since my current focus is on finishing (no new piecing projects until I get caught up with the quilting!) I did let myself whip up a few little gift items just so my sewing machine didn't forget who I was?!?  Mug cozies (that used up some crazy scrap piecing blocks), little change purses, and some tea wallets for my club sale next week!!
Post script -- diving into my UFO's also seems to be a way to energize myself.  Not only do I "accomplish" something but I reduce the burden of "so much to do".  Taking a break from the excited frenzy of starting new projects and clearing out a few old projects has become a good cleansing activity for me.  But don't worry, a couple new projects are in the wings as I write this!!
I must do something fabulous with these two fabrics!!  Are they one project or two??
Now back to the sewing machine!!

Mary


Monday, October 2, 2023

Accountability -- Third Quarter 2023 Review

 While there has been a long "radio silence" here on the blog for over a month, my sewing fingers have been busy.  I realized in mid-August as I finished up the Dresden Stars tutorial series for the sew-along, that the "tops to be quilted" pile was growing a bit faster than is good for my overriding goal to never have a big pile of UFO's again. 

Time to slow down on the piecing and the starting of new tops!  I was in the middle of a couple new starts which I needed/wanted to finish to eliminate the piecing distraction so I could focus on the quilting.

I had succumbed to the mini-plaidish sew along earlier in August when I realized I could cut most of the pieces out of my scrap boxes of  3", 2 1/2" and 1 1/2" strips.  It wasn't even like I was starting a new project because after all, everything was practially cut?!?  Never heard of the Plaidish quilt? -- check out this Instagram hashtag collection HERE.  It's the brainchild of Erica at Kitchen Table Quilting and the instructions are very clear so it was easy and fun to organize the blocks and watch them become a plaidish quilt top.  This is a laprobe and destined to be a holiday gift for someone.

And would you look at the backing!?!  I'm stretched to make backings these days as most of my big stash pieces are gorgeous florals which aren't always as versatile as I would like.   Plus the yardages are smaller.  So every backing is becoming a challenge but I'm very pleased with this one!!  Using the stash is always a priority!!

Did you start this quilt along?  I loved the cover quilt and started with the group earlier in the year but lost interest rather quickly.  It may be because I wasn't working with bright cheery prints -- using my stash of traditional reproduction prints which I enjoy working with but . . . . or maybe just lack of focus.  Bright, new, shiny -- you know the feeling!

So I quit at "this many" blocks thinking another laprobe.  I set the blocks together and was trying to decide if it needed a border since it was a bit skinny -- only 36" wide -- and I thought what am I going to do with another laprobe???  
So I didn't add borders (it's the rebel in me) and split the center seam crosswise for two wheel chair laprobes that I know I'll be able to donate locally!!  This one is quilted with simple cross hatching and the second will be ready later this week!!
(The quilt is square but I always seem to hold the camera cock-eyed.)
Each one is 27" by 36" -- three afternoons to finish!!

Since the scrap baskets were still out from the Plaidish quilt . . . 
and I've been wanting to replace this much loved and worn Trip Around the World for a couple years. . . . .
 I didn't resist -- it was a fast job!
 Most of the squares were already cut (again, is it a new start?).  I followed the original quilt's light, medium, dark of a color rainbow look laying out a row at a time and piecing it as "leaders and enders" for other sewing.
Isn't it fun!!  It used up about 825 squares of scraps - yes!!
I think it will be a gift, too which might mean I'll have to make another one after the first of the year?

Time to document my progress on the 2023 goals!!

1.  Finish six more UFO's from the leftover 2022 list.  With the two table runner finishes below, I have crossed five of the six off my list!  This finish was a one afternoon project -- don't you always find yourself saying "that was so easy, why didn't I do it sooner?"  I have the answer!!  It's because we didn't have a reason to finish.  This one will be a gift this fall and the one in the photo for goal #5 has been donated -- found a reason, did the finish!!
The final UFO on this list is the Dresden Stars top I pieced in August and that might be the next top to be layered up for some machine quilting.  You didn't realize it was in my UFO stack did you?
  I could reach this goal for 2023!

2.  Quilt the new tops I made in 2022.  No new progress here  }-:  but my fall plan is to get one of the tops on that list of five layered and begin handquilting it now that evenings are starting earlier -- autumnal nesting, you know.

3.  Deal with all the antique/vintage quilt tops I own.  And no new progress here either.  I need a big dose of courage and more focus with fewer distractions --  maybe this will be my only goal in 2024? 

4. If/when I start new projects, chose from a list of seven.   I have not started any new projects from this list since January, but the progress on the two underway has been steady.  The Hextraganza quilt top is set together.  When I posted my progress on Instagram last week, the pattern designer left a lovely comment which gave me a thrill!!  This will be a finished top by year's end!!
 I'm at the final step of appliqueing the quartered-circle motifs in place.
Plus the Flourishes applique blocks are on schedule.  Nine of twelve are finished and here's the last three I stitched.  Each time I finish a block, I think to myself -- "I can't believe I did it?!?"  It's time to start number ten!  
I've started to think about the setting.  The pattern has a setting of course. but I might modify it so I would finish with three smaller quilts that could go to my granddaughters someday.

5. Re-home twelve finished quilts.   I only let go of one more piece - this recently finished table topper (another cross-off from the 2022 list!!) is going to a fall fund raiser for one of my nature groups.  They are a birdy bunch and the center motif of each star is a fussy cut bird print.  Hopefully it appeals to lots of folks and earn the big bucks!!
(Can you believe that binding job??)
I've let go of twelve pieces which was my goal for 2023 but I have decided to push myself a bit and increase the goal to let go of as many pieces as I finish this year.  So far I've finished thirteen quilted pieces so I'm in good shape.  I hope to finish five more so that means letting go of 18 -- trying to keep a lid on the inventory growth here!?!   Combined with my current intentions to donate two and to gift another two to specific people, it's shouldn't take much effort to figure out how to let go of  two more quilts . . . . . should it???  

If you've followed my journey as a quilter for any length of time, here or in the classroom, you know that I'm a goal-oriented quilt maker.  Some say to me, do what makes you happy and don't worry about how many you finish, etc.  However, I know that big stacks of UFO's are not good for my mental health.  Much as I love the thrill of a new project, the relief of finishing an old project is worth setting goals and striving to reach them.

Now go finish something -- that's where I'm headed!!

Mary


Friday, August 11, 2023

Part 6 -- Dresden Star Tutorials

 Time to share the last steps -- adding borders and some quilting ideas!  

I added three borders to my finished top -- first border is the background fabric and cut 2" wide to finish at 1 1/2".    Second border used up all my leftovers from the layer cake (plus a couple add-ins because it was pretty tight) -- it's cut 3" wide to finish at 2 1/2".  The third border is the background fabric and cut 4" wide to finish at 3 1/2" wide.

The layer cake leftovers could be pieced together with straight seams but for the fun of it, I cut all the pieces on an angle that matched the angles of the star points.

I cut all the leftovers into 3" wide strips (most of them were already that width) and then laid them end to end in a "random" scrappy order -- spacing the colors evenly for a bit of balance. Once satisfied with the order, I stacked up (on the left) and worked down through the stack trimming the ends and restacked them for sewing (on the right).

I used the 60 degree angle on a rotary ruler to trim  the ends and

the opposite end was trimmed on the opposite angle.
I used my diamond template to trim the sharp points  which helps with the matching as the strips are stitched together.  

Lay two pieces end to end as pictured
then when you flip the right sides together for stitching, the alignment will be quick and  accurate!  You can skip the trimming step but I never do since noticing the increased accuracy of my piecing!
Now just sew all the strips together into one long border band and you are ready to add it to the quilt top.
If you scroll back up to the first picture and look at the lower right corner, you can see that I cut off the band when I reached the corner, squared it up and continued.  I added this border "log cabin" style around the quilt to get as many "the color turned the corners" as I could.

Finally, I'm going to share the quilting designs I used on the first version I made of this quilt because I'll probably use the same ones on this version.  Why make new choices???
A striped fabric cut on the bias was the perfect binding!!

The outer border was this simple straight line-curvy line repeat worked back and forth -- the straight line was worked stitching forward and the curvy line backwards sneaking along the edge of the second border to get to the beginning of the new line.
For the setting triangles, I marked the center of each piece, then "arced" from point to center, center to point, etc. working around the triangle.  It was a big "pumpkin seed" so after the first one, I added the little vein squiggle in the center of each "seed".  You can also see the first border quilting -- first I stitched straight lines evenly spaced from the seams, then came back around with the curvy line.  The curvy line was freehand -- you can do that!!
This is the best picture I could get of the detail on the star points.  My goal is always to do as much continuous stitching as possible to eliminate thread burying.  I outlined the center hexagon "in the ditch" and as I got to each blade seam, I arced up to the point, freehand squiggled the point, and then back down to the hexagon.  The result was just one beginning and one ending set of threads for each star block.
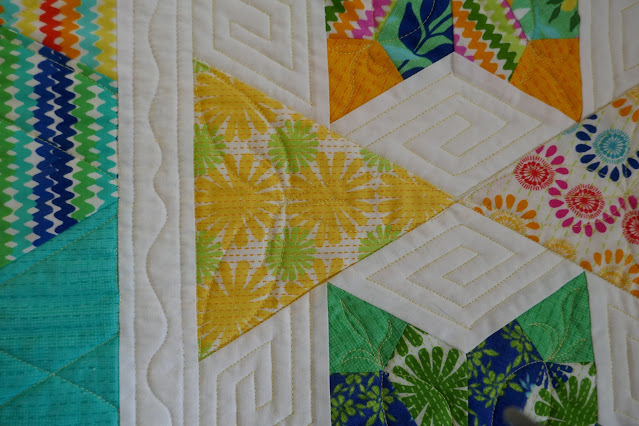
The background diamonds were quilted as I outlined the blocks.  Look at the bottom of the diamond below.  Trace the stitching to the left along the seamline.  Stop at the first line of the "maze" that you come to and then trace around the "maze".  Into the center and back out.  Then I stitched a few stitches along the seamline back to the beginning of the "maze",  retraced my stitching and on to the next diamond.  So again, one starting and one stopping set of threads to bury.  The "mazes" aren't perfectly aligned -- I used the edge of my free motion foot to align things and I'm content with the results.  If marking makes you happier, use my photo as a pattern for your diamonds.
I have yet to layer my quilt top -- the backing is still to be pieced (but I did find yardage in my stash for that) and I've had to fix a design glitch in my pieced border!?!  Scroll back up to the first picture.  See those two solid looking brown strips?  They were an add-in to bring more brown into the border but when I stepped back (after the borders were finished), they glared at me.
My solution?

I pulled out the tiny scraps I had left of the layer cake
and created a pile of tiny hexagons (1/2"), basting them as for English paper piecing.
I had enough to prep a few 5/8" hexagons and now I'm popping out the papers, pressing the hexagons and machine stitching them in place.  
To make it look like it was a "plan" all along (this is a skill you need to cultivate), I scattered some all along the border.   It's working -- breaks up the brown globs perfectly but they are a pain in the ---- to stitch down so I keep getting distracted to stitching that is more "fun"!?!
I hope you will give this pattern a try or at the very least, give my Set-In Piecing Simplified technique a try on your next piecing project with set-in seams.  They are so much easier than you think they are going to be when you use this technique -- that's my students review of the process!!
If you haven't invested in my teaching guide for the technique, here's a coupon code to use for 25% off until the end of August, 2023!  Click on my face up on the right side of the blog and use this code when you check out in my Etsy shop!


Let me know if this series has been helpful and inspiring!

Mary


Wednesday, July 26, 2023

Part 5 -- Dresden Star Tutorials

My blocks are finished!!  
Time to set them into the quilt top!
For the lap robe size, I'm setting the rows horizontal -- for the crib size in the pattern, I set the rows vertical.    Here, I cropped the photo of my current quilt and rotated it 90 degrees to illustrate that option.
NOTE:  There are some other setting options that might appeal to you for hexagon shaped star blocks from a sew-along I did here on the blog in 2014 -- you can review them HERE.

Anytime I'm making a "scrappy" quilt, I begin the setting process by putting my finished blocks onto the design wall in a random order -- I start at the top left corner and lay the blocks in position as they come off my pile of finished blocks.  
Then I step away for a couple hours.
When I come back, what ever "jumps" out at me is what I change.
The only block that jumped this time is the second from the right in the second of the bottom row.
It grabbed my attention immediately (not in a good way) so I started moving it around.

My goal was to minimize it's impact.  Positioning it in a corner and making sure the other corner blocks were also "strong" seems to do the trick for me.  I also organized the center horizontal row with the brightest blocks and that gives a focal point.  I could have also put the "difficult" block in the center of the quilt if I wanted to draw attention to it.
Once I was happy with the block positions, I added the setting triangles -- random placement to begin.
Looking through my camera is a good way to pick-up on "glaring" spots.  
At this point, the quilt felt chaotic and unbalanced so I began to move triangles around.
What worked for me was to organize the triangles with teal prints around the center Dresden Star -- it creates a subtle secondary star which I like but there could have been a dozen other arrangements.
It's all about what appeals to your design sense.
Trust your intuition -- if you are waffling, it means you don't like it!
Be sure the straight of grain on the setting triangles is laying horizontal to the quilt.  This controls stretching when sewing the rows together.
Can you find the four triangles that are pieced from half triangles?

After a day of rest (to be sure I liked the layout), I was ready to assemble the quilt top.
The beauty of this layout is that it doesn't require any more set-in seams -- all straight from this point!!
These are the basic units to make.
If you took the time to trim the corners of the triangles and half triangles as you were cutting, all that you need to do to position them is match the corners as shown here.
and here!  
Press the seams toward the triangles.
Once you have all the diamond shaped units and the end units,
 begin to assemble the rows.

There is one little trick you need to know to avoid mismatched intersections as you join the units to assemble the rows.  This can happen if you don't match properly.
This is what you want!
You can poke pins through the seam allowances and fiddle or if the seams allowances are a consistent accurate 1/4", do this.
I hope I got close enough with the photo
Looking down "into" the seam allowances, I've discovered if I align the corner of the seam allowances on the top unit with the end of the stitching line on the lower unit -- the seams will cross/intersect 1/4" from the raw edge.  It might take a few practices to do this but once you figure it out, it streamlines the matching.  It's hard to convey in a picture or words, but if you do it with your units and compare it to the picture, it will make sense.
 I had to fix a couple.  
Usually my bad ones happen because the unit seams weren't exactly 1/4".

It's a good idea to "label" the right end units with a pin or something.  I flipped a row 180 degrees and while looked okay at a quick glance, it messed up my setting triangle arrangement at the center of the quilt.  That will teach me not to be such a cocky bugger?!?
Since the seams within the rows are angled, you can press them to either side.
Here's the finished top ready for borders!  Right now it's about 36" wide and 52" long.  Once the borders are added, it should be 51" by 67".
If you want to make a larger quilt, every block added to the width of a horizontal setting increases the width of the quilt by about 12" and every row added increase the length by about 10".

I'll be back in a week to walk you through the borders and share some quilting ideas!
And happy dance, I found a hunk of fabric for a backing in my stash!!  With all the finishing I've been doing the past few years, those big pieces are becoming more rare in my stash?!?

Mary