Showing posts with label tips from a teacher. Show all posts

Friday, December 10, 2021

So Close!!!

 #18 of twenty-one is finished!!  I trimmed and bound it over the past couple days!

This is an antique quilt top I rescued from 1930's green sashing several years ago.   I bought it at a show in the Columbus, Ohio area because I love shirting prints from the late 1890's and early 1900's, but the green sashing was just not right.

As I quilted the blocks the past couple weeks, I fell in love with the quilt's charm.  It seems to have been pieced from leftover clothing fabrics but as I got my nose into each block I started to appreciate the care that went into the fabric selections. 

I haven't taken the time to search out the name of this traditional block but every single block is set up exactly the same way with three fabrics -- the center square and the corner squares are one fabric, the "sashing" and the four middle squares a second print, and the four 9-patch corners from a third print.  All the stripes are lined up - no helter, skelter placement.  I can see the piecer choosing three fabrics from her scrap bag, cutting out the pieces and taking pleasure in laying out the next block.

The block above is one of my favorites because of those gray/black and white prints.  You can see I kept the quilting simple.  I used a variety of reproduction white and black shirting prints for the new sashing and they are a good fit with the rest of the quilt.  I just have a few threads to bury this evening that I missed while quilting and it will be ready for a gentle washing.

While binding it, I tried out a new tip for joining the binding ends that I've been seeing in Instagram "reels" the past couple weeks.  Of course, now I can't find it to share with you, but following is a series of pics that illustrate it.

Here we go!

I've trimmed the left end of the binding straight about 8" from my starting point.

Then I marked that end's position with the pin but didn't pin the binding down and lapped the right end over the left end.
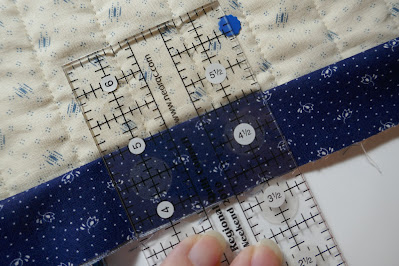
This little ruler is 2 1/2" wide and so is my binding, so I aligned the right side of the ruler with the pin
and drew a line on the left side of the ruler.
The rule of thumb here is that the distance to the "mark" is the width of the binding, so a 2" binding would use a 2" distance to the "mark".
Breathe deeply and cut the excess binding off at the mark.
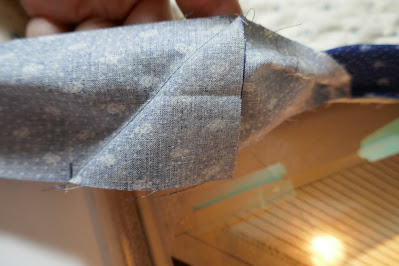
Time to attach the two ends -- quickest way I found was to measure 2 1/2" in from the end of the left side and make a little line
which is aligned with the edge of the bottom layer as they are setup for this diagonal seam.
Stitch the ends together on the diagonal, open it out and check to be sure it worked.
Trim off the triangle, fold the binding back in half
and stitch to the edge of the quilt!
Wa-la, a perfect invisible join!
I used this process about six times (doll quilts and potholders) before doing it with this quilt.
I like it!!  And it's easy to remember.

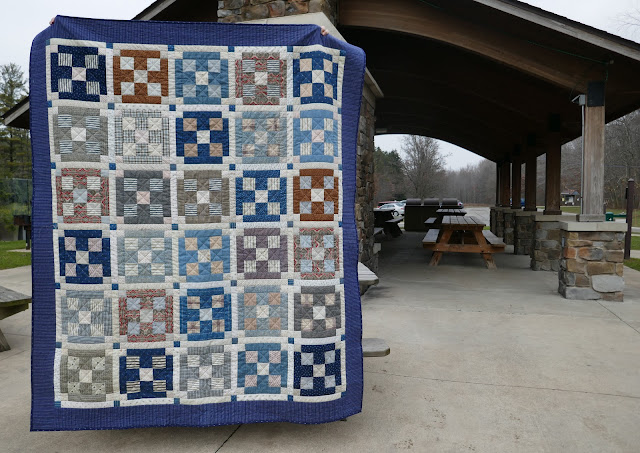
Speaking of the quilt -- here it is (in the wild)!!
Quilt #18 of twenty-one!!
I'm so pleased with it and have no idea what it's destiny is beyond being admired for now.
Finishing it has inspired me to set my 2022 goal -- dealing with the antique quilt tops I've accumulated over the years.  I might sell some, I might donate some, and I might finish some to keep.
But by the end of 2022, all of them will be in a better place than they are today!

No triplet pictures today because we are hunkered down a bit until the new Covid variant is better understood.  Instead here are triplet hats that I made with a wonderful "new-to-me" pattern from an English designer. It popped up so many times on Instagram over the past month that I had to see what all the fuss was about.  I love it -- so much versatility.  Use any yarn and any needle size because she has size charts based on your personal gauge -- you don't even have to swatch!!
Brilliant!!
It's the Musselburgh hat by Ysolda Teague -- HERE on her website and it's also on Ravelry.
(P.S. -- the yarn has been in my stash for over 10 years so please don't ask.)
If you browse Instagram, check out #musselburghhat to see all the inspiring variations!
(Leftover sock yarn, look out, I'm coming for you!!)

Quilt #19 just came back from the quilter and is waiting for it's binding!
Quilt #20 went "under the needle" this morning -- it's a challenging one but the only way to get to the other side is to start.
Quilt #21 is layered and ready for action!  It simple so I saved it for last because I think I can do it in two days -- one to quilt and one to bind -- hope I'm not being cocky!?!
(Maybe I should plan on three days?)

Finally, a mini-rant.
More than ever we all need to be nice to every person we encounter.  Not just because "it's the season" to be nice, but because we all really need it!!  The emotional exhaustion we are experiencing is creating a social backlash of behaving badly towards others.  As I was checking out at a store last week, I overheard the woman in front of me say to the clerk as she left
 "I hope everyone is nice to you today."
What a lovely thing to say to someone!
Perhaps the customer knew the clerk but I echoed her wish to the clerk as well.
For the rest of my errands, I wished every clerk the same and their reactions were without exception -- a little look of surprise and then a smile.
Those smiles meant I had touched a cord and that made me smile -- win, win!
Don't feel like smiling yourself ?  That's okay.
I'm reminded of a pastor's response to a question about "how to pray"?
 "Fake it until you make", he said.  
We've all heard that expression, but what he meant was to do what you know is right and it will become powerful and meaningful and second nature.  
Let's all be nice more often and spread the smiles and the good feels.

Have a pleasant weekend,
Mary


Tuesday, March 16, 2021

Turning A Corner -- Tips for Better Bindings

Number five is finished!! 
#quilt21in2021
I was concerned about too little quilting but I washed it and dried it on low and it's fine!!
Soft and cozy.
The simple quilting made for an easy and quick finish and once again, I'm wondering why I've left this top laying around for over twenty years?
As I was binding it yesterday, I thought perhaps my readers are getting a bit tired of me raving about all my finishes so today I'm revisiting a post I wrote a few years ago on how to turn a better binding corner . . . . except that for some reason, I apparently deleted the post???
Arrggghhhh!!
Happily the photos were still archived and so while I have to write the words again, I don't have to  take new photos, so here we go.
Generally, I run a wide long zigzag around the outside edge of a finished quilt before adding the binding.  I believe it helps flatten the edges and eliminates most of the waviness that sometimes occurs during the quilting process.
I cut my binding strips on the cross grain most of the time but if I have curved edges or want a special effect (diagonal stripes), I cut the binding on the bias.  I cut 2 1/2" wide strips for a completely machine bound quilt and 2 1/4" for one where I'm going to wrap and stitch the binding to the back by hand.

I have stopped pressing the binding in half lengthwise before applying it to the quilt -- now lets see if I can find the video that sold me on that idea?

Well, I found the person, but not the video -- maybe it was a blogpost not a video?  
I'll try to explain -- if you press a crease down the center of the binding, after you've stitched it to the quilt and are ready to fold it to the other side for the second stitching, less fabric is needed on the "inside" of the doubled strip than is needed on the "outside" which means the crease can interfere with it laying smoothly.  Don't understand?  Don't worry, just try it.
Besides, I like one less task!

I apply the binding with a walking foot.  The seam depth is more than 1/4" from the needle to the edge of the foot so sometimes I adjust the needle position.  The thickness of the batting is my guide for this.  The thicker the batting, the narrower the seam needs to be (though not less than 1/4") so there is more binding to roll over the edge.
When I'm two or three inches from a corner, I fold the binding strip on a diagonal so it extends to the right of my presser foot and finger press the fold.  My diagonal fold intersects the corner of the quilt as perfectly as I can make it line up.
Then I use a colored pencil to mark a line in that crease when I unfold it.  
Now I'll stop stitching when I get to that diagonal line. . . . .
drop my needle into the fabric, lift the presser foot and pivot to stitch down the diagonal line to the edge of the quilt.  This secures the end of the stitching but doesn't interfere with the turning of the corner.
Flip the binding off the quilt so the raw edges are a continuous straight line with the next side of the quilt.  The diagonal stitching provides a firm stop line for the fold.
Now bring the binding back onto the quilt.  The key to a crisp miter happens right here!
The fold I'm point to with my scissor tip must be lined up exactly with the edge of the first side of the binding.  If it extends beyond the edge or falls short of the edge - you are already doomed.
Second, the folded edges where I'm pointing the scissor tip in the picture below must be aligned perfectly.  If the folds are cockeyed, the corner will be a mess.
To stitch down the second side, I start far enough in from the edge to secure the diagonal folds underneath but don't stitch all the way to the edge.
I do one final little step as I turn each corner.
I trim off the corner of the quilt, not the binding to reduce bulk in the corner.
This picture is from another post I wrote about binding and you may want to check it out HERE for an overview of how I handle doing the second side by machine.
If doing the second side by hand, I've learned that stitching the folded edge all the way into the corner gives me better results.
Square as square can be with a perfect little miter!
I hope these tips are helpful to you next time you bind a quilt!
I found the inspiration and courage to start quilting my birth year temperature quilt over the weekend.  I'm about one third of the way along with free motion "breezes" blowing across the surface.
Yes, I have a pot of amaryllis on my machine table!  
Plenty of sunlight and a cheery companion! 
We've had good news here in Ohio -- 40 year old's and over are eligible for the vaccine beginning this coming Friday!  That means my children are eligible.  I hope your part of the world is making good progress with this as well, too!

Wishing you lots of sunshine this week!!
Mary


Friday, May 29, 2020

Tips for Piecing Mississippi Mud Blocks

"Are you in" as they say?
If you don't want to start a new quilt, give my assembly technique a try using 16 squares, any size.
(Think potholder?)  If you are just going to experiment, you can skip "piecing the star points".
Let's go!! 
Piecing the star points -- you will need eight star point units for the main block.
The instructions on how to piece these are at the top of page 5 in the pattern if this technique is new to you.  Just do eight for now because as I piece a block, I make the star point units for the next block as my "leader and enders" while chain piecing.

If you are using one fabric for all the stars, piece eight star point units using the small squares you've cut and eight different "background" squares.
If you want to use two different star fabrics, piece four of each color on different "background" squares.
If you want to use lots of different star fabrics, piece four points of one color, two of a second color and one of a third and fourth color.

Layout a block as below next to your machine -- if this is the beginning of a quilt, try to use fourteen different "background" prints in the block.  The star points in the upper right corner and lower left corner will complete stars in adjacent blocks as you set the blocks together.  If you are using two star fabrics, both of those corners and the partial star in the lower right corner will be fabric #2 while the complete star will be fabric #1.

TIP:  Laying the complete star out first is the quickest way to begin -- and double check that all the star points are angled as in this photo.  It's easy to get one rotated 90 degrees (wrong!!) so stop and look before you start to sew.
I always hung a sample block in front of my classroom when teaching this quilt so students could look up and quickly check the star points positions!
Assembling a block -- Flip the squares in the second vertical row (from the left side of the photo) right side down on top of the first row squares.
This sets up each pair of squares with the seam edge on the same side as you will stitch, so no need to twist or rotate the pair as you align the edges.
Chain piece the four sets starting with the top set and working down to the bottom set. 
Don't cut anything apart yet!!
Before clipping off this string of squares, piece a star point unit for the next block as your "ender". 
This star point unit will stay under your needle and you'll clip the complete chain off the back of it and head to the ironing board.
No clipping of the thread chains yet!!
Lay it on the ironing board with each pair's open side facing toward you.
Clip off that star point unit (which was my "leader) and set it aside.   The "ender" is still under the needle at my machine!
Flip the second and fourth units (counting from the right) up.
Press the seams flat to set the stitching. 
Then work along the chain and flip the top piece up (away from yourself), press the seam to one side.
Flip the second one down (towards yourself) and press the seam to one side.
Continue alternating along the chain. 
I know lots of quilters these days are pressing seams open but I prefer pressing to one side for a couple reasons.  The most important reason to me is that when the seams oppose each other, 
I can feel when they are matching up more accurately.  
To understand this better -- lay two pairs right sides together.
Manipulate the seams back and forth between your fingers and feel the alignment.
If you feel a gap or a lump where the seams lines intersect, it's not quite right yet.
It should feel smooth on both sides of the stitching line when the seams are snug against each other.
I also believe the quilt top is weaker when the seams are pressed open plus it's just too much work to press them open.  
(I've tried the open seam approach and frankly my matching stinks when I do it.)

Repeat the process for the third/fourth vertical rows remembering to start at the top of the block and work down.  At first this may not seem intuitive to you but it's a common mistake during workshops.  If you start at the bottom and work up -- everything gets twisted around and you'll get frustrated.
Don't forget to "ender" with another star point.
Now you have eight pairs of squares. 
At this point, I clip the thread chain between the second and third pairs in each column. 
Flip the top pair face down on the lower pair
until you have four sets as below. 
The sewing begins with the upper left pair -- still chain piecing -- and move to the 
 upper right pair, then the lower left pair, then the lower right pair.
Do another star point unit as your "ender".
Back to the ironing board with the complete chain in tact -- see that "leader" on the left? 
The pressing is the same -- first set down, second set up, third set down, fourth set up. 
Head back to the machine, layout the block, cutting the thread chains as needed -- 
the block is now four 4-patch units. 
Flip the right side units onto the left side units and chain piece to assemble. 
One reason I leave the thread chains is that it makes it easier to be sure which edges I want to stitch together -- it there is a chain, I know to seam those two edges together.
No chain, no stitching! 
Last trip to the ironing board -- I forgot to take a picture of the second part of this step but again, the first one on the right stays down and the left one is flipped up before pressing the seams to one side.
Two halves, ready for the final seam!! 
As you prepare to stitch the two halves together,  notice this is the first time you've had more than one seam intersection to match!   In the previous step when I laid one 4-patch on top of the other to sew the seam, I actually matched the seams all the way around so the two units are centered on top of each other -- then when I stitched the seam, I measured the 1/4" from the raw edge of the largest 4-patch, consistently.
What this achieves is that any slight size variations are adjusted consistently so when I put the two halves together, all three seam intersections align correctly. 
 My blocks are perfect from the right side and fit together well with the rest of my blocks.
 (I never trim blocks to the "correct" size, but that's a sermon for another day.)
Often times, I don't press this final seam until I begin to layout the blocks since I don't know if it should go up or down at this point.  Once I lay the blocks out, I pick up a row of blocks and press all the final seams in the same direction.  The next row is pressed in the opposite direction.
This has saved me lots of annoyed frustration when setting the blocks together.
With this new version, since every block was assigned a specific position in the quilt, I could press that final seam as I made them before adding them to the design wall. 
So here's a basic finished block for the multi-color star version. 
I learned this approach to piecing blocks (it works for setting blocks together, too) from my long time teacher/mentor/friend, Mary Ellen Hopkins almost forty years ago.  She referred to it as working in "twosy/foursy".  And I've been using it and teaching it for just as long.

TIPFor edge-to-edge quilt settings, all the blocks should pressed identically (except for that last seam) if made from an even number of units (2 by 2, 4 by 4, etc.).    If the block is an odd number of units (5 by 5, etc.), every other block needs to be pressed in the opposite order.  Then when the blocks are set together, the seams will automatically be opposing making the matching simple.

I wish you could sit in a workshop with me and learn this technique face-to-face but hopefully I've been able to explain it clearly with my pictures and text.
And here are my "leader/ender" star point units ready for the next block! 
With both the one color stars and the two color stars versions, you can literally piece blocks and keep them in a box until you are ready to set the blocks together.  With a large variety of "background" prints, there is very little chance of any print ending up next to itself in my experience.
That's what makes it such a great stash busting quilt -- plus it's a great place to use up some of the tired old fabric that you don't want to use but can't throw away.

This variation was different because I pieced it block by block.  I placed each one on the design wall as it was finished.  Originally the background was all white squares, no black "border" squares -- but it just wasn't working for me -- all that light needed a frame.  So I un-stitched the outside edges of the first four blocks I made and changed the outer squares to black print. (Ugh!)
I kept getting bogged down with the color placement decisions for the stars until I realized
 I could "plan" the star colors for the entire next row by simply laying the main square of each star on the design wall -- so much easier!!  I think the seed of this idea was all the "rainbow" style quilts I see on Instagram.

The checkerboard border is the result of cutting too many black squares and not wanting to put them back into the stash.  I auditioned several ideas but settled on this one in the end. 
I went back after all the blocks were pieced with the black border squares and added the checker board squares -- but I included a diagram at the end of the updated pattern showing this variation so you don't have to do that.  You can add the checkerboard squares as you piece the blocks.  It will be so much easier!!

This is the upper left corner block with the extra squares added on the left and upper edges.
I used 40 black squares and 40 white squares for the my laprobe size quilt top but I'm sorry I didn't count how many you need for any of the other sizes.  My guesstimate is that for every block needed to change the length or width of the quilt,  it would change that count by four squares of each color.
So my top is 4 by 5 blocks -- if I want it longer (4 by 6 blocks), I think I would need four more black and four more white squares.  I might be off one or two . . . . let me know!

So my quilt top is finished and currently on the "ready to quilt" shelf.  I stopped assembling  when I got four sections together as you see below -- it will be easier for me to quilt it this way. 
Okay, I have written and edited and re-read and edited and proofed and read it again. 
It's as ready as I can make it, but if I've left out something, raise your hand and leave a comment!

Share your test run on Instagram and tag me @hueymary and use the hashtag #mississippimudquilt
-- I want to see what you do!

And if you hesitated to buy the pattern at first, but now you are ready 

Still mostly isolating up here in NEOhio -- have a good weekend!

Mary