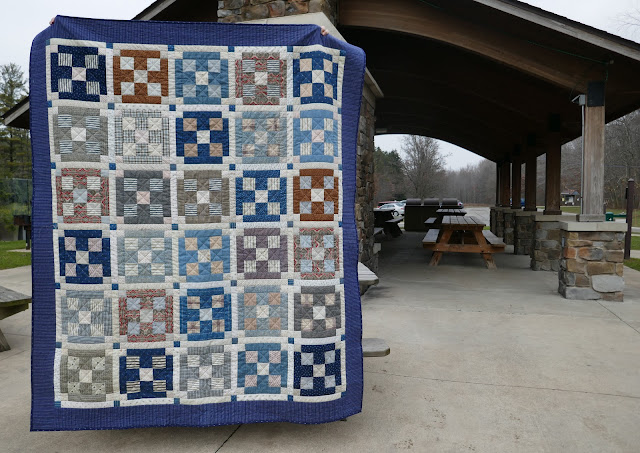
#18 of twenty-one is finished!! I trimmed and bound it over the past couple days!
This is an antique quilt top I rescued from 1930's green sashing several years ago. I bought it at a show in the Columbus, Ohio area because I love shirting prints from the late 1890's and early 1900's, but the green sashing was just not right.

As I quilted the blocks the past couple weeks, I fell in love with the quilt's charm. It seems to have been pieced from leftover clothing fabrics but as I got my nose into each block I started to appreciate the care that went into the fabric selections.

I haven't taken the time to search out the name of this traditional block but every single block is set up exactly the same way with three fabrics -- the center square and the corner squares are one fabric, the "sashing" and the four middle squares a second print, and the four 9-patch corners from a third print. All the stripes are lined up - no helter, skelter placement. I can see the piecer choosing three fabrics from her scrap bag, cutting out the pieces and taking pleasure in laying out the next block.
The block above is one of my favorites because of those gray/black and white prints. You can see I kept the quilting simple. I used a variety of reproduction white and black shirting prints for the new sashing and they are a good fit with the rest of the quilt. I just have a few threads to bury this evening that I missed while quilting and it will be ready for a gentle washing.
While binding it, I tried out a new tip for joining the binding ends that I've been seeing in Instagram "reels" the past couple weeks. Of course, now I can't find it to share with you, but following is a series of pics that illustrate it.
Here we go!
I've trimmed the left end of the binding straight about 8" from my starting point.
Then I marked that end's position with the pin but didn't pin the binding down and lapped the right end over the left end.
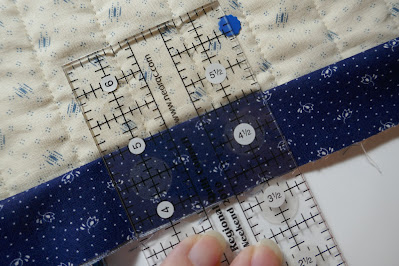
This little ruler is 2 1/2" wide and so is my binding, so I aligned the right side of the ruler with the pin
and drew a line on the left side of the ruler.
The rule of thumb here is that the distance to the "mark" is the width of the binding, so a 2" binding would use a 2" distance to the "mark".
Breathe deeply and cut the excess binding off at the mark.
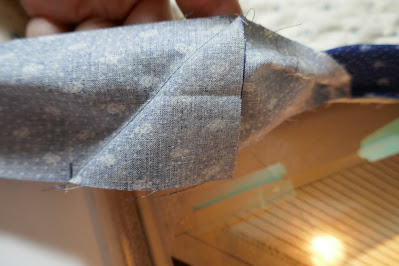
Time to attach the two ends -- quickest way I found was to measure 2 1/2" in from the end of the left side and make a little line
which is aligned with the edge of the bottom layer as they are setup for this diagonal seam.
Stitch the ends together on the diagonal, open it out and check to be sure it worked.
Trim off the triangle, fold the binding back in half
and stitch to the edge of the quilt!
Wa-la, a perfect invisible join!
I used this process about six times (doll quilts and potholders) before doing it with this quilt.
I like it!! And it's easy to remember.
Speaking of the quilt -- here it is (in the wild)!!
Quilt #18 of twenty-one!!
I'm so pleased with it and have no idea what it's destiny is beyond being admired for now.
Finishing it has inspired me to set my 2022 goal -- dealing with the antique quilt tops I've accumulated over the years. I might sell some, I might donate some, and I might finish some to keep.
But by the end of 2022, all of them will be in a better place than they are today!
No triplet pictures today because we are hunkered down a bit until the new Covid variant is better understood. Instead here are triplet hats that I made with a wonderful "new-to-me" pattern from an English designer. It popped up so many times on Instagram over the past month that I had to see what all the fuss was about. I love it -- so much versatility. Use any yarn and any needle size because she has size charts based on your personal gauge -- you don't even have to swatch!!
Brilliant!!
(P.S. -- the yarn has been in my stash for over 10 years so please don't ask.)
If you browse Instagram, check out #musselburghhat to see all the inspiring variations!
(Leftover sock yarn, look out, I'm coming for you!!)
Quilt #19 just came back from the quilter and is waiting for it's binding!
Quilt #20 went "under the needle" this morning -- it's a challenging one but the only way to get to the other side is to start.
Quilt #21 is layered and ready for action! It simple so I saved it for last because I think I can do it in two days -- one to quilt and one to bind -- hope I'm not being cocky!?!
(Maybe I should plan on three days?)
Finally, a mini-rant.
More than ever we all need to be nice to every person we encounter. Not just because "it's the season" to be nice, but because we all really need it!! The emotional exhaustion we are experiencing is creating a social backlash of behaving badly towards others. As I was checking out at a store last week, I overheard the woman in front of me say to the clerk as she left
"I hope everyone is nice to you today."
What a lovely thing to say to someone!
Perhaps the customer knew the clerk but I echoed her wish to the clerk as well.
For the rest of my errands, I wished every clerk the same and their reactions were without exception -- a little look of surprise and then a smile.
Those smiles meant I had touched a cord and that made me smile -- win, win!
Don't feel like smiling yourself ? That's okay.
I'm reminded of a pastor's response to a question about "how to pray"?
"Fake it until you make", he said.
We've all heard that expression, but what he meant was to do what you know is right and it will become powerful and meaningful and second nature.
Let's all be nice more often and spread the smiles and the good feels.
Have a pleasant weekend,
Mary


Love the new quilt, she's a beauty. She probably only had enough green fabric on hand for the border, use it. The antique quilt is so happy now. Thanks for the reminder to make a pleasant comment to cashiers, they need it!
ReplyDeleteI like the secondary pattern at the cornerstones. I think it gives the quilt a little bit of extra personality. Thanks for the "be nice" and "fake it until you make it" reminders. I once heard a similar way to think about prayer. If there is someone you don't like or who gets on your nerves, you should pray for that person - it becomes difficult to think negatively of someone who you are praying for regularly. Merry Christmas!
ReplyDeleteI don't think that binding tip is terribly new, although it certainly is worth repeating. I've seen tutorials where after you cut off the extra length, you unfold it and use it to measure. I don't bind all that often and never remember the procedure from one time to the next, so I've started using a binding ruler that has instructions on it.
ReplyDeleteYou are no doubt right but there has been such a flood of "reels" about it lately. I've used a similar technique for years and am quite good at it but this is a bit quicker and using the ruler seems easier to me than using excess binding. And as my friends will tell you, I'm notorious for have "just enough" binding so don't always have the extra to use as a measure?!?
DeleteBeautiful projects! I love your reminder (I don't feel it is a rant ;-)
ReplyDeleteAfter seeing your #22 post, I just had to go back through and check out all the finishes (I may have seen a few before but not all). Oooh, ahh on this one as I love reproduction fabrics so can really appreciate you working with the real thing! Lovely restoration and good choice on replacing the sashing with similar shirtings. Sure you won't keep this one?!? Looking forward to seeing you work through your antique quilt finds in 2022!
ReplyDeleteI have really enjoyed your blog posts. I am a quilter, but I especially enjoyed discovering that you are a birder!
ReplyDelete