Showing posts with label machine quilting strategy. Show all posts

Friday, March 27, 2020

Staying Busy at Home

It's been five days since the governor of Ohio decided it would be best if as many of us as possible just stayed home.  Monday was unsettling as we reviewed what we had and what we might need so my daughter could make a supply run but as each day passes since then, I've felt a bit calmer mostly because I've stayed busy.  I have the advantage of being retired for the past year and a half so I've adjusted to "not working" other than to do my own stuff.  

I've seen a number of quilters talking about losing their creative drive during this challenging health crisis.  Folks, we don't need to be "creative" - we need to be "calm" and the best way I know to do that is keep those hands busy.  I'd bet that most of us have enough UFO's to keep us moving along in spite of not feeling creative, so my advice is to get something off the shelf and push into it!

This past week, this quilt has been my focus.
Isn't it gorgeous?!?
When I finished the piecing (more than 5 years but less than 10 years ago), I set it up to be machine quilted in sections.  This is not a new approach for me and it has enabled me to finish several large quilts myself.  The thing I always notice right away is how much better my machine quilting is working this way -- not having a large piece to struggle through the machine makes a huge difference.
I took this picture a few days ago -- all four sections are quilted up to 2" from the edges that will be joined.  Notice that the "joins" of the top half and the lower half will not be centered to each other.  This is one of my "bulk management" strategies and it works very well.
Join me for a quick tour of the process from this point.

With the right sides of the sections matching and the batting and backing pieces of both pulled out of the way, I pin and stitch two sections together.
Once stitched, I spread it out on the ironing board and press the seam to one side.  Since I use 100% cotton batting, I don't need to worry about a hot iron damaging my batting, but if it had any synthetic fiber, I would make sure to have a pressing shield/cloth handy for the tight spaces. 
Now I need to join the batting and the backing.  I find spreading it over a narrow table as below works best as the weight of the quilt hanging down on both sides keeps the quilt smooth. 
The batting is overlapping at this point.
I need to be sure both pieces are flat and smooth. . . . . . 
. . . . . because now I'm going to cut up through the middle of the area, cutting both layers of batting as I go.  Steady does it!  I lift the batting slightly to keep my scissors away from the quilt top. 
There will be excess batting to pull away and the trimmed pieces will butt up to each other nearly perfectly. 
The batting edges can to basted together with a "catch stitch" or use a fusible tape like this one from Marti Michell.***  It's 2" wide and fuses to cotton batting beautifully.
Once the batting edges have been basted together, they will lay flat and it's time to seam the backing pieces.  
I overlap one side over the other, trimming off any excess and stitch it by hand -- like applique.   
One of the delightful parts of this finish for me is getting to use these three charming prints that I have been hoarding in my stash for quite some time -- one had 2002 on the selvedge?!?
I stagger the three seams -- the seam of the quilt top is centered in the open space, the seam of the batting pieces is about 1" to the left of the quilt top seam, and the seam of the backing pieces is about 1" to the right of the quilt top seam.
This staggering both helps reduce bulk and seems to make the join more secure.
In the photo below, you can see the unquilted area -- notice how far the backing seam is from the center of that area. 
Here's a view of the same area from the front -- notice the unquilted area along the top half of the photo.  Except for the fact that it isn't quilted yet, you can't even tell that I'm working in sections.
My reference book for this process is Machine Quilting In Sections by Marti Michell.  
When I was working as an educator for Marti, quilters often said to me "oh, I have that book" and my response was always, read it four times and try it!!

Click HERE to read another post I wrote about this process and THIS ONE shows some of the other quilts I've finished using this approach.

So on we go through this huge world event -- it's going to be bigger than Y2K in my memory!  I hope you can keep yourself motivated through the calming solace of stitching a bit every day because when we look back, we want to be able to point to the blessings of this time not the fears.

God bless you abundantly!
Mary

***EDIT April 2025
Marti Michel closed her business in late in 2024 and while some shops may still have a stock of her templates, you can also find them on Ebay and Etsy. 


Tuesday, March 20, 2018

Still here . . . .

My spontaneous one-week hiatus from Through Rose-colored Trifocals turned into three weeks?  Not sure how that happened?  Too busy stitching?  Too busy birding?  Perhaps.

I have been stitching steadily -- if you watch me on Instagram (@hueymary), you've seen some hexie machine piecing, a few bindings, a bit of birding, and some progress on some ancient UFO's.

Last August, you saw this lovely blue and yellow quilt as I shared how I layer quilts on a table -- you can read that complete post HERE
 Then it sat for several months until I started to quilt it in January.  I thought I would finish it in January once I settled on a simple "maze" for the wonky log cabin style blocks, then while when considering a design for the setting triangles, I stalled out.
Feathers were the original idea but in the end, I settled into a more comfortable design that I'm confident about being able to execute -- a whimsical flower with simple leaves and tendrils.  Surely I'll finish it in February!?!
After another long pause and sketching out several border design ideas, I decided on a simple Greek key style border which echos the "mazes" in the central blocks.
It took a few days of experimenting on graph paper to figure out the path and find the right proportions.
I was thrilled with the strategy I developed and so I'm going to share it in a progression of pictures that I hope will inspire you.  
After drawing two of the "key" motifs onto the border with a Clover Chaco Liner, I stumbled into a way to add some painter's tape "lines" to my Fine Line tool enabling me to bypass most of the marking.
The long tape line (horizontal in this picture) will dictate the space between the lines of the repeat and the short vertical pieces indicate the length of the longest line within each repeat.
A complete repeat is a square unit in my design and sits centered from side to side on the border.
Follow along as I stitch one repeat.
The tape running parallel to the edge of the tool is lined up on the seamline between the narrow yellow border and the outer blue border.
This motif begins at the horizontal tape mark . . . .  
. . . . and stops at the edge of the last horizontal tape mark. 
I rotated the Fine Line tool 90 degrees and stitched to the right . . . .  
. . . . stopping at the right edge of the left hand piece of tape in the photo below. 
Then I moved the tool and used two of the lines inscribed on the tool to measure the distance of the third line which was stitched away from myself. 
This is the end of that line . . . . .  
. . . . and now I stitch left 1/3 of the way across the open space.  I have moved the tool out of the way in this picture so you can see where I'm going.  The interesting thing I noticed after stitching several of the motifs is that I have the visual ability to judge 1/3 of that distance pretty accurately.
Now I shifted the tool into a vertical position and stitch towards myself 1/2 of the distance to the opposite line -- again, I have the visual ability to "eyeball" that distance without actually measuring it!
Rotate again and stitch left stopping at the halfway point. 
Now stitch away from myself (slightly different camera angle). 
 I missed one picture here, but the route is to stitch to the right until I reached the right side limit of the previous motif.
To get to the next motif, I again used the tape marks to maintain a consistent distance down the right side of the border. 
Here's the stop point for that line.  Rotate the tool to the horizontal and stitch left until I arrive back at the left side of the design.  
Here I am back at the beginning of a motif -- repeat, repeat, repeat.
The key was to set up the pattern on graph paper and draw through it to find the easiest sequence.  Using the tape to set up the repeatable distances eliminated most of the marking so the stitching went smoothly and it only took two work sessions to complete the borders.

Realizing that I'm able to visually judge 1/3 or 1/2 of any space saved time and energy because I didn't need to draw out each line of the design.  I'm sure if you took a ruler to my motifs, there are some spacing irregularities within each key, but as long as the lines are straight and the outer edges consistent, the brain sees my complete design as being just fine.  
Then there is the organic appeal of the slight and largely unnoticeable imperfections.
Ready to bind (finally)!!
Of course, there was none of that beautiful blue batik left for a binding and "matching" blues is always a challenge so to maintain momentum on this 13 year old project, I went with a yellow binding!!  Machine stitched on both sides.
Here's the finished quilt ready to be washed and brighten up my living room as spring begins! 
This finish puts me under the 90 UFO's mark for certain and there are three more ancient UFO's in the mill -- two are layered for machine quilting and a third just moved from "still appliqueing" to "ready to make a backing"!!  
Progress is good!!

While today is the first official day of spring, judging from the ice we found along the shore line of Lake Erie on today's birding adventure, we aren't done with winter.
Still time to stitch, stitch, stitch before the garden begins to lure me outside!
Enjoy the changing seasons!!
Mary


Friday, August 4, 2017

Another Look at Meteor Shower

It's not often that I push all the way through a project from beginning to end but apparently having a quilting design idea was enough motivation to keep me moving on this piece!
Sometime in the past couple years, I came across a quilt on Pinterest quilted in concentric circles like a huge target and it inspired me.  The swirling design of Meteor Shower called out for concentric circles as soon as I started the final stages of piecing! 
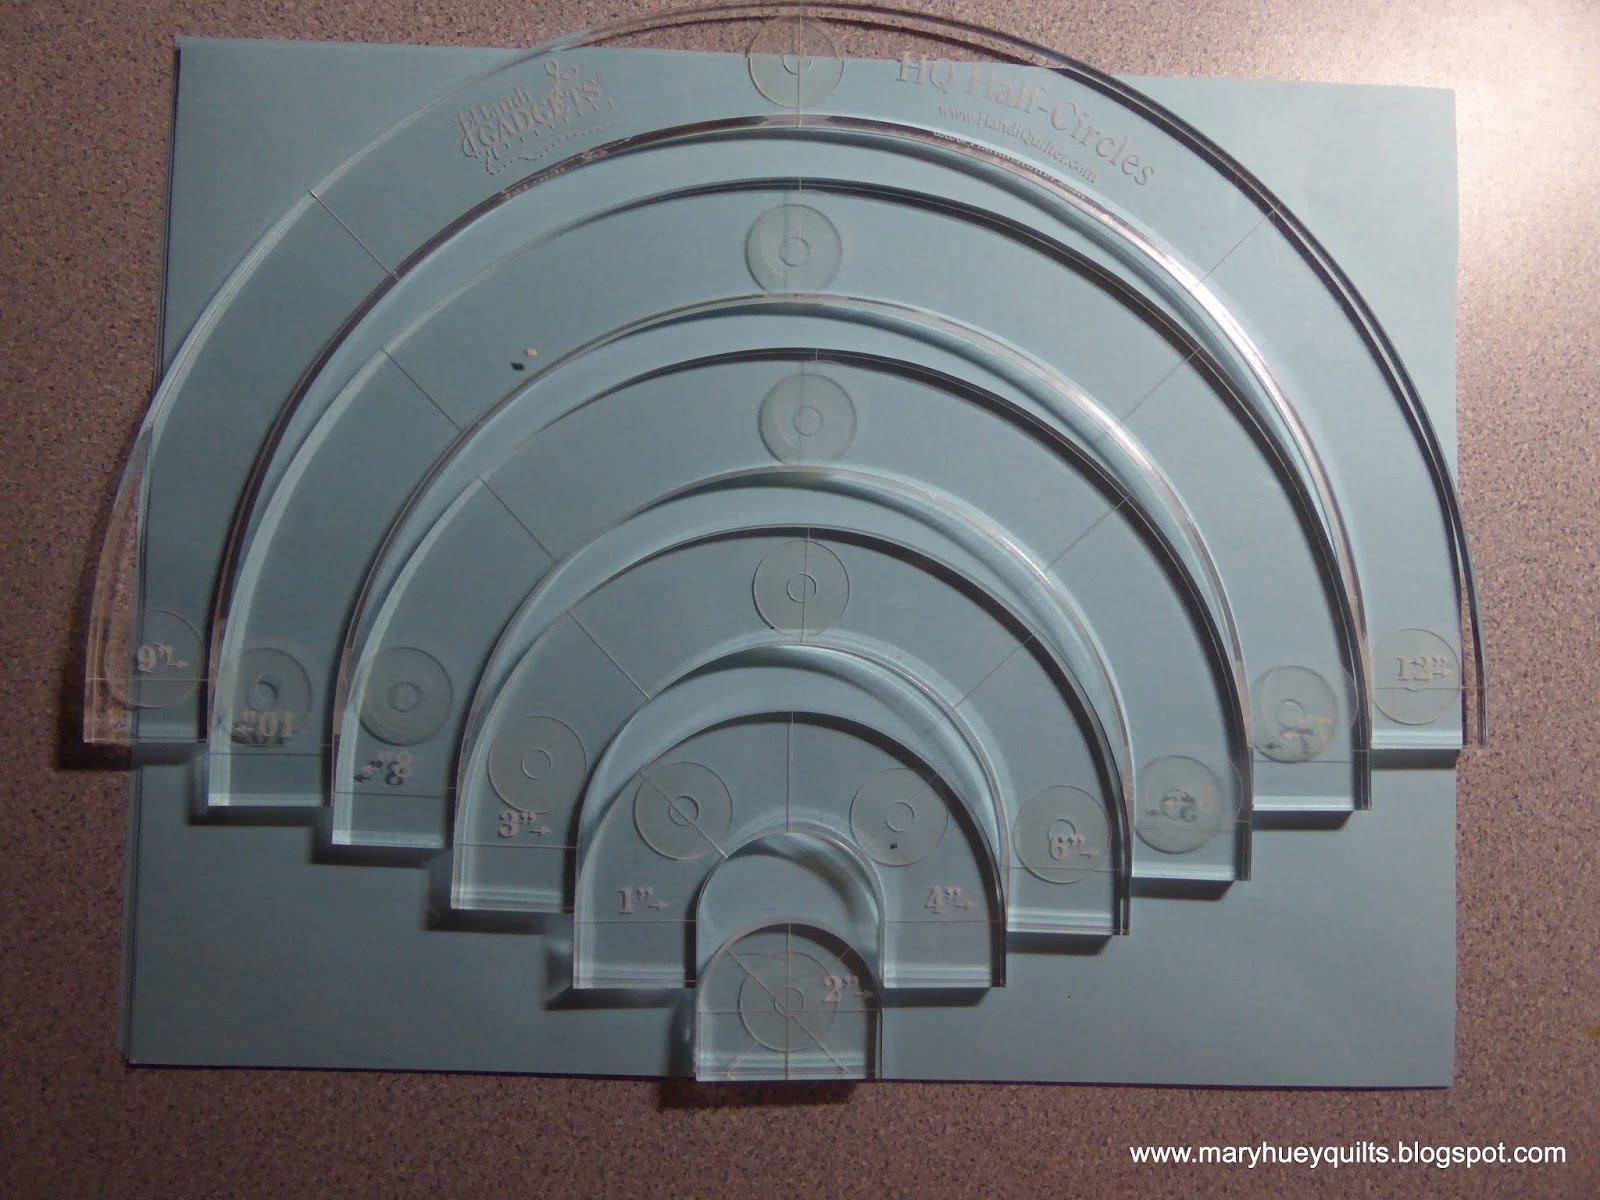
Eager to try it out, I fiddled with my set of Handi Gadgets Half Circles.  
The first circle fit right inside the center hexagon!
Once I had finished the 12" circle, it was obvious I would need a new strategy.
In the spring, I watched a gal demonstrate the Westalee Ruler Foot Echo Guides for Cindy's Sew Easy Shop here in Cleveland (Ohio) during a local show.  The tools are distributed in the USA by Sew Steady and HERE is a little video about the echo guides.  I was very impressed so I bought a set and hoped that my APQS ruler foot would work with them.  It didn't, but happily, APQS introduced a new ruler foot -- exactly 1/4" from the needle to the outer edge and with a new shank design (look back up at the first picture) that accommodates rulers all the way around the foot -- and the guides do fit on that foot!!
I experimented with drawing circles -- that didn't work.
So I used my Fine Line arc ruler to keep my stitching (fairly) steady and on track.
The key lies in stopping every 3" or so and adjusting the ruler to line up with the next section of the previous circle.  I'm not going to share close-up pictures of the stitching -- you'll see all the hic-cups.
As I neared the point at which the ever larger circles would intersect the edges of the quilt, I decided to stop the circles once I was past the last group of teal diamonds and finish the corners with straight lines to create the appearance of a burst of light.
A sheet of paper laid on the quilt helped me experiment with how that might look and how to proceed with the stitching order.
I switched to the straight ruler and zigzagged around the center creating a series of points.
After the first complete pass around the quilt, it did not lay completely flat outside the circle.
I needed to add more quilting to match the density of the center of the quilt. 
A second trip around the entire quilt with zigzags that overlapped the first round and were shorter took care of that.  As I was finishing the second round, I thought it would have added some more interest to have changed colors of thread and perhaps add a third row with a third thread color.
Next time?
Or you could do that and let me know how it looks!
Here's a close-up of one corner so you can get a better idea of how it looks.
The edges were not quite as flat as I want for a wall hanging so I spread the quilt out and laid a soaking wet towel over top for a couple hours -- that flattened it out nicely.
It's laying out on the porch drying overnight -- thought I would get it bound today, too.
But there is no point rushing it -- it will be good and dry by morning and tomorrow, I'll have a FINISH!!!
I love the movement the concentric circles create!
I'm not sure I would do a big quilt with this design and I think most quilters who do circles use a walking foot and a guide, but George doesn't walk, he only runs!!

If you missed leaving a comment on my last post to enter my Adventures In Hexagons giveaways,  keep going down the page and read Tuesday's post.
Winners will be picked on Saturday evening, 8/5/2017.

Enjoy your weekend!!
Mary


Tuesday, December 20, 2016

Quilting a Vintage Top

I should go back and see how many times I've had finishing this quilt on my goal list.  Finally, I'm right on the edge of success.  I layered it up at the end of November and have been slowly moving through the quilting process. 
I began with almost no plan for the quilting so I ditch quilted all the sashing and blocks hoping that was enough engagement with the process to kick start some clever quilting ideas.
The blocks are around 80 years old -- they were started by a lifelong friend of mine when she was in her teens.  She in turn gave me the blocks to finish when I was in high school.

I asked myself how it would have been quilted in the 1930's when it was started? 
The best answer to that question is "simple" and probably by outlining the appliques and using a grid  for the background.

Since I don't feel my skill is good enough to outline the applique right at the edge, I echoed the shapes instead.
A grid would have meant so much stop and start work so I experimented with this inner frame of three lines 1/4" apart.  It was easy to do with a straight ruler and my ruler foot.
I also echoed the shapes 1/4" inside the appliques -- I'm really pleased with the impact it has on the flowers!
A simple 4-petal flower in the cornerstones repeated the shapes of the flowers and leaves and was easy to stitch.
I was pleasantly surprised at how well a spool of standard Mettler cotton thread worked on my machine -- meant not having to leave the house on a hunting foray for thread!
Up to that point, the ideas came steadily and the stitching progressed!
But then it was time to quilt the sashing.
I drew on it with my chalk wheel.
I drew on paper. 
 I pulled out quilting stencils and books of designs
I made a mock-up and experimented with different designs.
Nothing!
So I quit experimenting and jumped to the borders -- simple lines 1" apart perpendicular to the edge of the quilt -- no picture because it doesn't show up enough.

I came back to the sashing and decided to just start by stitching a box 1/2" inside of each rectangle.
As I did the first box and pondered how to fill it in, two chance events the day before resulted in an idea!!
On Instagram, a gal shared her experiments with quilting a repeating design inside boxes which she had drawn on her fabric.  Later the same day, I had a conversation with a friend about using "dots" to mark alignment points to use with quilting rulers.
When the idea came, it seemed very quick but there had been a week or more of contemplation and experimentation which probably had to precede the final result.
The two diamonds came first and are the result of dividing the space into quarters.
Marks along the edges were used to align the quilting ruler. 
I realized that by starting at the center of the end of the sashing, that would set me up to start the diamonds without breaking the thread.  I hope I can remember that strategy in the future! 
Here's my ruler in place for the longest line as I zigzagged across the center of the sashing. 
On the way back up the sashing, I finished the diamonds. 
and added the floating (and very organic) circles, one half circle at a time --  
 over to the opposite point and back, retracing the lines connecting to the diamonds and finishing the circle.  The first circles were an after thought since the diamonds looked empty, clunky.
The entire design was stitched continuously with the help of dots to guide my ruler placement.
Each motif is taking about 8 minutes to complete including the time to mark it. 
I'm very pleased with the impact of the sashing design on the overall quilt -- it has an art deco look that I think fits perfectly with the design.  There are only a dozen sashing units left to quilt and then I'll be ready to bind and cross another UFO off the lists.  Hooray!!
Update -- 12/27/2016
It's completely finished -- I took this picture just before putting it into the washing machine.
I took it along for the Christmas weekend in Pennsylvania and finished stitching the binding and tying off all the quilting threads (I hope).
Later this week, I'll deliver it to it's new home!!
My fourth finish for the fourth quarter 2016 Finish Along goals!!
I think I'm going to finish all the pieces on this quarter's list HERE!!

Mary