Showing posts with label APQS George. Show all posts

Friday, March 23, 2018

Another Finish and a Simple Pattern

Last fall, my quilting gang and I took on a project to make a half dozen twin size quilts for men coming into a local recovery home where they live during the final stage of their transition to a sober life.  The director of the home welcomed our offer and made only one request – that they be “manly” quilts.  Fine, I said, not realizing that our supply stash was heavy on “not-manly” fabrics.  So the challenge became one of finding inspiration for simple quilts we could produce easily and still achieve a “manly” look.  One morning, I woke up with the inspiration for “Lift-Off” in my head.

Ever since Marti Michell introduced her small Diagonal Set Triangle Ruler, I've been thinking about using it to cut and create a flying geese quilt using giant 5" by 10" geese units!!
 Both of the triangles needed for a basic goose unit are cut using the full ruler.  It's the same combination of large and small triangles as Marti's standard Flying Geese Ruler -- just bigger!! 
Most of the units are the standard layout -- one large and two small triangles, but to create the look of a flock of wild geese lifting off a pond, I included several of these "combination" goose units.
Wait until you see how they fit into the design!
It took me most of that day to cut out all the triangles and piece the geese.  At the end of the day, I had the basic layout of the flock up on my design wall.
Then I stumbled across this print while searching through our "charity" stash and the background of the quilt materialized easily!
The quilt is built in vertical rows and while I had the background sketched out on graph paper, the sizes of the available fabric dictated the final sizes of the background pieces -- the idea is that the flock is lifting off a lake (where they spend the night because it's safer) and heading out for a day of foraging in meadows and marshes nearby. 
Once the layout felt right, I started to assemble the vertical rows.
I quilted it in two sections of three rows with (somewhat) parallel vertical lines for ease in handling and to reinforce the flow of the pieced design. 
Have you tried quilting larger pieces in sections?  It is definitely my "go-to" strategy for the past decade.  It's so much easier to handle since I am working at a large sit-down machine (APQS George) when quilting.
Finally the day it was finished!! 
I love the way the movement of the flock up through the quilt! 
It reminds me of days I've been lucky enough to come across a flock of geese or swans lifting off and moving on! 
Next week, it is off to it's new forever owner.
I hope it will remind him each day to keep "lifting-off" for the next good thing!! 
I've written a 3 page guide to help others create this quilt.  It's isn't a complete pattern as it assumes you already have a favorite way/tool for creating flying geese units.  It includes a chart of six sizes from a 12" by 18" wallhanging to a full size quilt, very basic instructions, and a drawing that you can use to play with the design.  
(Can you see this with a "rainbow" background?)
You can purchase a PDF copy of it from my Etsy Shop HERE and support my group's efforts!
All proceeds from the sales go directly into our "batting fund" so we can keep layering up quilts!
We are grateful for the opportunity to bless others with our skills!

Have a lovely weekend!
Mary

P.S. Happily, this is also one of my first quarter 2018 Finish Along goals -- DONE!!!


Tuesday, March 20, 2018

Still here . . . .

My spontaneous one-week hiatus from Through Rose-colored Trifocals turned into three weeks?  Not sure how that happened?  Too busy stitching?  Too busy birding?  Perhaps.

I have been stitching steadily -- if you watch me on Instagram (@hueymary), you've seen some hexie machine piecing, a few bindings, a bit of birding, and some progress on some ancient UFO's.

Last August, you saw this lovely blue and yellow quilt as I shared how I layer quilts on a table -- you can read that complete post HERE
 Then it sat for several months until I started to quilt it in January.  I thought I would finish it in January once I settled on a simple "maze" for the wonky log cabin style blocks, then while when considering a design for the setting triangles, I stalled out.
Feathers were the original idea but in the end, I settled into a more comfortable design that I'm confident about being able to execute -- a whimsical flower with simple leaves and tendrils.  Surely I'll finish it in February!?!
After another long pause and sketching out several border design ideas, I decided on a simple Greek key style border which echos the "mazes" in the central blocks.
It took a few days of experimenting on graph paper to figure out the path and find the right proportions.
I was thrilled with the strategy I developed and so I'm going to share it in a progression of pictures that I hope will inspire you.  
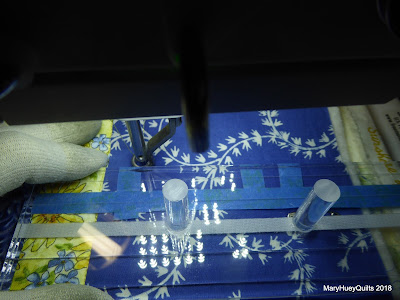
After drawing two of the "key" motifs onto the border with a Clover Chaco Liner, I stumbled into a way to add some painter's tape "lines" to my Fine Line tool enabling me to bypass most of the marking.
The long tape line (horizontal in this picture) will dictate the space between the lines of the repeat and the short vertical pieces indicate the length of the longest line within each repeat.
A complete repeat is a square unit in my design and sits centered from side to side on the border.
Follow along as I stitch one repeat.
The tape running parallel to the edge of the tool is lined up on the seamline between the narrow yellow border and the outer blue border.
This motif begins at the horizontal tape mark . . . .  
. . . . and stops at the edge of the last horizontal tape mark. 
I rotated the Fine Line tool 90 degrees and stitched to the right . . . .  
. . . . stopping at the right edge of the left hand piece of tape in the photo below. 
Then I moved the tool and used two of the lines inscribed on the tool to measure the distance of the third line which was stitched away from myself. 
This is the end of that line . . . . .  
. . . . and now I stitch left 1/3 of the way across the open space.  I have moved the tool out of the way in this picture so you can see where I'm going.  The interesting thing I noticed after stitching several of the motifs is that I have the visual ability to judge 1/3 of that distance pretty accurately.
Now I shifted the tool into a vertical position and stitch towards myself 1/2 of the distance to the opposite line -- again, I have the visual ability to "eyeball" that distance without actually measuring it!
Rotate again and stitch left stopping at the halfway point. 
Now stitch away from myself (slightly different camera angle). 
 I missed one picture here, but the route is to stitch to the right until I reached the right side limit of the previous motif.
To get to the next motif, I again used the tape marks to maintain a consistent distance down the right side of the border. 
Here's the stop point for that line.  Rotate the tool to the horizontal and stitch left until I arrive back at the left side of the design.  
Here I am back at the beginning of a motif -- repeat, repeat, repeat.
The key was to set up the pattern on graph paper and draw through it to find the easiest sequence.  Using the tape to set up the repeatable distances eliminated most of the marking so the stitching went smoothly and it only took two work sessions to complete the borders.

Realizing that I'm able to visually judge 1/3 or 1/2 of any space saved time and energy because I didn't need to draw out each line of the design.  I'm sure if you took a ruler to my motifs, there are some spacing irregularities within each key, but as long as the lines are straight and the outer edges consistent, the brain sees my complete design as being just fine.  
Then there is the organic appeal of the slight and largely unnoticeable imperfections.
Ready to bind (finally)!!
Of course, there was none of that beautiful blue batik left for a binding and "matching" blues is always a challenge so to maintain momentum on this 13 year old project, I went with a yellow binding!!  Machine stitched on both sides.
Here's the finished quilt ready to be washed and brighten up my living room as spring begins! 
This finish puts me under the 90 UFO's mark for certain and there are three more ancient UFO's in the mill -- two are layered for machine quilting and a third just moved from "still appliqueing" to "ready to make a backing"!!  
Progress is good!!

While today is the first official day of spring, judging from the ice we found along the shore line of Lake Erie on today's birding adventure, we aren't done with winter.
Still time to stitch, stitch, stitch before the garden begins to lure me outside!
Enjoy the changing seasons!!
Mary


Friday, May 20, 2016

It's Finished!!

At long last!!
It's a finished quilt.
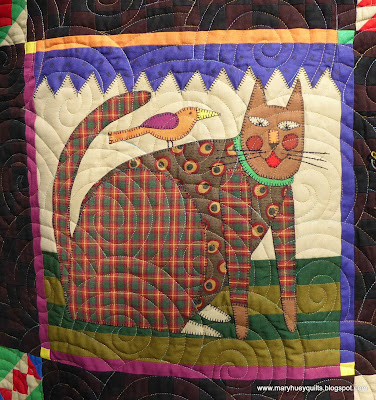
It's called Folk Art Cats and the pattern is still available from The Stitchin' Post in Sisters, Oregon.  It was originally a block of the month with fabric kits so none of the choices are mine. 
Once I had accumulated all the kits, I had the gals in my Friendship Quilt group prepare the blocks -- they pieced the backgrounds and fused the appliques when it was my turn to provide the "work of the month".
Then I began the (arduous and lengthy) task of completing the (miles and miles) of machine pin stitching to secure the edges.  It's not a task I enjoy so it literally took years.
Finally, I had to face the sashing assembly.  It's difficult to see in the pictures, but the sashes are all black and dark rust pieced checkerboards of 1" finished squares not to mention the twenty different 3" blocks for the cornerstones.  I ran out of the dark rust, so substituted a lighter rust.
  Ahhhhhhhhhh!!
The cats have quite a bit of personality which is true of real cats as those of you who have owned more than one cat  know.   (The safety pin is to remind me to go back and tie off that thread end!)
I started quilting this in two halves and then realized that it would be a challenge to merge the quilting across the center join area.  So I stalled for two weeks trying to decide how to continue.  In the end, I added the second half of the top and then the backing and layered it up as one large piece.  It made it a bit more challenging to maneuver at my machine but solved the finishing dilemma.
The backing fabrics have been stuck in my stash for quite some time so it was fun to use them up!!
Once the backing and the top were stitched together, I layered in the second piece of black Dream Poly batting.  I like the black batting on dark quilts because it keeps the colors looking richer.  Trimming the edge straight makes butting the two pieces together easier.
This herringbone or catch stitch does a good job of holding the edges together (but it's a pain in the neck to do).
Now the only thing keeping me from finishing the job was this . . . . Gordon loves the chair at my APQS George quilting machine and he's so old that I let him be.
I've had cats almost continuously since I was four years old -- on those few occasions when I've been without one, I've been on the lookout for another one!!  The swirling Baptist fan-like motifs worked out very well.  Now I'm wondering what took so long to start the quilting.  And it was easy to do.  It's very "organic" with inconsistent spacing between the lines and different size swirls but I'll be repeating this quilting strategy on future quilts for sure.
My current feline sidekick, Willie is seen here "holding up" the back corner of the quilt.
The quilt goes to my oldest daughter (Gordon's person and my housemate).
This weekend, I'll finish the binding and layer up another piece.  It would be good to ride the current quilting momentum and achieve a second finish for this quarter's 2016 Finish-A-Long goals!!

7/2/2016 -- linking up with the Second Quarter LINKY HERE!

Enjoy the weekend!!
Mary Huey

** Some of my posts contain affiliate links and if you make a purchase via one of those links, I may get a small commission.  I only suggest products that I use and recommend based on my own experience.  Thank you for supporting my blog!


Friday, May 29, 2015

An Almost Finished Quilt

With the end of May starring me in the face and several still unfinished pieces on my second quarter list for the 2015 Finish-Along with Adrianne over at On the Windy Side, I've been focusing on quilting for the past week.  The goal has been to spend at least an hour every day hand quilting this masterpiece (hopefully, I'll be sharing it's finish by the end of June) and another hour machine quilting (there are four pieces in that queue?!). 
I'm happy to report that good progress is being made on both fronts . . . . well, it was good until last evening.  There I was moving smoothly through quilting the borders on my dotty sampler from Alison's QCQAL over at Little Bunny Quilts -- on the cusp of a finish!! 
 
WHAM!!  George stopped dead in his tracks.   The needle broke. 
 
I disassembled carefully looking for all the pieces of the needle (grateful for my days as a Bernina mechanic) and found the tip lodged in a very bad place.  Out of my depth!! 
So after I'm done writing today's post, I'll be talking to a technician at APQS. 
Grrrr.
 
But I can still share with you what I planned for today.  I spread out the almost finished quilt on the lawn for some close-ups of my machine quilting experiments.  Warning -- there are threads exposed in the following pictures and if you find that offensive, I apologize.  Just needed to calm down and divert myself from the panic I was feeling. 
Continuous curve quilting is my happy place -- I've been using that "design" for years.
Sometimes I experiment with "line dancing" -- sometimes it works for me (visually) but most of the time I'm not crazy about the results.  This one is okay (apparently I didn't photograph the two blocks that didn't make me happy).
 At some point, since I wasn't totally satisfied with the results of my design efforts, I decided to experiment with some of the straight line ideas I find reading blogs and looking at Instagram.
I'm liking the results and with my straight ruler and the new ruler foot, it goes smoothly.  I need lots more practice on the balance of the spacing but that will come!
I like the results but I haven't completely figured out how to travel through the transitions and it feels like more starts and stops than I enjoy.   So I started to combine the continuous curve idea and the straight lines to help with that.  This block had one start point and one stop point!!  Yea!!  It also helps blend my experimenting in with the first four blocks I quilted. 
 I love "drawing" these crazy stars -- a little oops there, better the next time! 
This quilt is designated for donation and I use these quilts to accumulate machine quilting experience and to experiment with designs and ideas.  I prefer to quilt (rather than tie) these quilts so they are more durable (most of mine go to hard working underemployed or disabled people in Appalachia and my goal is that they will bring a useful element of beauty into their homes).  
And the quilt isn't as wobbly as it appears in this photo -- remember it's laying on the lawn.
 
Photographing and organizing my thoughts calmed me down.  I spent the rest of the evening burying the thread tails and I'll finish the border quilting today on my Bernina.  If I stay on task, the quilt will be finished this weekend and I'll share some pics early next week.
 
 I'll call APQS later this morning and get George fixed -- hopefully it will be painless for both of us!!
 
I hope you get to score a finish this weekend!!
 
Mary Huey