Monday, January 29, 2018

Opal Essence Finish!!

While it's not my first finish of 2018, Opal Essence (pattern from Lorena Uriarte) is January's "one monthly goal" finish!
The deadline of getting it ready to exhibit in the "workshop" section for the upcoming regional quilt show keep me moving on this one.  Saturday it was time to ponder the binding -- my first inclination was black, but when this hank of binding left over from a project last fall caught my eye, that changed!  (As you can see, I neither press my binding in half or roll it up tidy before working with it.)
And there was almost exactly enough!?!
Several years ago, during one my stash busting marathons, I realized that some of my projects stall because I can't find the perfect fabric or more of "that" fabric.  So the rule became, you have one week to find what you think you want to use and then you have to settle for the best available alternative.  Interestingly, as time goes by, that process gets faster and faster for me.
The almost perfect stripe was in place almost before I could hesitate.
Now it's perfect!!
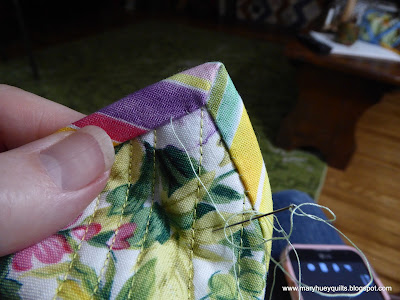
Here's a tip for simplifying the mitering process when hand stitching the back side of your binding in place.  Stitch all the way to the edge of the quilt.
Now when you fold the adjacent edge into place, everything is snug underneath and a perfect miter is almost guaranteed!!
Look at that!! 
I wrote a post a couple years ago on how I handle the corners while doing the first round of stitching the binding by machine -- click HERE to check that out!
With the binding finished, I used a permanent fabric pen to write out a "label" onto the backing -- adding on labels is lovely but I skip them pretty regularly so this is a simple and good alternative.
And how about that backing fabric??
From my hoard, couldn't cut it up for anything, don't want it to be in the "big yard sale".
Perfect backing!!
Most of the quilting is done by machine but I used some silk pearle cotton weight thread my mother brought me from Europe years ago to stitch circles inside the circles! 
Our world is pretty brown right now -- waiting for snow but by then the light would be gone outdoors so here it is in my brown backyard.   Tomorrow it's off to hang at the show for a couple weeks and recruit students. 
In the meantime, I've started organizing some demonstration samples in other colors palettes to expand my students' perception of the design.  This cluster of blues and aquas is a mixture of modern prints and reproductions -- working with what I have for the sake of my students!!
Looks fine!
Lots of yellow arcs for the circles. 
And I'm refreshing my applique skill set by using freezer paper with this group.
Linking up over at Elm Street Quilts One Monthly Goal HERE!!
Need Lorena's pattern -- click HERE to get to her shop -- it's a downloadable PDF so you can be working on your version tonight!!

Next!!
Mary


Saturday, January 27, 2018

Project Quilting -- Season 9, Triangulations

The challenge theme for Project Quilting this week has been "Triangulations".
Since I already had an important deadline, I decided to take a pass on this one but apparently I forgot to tell my subconscious.
On Thursday it reminded me that there are quite a few triangle sets (HST's to some of you) in the basket of 2 1/2" scrappy squares.
They are allowed to live there because they are 2 1/2" so they are compatible with the squares.
Okay, we'll just have a look and see how many there really are.
Hmm, when stacked up with all the light green squares, there are quite a few? 
If we are going to do this, it has to be small -- perhaps a tablerunner for the linen chest? 
These triangle sets are left over from a full size quilt I pieced in 2006 or 7?
To stimulate discussion, I laid them out arranging the lights and mediums to make diagonal bands -- I find that moving fabric or pieces around is a much quicker way to find solutions than just staring at the pieces.
IDEA!! Since it's such a soft, subtle pattern it would make a nice background for some applique.
(Little voice in my head -- and when will you have time for that?  The deadline?)
And then I remembered this little piece of applique in a stack of rather old UFO's that I can't bear to let go.  It was the beginning of a sample for my shop and my mother did the applique for me.
What if I inserted it into the piecing?
So began the experimenting with it's position.  I miscalculated the finished size of the triangle sets once they were joined and realized to insert it, I would have to trim off some of the applique.
Not happening!!
So I moved it to the end and shifted the triangle sets around some more until I was satisfied with the arrangement. 
The quilting was an evening's work since I kept it simple! 
At one point when I hung it on my work wall, I realized it also would make a lovely wallhanging.
So I inserted "hanging" triangles on all four corners just in case it is used that way in the future. 
Now it's on the linen chest in the living room.
It's measures 10" by 29". 
It's perfect!
Love having this piece my Mom stitched on display and another ancient UFO crossed off the list!
And even though I was pro-quiltinating by answering this challenge, I still made my deadline!!

Thanks for the challenge Project Quilting!!
Check out all the other challenge-makes HERE.
You can vote for your favorites, too!

Mary


Thursday, January 25, 2018

An Easier Way!

I hope I'm not the first person who has figured out an easier way to close-up something like a pincushion after it's stuffed!  Read on and let me know!

I found these little strip pieced bands left over from a project last spring while tidying up the studio earlier this month.  I like to make a little gift for all the members of my quilting gang and this year I settled on pincushions.  
Can you ever have too many pincushions?
I found fabrics to enlarge each of the strip pieced bands into squares plus fabrics for the backings.
Once the squares for the top side were finished, I cut a square of muslin to underline them and did a little quilting. 
 For the back sides, I cut rectangles of the backing fabric and muslin -- the length of the rectangles matches the size of the square and the width is 3/4" more than half the size of the square.
Here are all the pieces I used.
After layering the four backing rectangles (muslin, backing fabric right side up, backing fabric right side down, muslin), I marked an opening about 2" long in the center as below.
I stitched the layered backing pieces together -- notice that I backstitched just before the mark, then lengthened the stitch through the center and when I reached the second mark, I shortened the stitch again, backstitched and continued to the end.
Before pressing the seam, I snipped the last stitches of the basting by each mark. 
Press the seam of the backing to one side -- I tried pressing it open, but decided after the first pincushion, it was better to press to one side.
I layered the back and the front right sides together and stitched all the way around.
I trimmed away the excess seam fabric -- rounding the corners a little bit helps prevent those wierd pointy corners. 
Now I pulled out the basting stitches in the backing seam. 
There's the hole for turning the pincushion right side out.  This is the first one I did, so the seam is pressed open, but it was harder to get the seam closed up after the stuffing. 
I made a little paper funnel and used a bit of lavendar mixed with ground walnut shells.
Once the pincushion was stuffed as full as I could get it, it was easy to stitch the opening closed by hand. 
A ladder stitch worked well for me though I kept the stitches very small so there weren't any gaps for the shell pieces to sneak through. 
And here is the first one!!  Ready to gift!!
This way makes the closing stitching so much easier than trying to stitch a gap in a side seam.  Plus the pincushion lays flat while you are working on it!!
I'm not sure if I included this little stack of bands in my UFO count, but it's good to have them usefully re-purposed and off the cutting table!!

So what do you think?
Easier?
I hope so!
Just one week and we'll be at the midpoint of winter!

Mary


Monday, January 22, 2018

Retreat Stitching

Greetings from balmy Northeast Ohio!
We are having a bit of thaw, snow has melted, birds are singing, people are out walking -- but the snow and cold will be back in a day or two.
I'm unpacking from my retreat this past weekend in Ohio's Amish country.
It's a lovely scenic rural area though you do have to get off the main roads to enjoy scenery like this!
I don't know what your house is like, but in my house all flat surfaces are "pile magnets" so the prospect of a table with nothing on it all to myself for 3 days determined my work schedule for the retreat.  My main goal would be to begin creating the four large central motifs for my version of Marge Sampson-George's Dodecagon quilt.

I have been studying my layout "sketch" (draw in Electric Quilt) for the past month and auditioning for the best focal print. Part of the trick of making any quilt is deciding on the best assembly strategy!
I've accumulated dozens of 1" basted hexagons in yellows, greens, and rosy pinks. 
The time to start assembling has arrived!
I cut four of the large motifs and gave them a pressing with Best Press.
Each motif will be appliqued in place centered inside a diamond shaped wreath of 1" hexagons.
In order to do the applique easily, I need to remove the papers from the back side of the black hexagons, but I also need the edges of the hexagons to be stable.
Therefore I decided to border the black hexagons with the next row on all four sides.
That meant making four strips of hexagons that matched the layout sketch -- this creates sashing elements between the dodecagon motifs.
My friend, Karen, over at Faeries & Fibres taught me to make these bands of hexagons and then set them together rather than adding single hexagons to a unit one at a time.
So here are the eight bands I need to assemble the outer edges of these units.
Now I can continue from one joining seam to the next with a single thread and it's less awkward to hold.
I'm hope those of you who do English paper piecing have adopted the habit of using the little clips to hold pieces in place -- it minimizes the stress on my hands!

Here are the eight bands sewn into four pairs with the black filler hexagons in position.  I added these before setting the four pairs of bands into the final "wreath". 
Now I've added the filler hexagons and joined together the the pairs of bands at the ends.
Once the final seams of the bands are joined, I removed the papers from the back side of all the black hexagons.  Since my basting doesn't go through the papers, the seams all stay in place without pressing.
Next step is to center the diamond shaped wreath of hexagons over the large floral motif.  I baste it in place while keeping it flat on the table.  Then it's ready to be appliqued. 
Here it is sitting next to the second hexagon wreath in process.
Once all four of the floral motifs are in place, I'll be ready to set them together with the dodecagons which are surrounded by black hexagons.  I'm anxious to get to this point but must be patient and wait until all four motifs are in place!
(Those white blobs at the top of the pieces are my position notes.)
I was pleasantly surprised at how relaxed I was about just hand stitching for the three days of the retreat!!  I also cut out two shirts and two apron panels -- once they are cut out, the sewing is much more likely to happen -- and finished a small applique motifs on an ancient UFO.

How about this farewell sunset from Saturday evening.  I was watching out across these fields for a short-eared owl (who never showed).  I live in an old neighborhood and we don't get views of the horizon like this!!
So it's back to the "urgent" deadlines for this week.
I'm looking forward to my next retreat at the beginning of March and thinking seriously about designating it as another "hand stitching" event for myself!

Mary