Showing posts with label workshop sample. Show all posts

Tuesday, January 30, 2018

Opal Essence Finish!!

While it's not my first finish of 2018, Opal Essence (pattern from Lorena Uriarte) is January's "one monthly goal" finish!
The deadline of getting it ready to exhibit in the "workshop" section for the upcoming regional quilt show keep me moving on this one.  Saturday it was time to ponder the binding -- my first inclination was black, but when this hank of binding left over from a project last fall caught my eye, that changed!  (As you can see, I neither press my binding in half or roll it up tidy before working with it.)
And there was almost exactly enough!?!
Several years ago, during one my stash busting marathons, I realized that some of my projects stall because I can't find the perfect fabric or more of "that" fabric.  So the rule became, you have one week to find what you think you want to use and then you have to settle for the best available alternative.  Interestingly, as time goes by, that process gets faster and faster for me.
The almost perfect stripe was in place almost before I could hesitate.
Now it's perfect!!
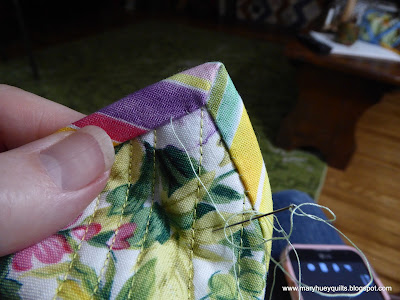
Here's a tip for simplifying the mitering process when hand stitching the back side of your binding in place.  Stitch all the way to the edge of the quilt.
Now when you fold the adjacent edge into place, everything is snug underneath and a perfect miter is almost guaranteed!!
Look at that!! 
I wrote a post a couple years ago on how I handle the corners while doing the first round of stitching the binding by machine -- click HERE to check that out!
With the binding finished, I used a permanent fabric pen to write out a "label" onto the backing -- adding on labels is lovely but I skip them pretty regularly so this is a simple and good alternative.
And how about that backing fabric??
From my hoard, couldn't cut it up for anything, don't want it to be in the "big yard sale".
Perfect backing!!
Most of the quilting is done by machine but I used some silk pearle cotton weight thread my mother brought me from Europe years ago to stitch circles inside the circles! 
Our world is pretty brown right now -- waiting for snow but by then the light would be gone outdoors so here it is in my brown backyard.   Tomorrow it's off to hang at the show for a couple weeks and recruit students. 
In the meantime, I've started organizing some demonstration samples in other colors palettes to expand my students' perception of the design.  This cluster of blues and aquas is a mixture of modern prints and reproductions -- working with what I have for the sake of my students!!
Looks fine!
Lots of yellow arcs for the circles. 
And I'm refreshing my applique skill set by using freezer paper with this group.
Linking up over at Elm Street Quilts One Monthly Goal HERE!!
Need Lorena's pattern -- click HERE to get to her shop -- it's a downloadable PDF so you can be working on your version tonight!!

Next!!
Mary


Tuesday, June 14, 2016

Hexie Pillow Finish!

Do you wander around Instagram? 
I do because it is loaded with inspiration. 
Last week while making that cute Jelly Clip purse for an upcoming workshop sample, an idea drifted into my head for another EPP project sample using a slightly larger hexagon (1 1/4").

My head is currently swimming with dozens of images from Australian quiltmakers whose fabric style I've dubbed "Aussie Bohemian" -- it's fresh and exciting to me.  One thing I've learned in the past 40 years of quilt making is learning to work in a new fabric style takes practice so I'm experimenting with fabric I already own in hopes that I'll absorb some of the essence of this style's spontaneity and whimsy.  Once I accomplish that, my fabric shopping will shift to build up more flexibility.  I learn more via that "trial and error" route than I do buying kits with all the "right" fabrics.

A stack of Kaffe Fassett charms provided a quick starting point and I spent an afternoon cutting and basting my hexagons.  I did all my calculation for 1" hexagons and . . . . . 
then used 1 1/4" papers.
That's what happens when I get too excited. 
So too many hexies, but in the end it was fine as I had more flexibility in my design.   
I pulled out most of the cool color pieces -- another project?
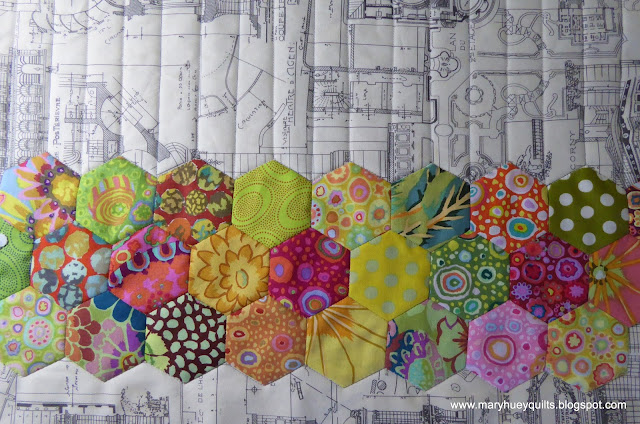
My goals were not to exert too much control over the fabric arrangement (there is that mostly yellow hexie flower near the middle) and to use an edgy (for me) background fabric. 
It was fun to realize how many background options I owned!
In the end, I settled on this soft graphic print.
Once the band of hexies was appliqued in place, I spent a hot and happy afternoon with this box of silk embroidery threads my mother brought to me many years ago quilting the hexies.
Some of the thread choices contrast with the fabric and some blend into them.
I planned to machine quilt the background with simple straight lines and in preparing to do that realized that my band has gone slightly askew during the applique process. 
 It wasn't perfectly aligned with the "grain of the print". 
 Arrrgh?!? 
So doing straight lines on both sides wasn't going to work because the background fabric "insisted" on straight aligned stitching!!
It took a few hours but I finally realized that using zigzag lines to echo the opposite edge of the band would camouflaged it perfectly.  Once again, a mistake leads to a creative solution and a discovery!!
The finished product is a neck roll pillow and by extreme good luck, I was able to create a band that would connect continuously around the pillow. 
This isn't really a tutorial, more of a recounting of what I did -- it took a couple days to think through things and come up with a way to achieve it.  There was quite a bit of measuring and testing as I proceeded.

The fuchsia/orange and the upper half of the green hexagons are not appliqued in place yet.  After quilting, I trimmed the background, batting, and backing to allow a 1/2" seam allowance as seen here.  More seam than usual just in case it's needed!
The top edge (in this picture) of the center green hexagon will join to the other end of the band right on top of the seam needed to create the tube for the pillow, so I stair-stepped the hexagons at both ends because I "felt" it would be easier to merge them after the background was seamed.
I also trimmed the batting out of the seam and used fusible batting tape to attach it to the backing fabric so the seam would be less bulky.  This is a great idea from Marti Michell who sells the tape in 1" and 2" widths.  I explained how I use it in THIS TUTORIAL.
I was nervous about stitching that seam in the backing so I machine basted it first.  All my fussing paid off, the hexies aligned perfectly!  Now to applique everything in place and hand quilt the remaining hexies at the joining seam.
I lifted my sewing machine up to access the free arm easily and machine quilted around the tube with  lines echoing the edge of the hexie band.
Right side.
Wrong side.
I used my tutorial from last spring on making a neck roll pillow -- boy, am I glad that I wrote that out, it came in handy!!  It's HERE.  And what fun to find a twill tape tie from a fabric bundle in my ribbon stash -- the colors and the twill tape are perfect!
It's hard to send it off to the shop, but it will only be gone for six weeks.
And those left over hexies won't go to waste!  How about this?
Or maybe this? 
So what is the next thing I'm going to do? 
Why order a fat eighth assortment of new Kaffe Fassett fabrics that SHABBY QUILTS brought to my attention in an e-mail this morning!!

And then I better layer up a quilt and quit procrastinating all the FMQ staring me in the face!

Have a good week!

Mary Huey

P.S.  The Orlando Modern Quilt Guild has put out a call for help making heart blocks and quilts to cover survivors and victims' families of the massacre on Sunday.  If you are so inclined, follow this link to the blogpost with information and a link to a simple pieced block.


I documented how I finished this style of pillow last spring while making gifts for my grandchildren -- click HERE to revisit it!