While it's not my first finish of 2018, Opal Essence (pattern from Lorena Uriarte) is January's "one monthly goal" finish!
The deadline of getting it ready to exhibit in the "workshop" section for the upcoming regional quilt show keep me moving on this one. Saturday it was time to ponder the binding -- my first inclination was black, but when this hank of binding left over from a project last fall caught my eye, that changed! (As you can see, I neither press my binding in half or roll it up tidy before working with it.)
And there was almost exactly enough!?!
Several years ago, during one my stash busting marathons, I realized that some of my projects stall because I can't find the perfect fabric or more of "that" fabric. So the rule became, you have one week to find what you think you want to use and then you have to settle for the best available alternative. Interestingly, as time goes by, that process gets faster and faster for me.
The almost perfect stripe was in place almost before I could hesitate.
Now it's perfect!!
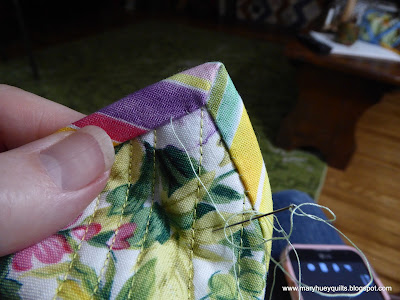
Here's a tip for simplifying the mitering process when hand stitching the back side of your binding in place. Stitch all the way to the edge of the quilt.
Now when you fold the adjacent edge into place, everything is snug underneath and a perfect miter is almost guaranteed!!
Look at that!!
I wrote a post a couple years ago on how I handle the corners while doing the first round of stitching the binding by machine -- click HERE to check that out!
With the binding finished, I used a permanent fabric pen to write out a "label" onto the backing -- adding on labels is lovely but I skip them pretty regularly so this is a simple and good alternative.
And how about that backing fabric??
From my hoard, couldn't cut it up for anything, don't want it to be in the "big yard sale".
Perfect backing!!
Most of the quilting is done by machine but I used some silk pearle cotton weight thread my mother brought me from Europe years ago to stitch circles inside the circles!
Our world is pretty brown right now -- waiting for snow but by then the light would be gone outdoors so here it is in my brown backyard. Tomorrow it's off to hang at the show for a couple weeks and recruit students.
In the meantime, I've started organizing some demonstration samples in other colors palettes to expand my students' perception of the design. This cluster of blues and aquas is a mixture of modern prints and reproductions -- working with what I have for the sake of my students!!
Looks fine!
Lots of yellow arcs for the circles.
And I'm refreshing my applique skill set by using freezer paper with this group.
Linking up over at Elm Street Quilts One Monthly Goal HERE!!
Need Lorena's pattern -- click HERE to get to her shop -- it's a downloadable PDF so you can be working on your version tonight!!
Next!!
Mary


I do love striped bindings. Yours is very pretty. Thanks for the tip about hand sewing the miters.
ReplyDeleteOh, it looks good from here! I'm not the biggest fan of tumbling blocks by themselves, but this element adds another dimension altogether. I love the modern take you've done.
ReplyDeletePerfect binding on that wonderful quilt. Love process posts. I learn so much.
ReplyDeleteGreat binding for that quilt. I like the idea of using what you have on hand. Generally, I can find a decent binding but not always. Plus, the idea of giving it a week and then make a decision sounds so reasonable.
ReplyDeleteThat tip about stitching all the way to the edge with the binding makes so much sense! Why did I not think of that before! :)
ReplyDeleteAnd I love the idea of give it a week and then move forward with the best available alternative. It keeps things moving and sometimes you fall more in love with the alternative than you would have with the "perfect" fabric.
Beautiful quilt, and the binding is just perfect!
ReplyDeleteGreat looking quilt and helpful binding tip. Thanks for linking up with Elm Street Quilts One Monthly Goal and congrats on your finish.
ReplyDeleteOhhhh what a great binding tip! Will definitely try that out on my next quilt.
ReplyDelete