Showing posts with label hexies. Show all posts

Thursday, February 20, 2020

My Dodecagon Quilt Top!!

 While I gave myself the "one monthly goal" challenge to use the entire month of February to get the five large sections of my dodecagon quilt together, once it started to happen I was anxious to see the finished top because it is so beautiful!!
(My pictures are a bit dark -- blaming cold cloudy Ohio winter days -- but you get the idea.)
I calculated that I needed to stitch twelve 1" seams every day to be finished!

First the upper right corner. 
Then the lower right corner!
And the lower left corner!
On Monday evening, I pushed to finish the upper left corner so I could take it for "show and tell" at the EPP group I attend at my local quilt shop, The Quilted Thimble in Chesterland, Ohio.
Three of the "tall" gals held it up for me and while it isn't a perfect picture, you get the idea.
The top is 70" wide and will be 97" long when I add a rows of these 80 modified hexies to the top and bottom to square up those edges.  They are all basted and I'm currently stitching them into two long bands to join the quilt top.
I made these pieces by printing out several sheets of 1" hexagons onto light cardstock.
I use this website to create a PDF which I can print out - click HERE
Then I cut them apart, a single sheet at a time as you see below -- the pieces with an "X" are sloppy cuts and needed to be discarded in the interest of accuracy. 
I made twenty-one dodecagon blocks using templates and papers from Marge Sampson-George (now available world wide through Broderie on Etsy).

The layout I used is my own design - a combination of several ideas I've seen for mosaic quilts over the years.  Marge's pattern uses 42 dodecagons and sets them together with a single band of hexagons. 

 I have counted and counted and counted -- my numbers might be off a couple but I cut and basted and stitched -- 348 pink hexagons, 216 yellow hexagons, 564 black hexagons, 954 green hexagons, plus 80 modified green hexagons for the upper and lower edges and 64 half hexagons for the sides for a total of 2226 (give or take a couple) hexagons. Most of the prints are reproductions or pieces that blend well with them -- all of them from my deep, deep stash.  Even the beautiful floral fussy cut motifs in the center was a piece I hoarded back in my shop keeping days!

The color scheme evolved as I played in my stash making the dodecagons -- from the beginning I wanted to use reproduction prints but I could not have told you what the color scheme was going to be at that point.

I've pulled some big hunks of fabric for backing auditions and I don't know how I will quilt this other than to say I intend to do it by hand.  Hopefully, I'll be quilting it soon - but I have a sweater to finish knitting and the applique of my #sharkdinnerbom tiles to finish before I dedicate my hand stitching time to quilting this!

In conclusion, I have to say "I can't believe this is all together".  It's taken about 3 years and a rough estimate of around 500 hours of stitching time.  It's a huge achievement and reinforces my belief that making steady use of 30 minutes here and there eventually produces the results!

If you'd like to revisit some of my past posts about the construction of this quilt top, just type "dodecagon" into the search box and a list will pop up for your reading pleasure!

So exciting!!
Enjoy the weekend!

Wednesday, September 13, 2017

Hexie Mania

In my Instagram world, English Paper Piecing and hexies are really hot right now. 
There are so many interesting new designs coming out and I know of at least four sew alongs that are centered on EPP and/or hexies. 
I certainly enjoy the process!  I'm a hand baster and find that stage of it quite soothing.  

However, I need to remain practical and not cave into any of the sew alongs right now.  I have two large unfinished hexie/EPP quilts in progress and starting another project would only take time away from each of them.  So I've held back and held back and held back.  

But when I saw the #100days100hexies2017 hashtag pop up in my Instagram feed, I decided to use the daily posts and prompts to motivate myself to produce the 1700 or so hexies I'm going to need to complete the setting I've organized for my Dodecagon blocks.
This is my working diagram (generated in Electric Quilt) and the tally sheet for how many hexies I need and how many I have finished basting.
I had a good start on the scrappy black ones, but still needed 236 -- that took 20 days.
Now I'm working on the yellow ones.
I'm going through hexie papers like they are M&M's!?!
So I was glad to come across this package of light weight cardstock in my office.
Not sure what weight it is, but it's light enough to work well.
Everyday, I punch another 20 papers from a sheet.
And I cut a stack of hexies -- 12 to 16 so they are ready for basting when the opportunity presents!
This weekend, I was able to finish 27 while serving as welcome hostess during a local event.
Don't you love hand stitching out in public?
It's such a great conversation starter -- everyone in curious and wants to know what I'm doing!
The rows of yellow hexies are growing.
(Apparently my blacks have a lot of blue in them since they always photograph navy?)
I'll tackle the green ones next.
And then the pink ones.
If I have stitching time once the day's hexies are basted (trying to do at least 10 a day),
I've started to add the black ones to the dodecagons -- I make two "chains" of hexies.
Once those are complete, I add them to the dodecagon.
Removing the dodecagon papers as I go makes it easier to manipulate the edges and keep them aligned. 
I'm pleased with the progress I'm making though I don't expect I'll get all the needed hexies basted by the end of the 100 days.  Most of the participants are doing a single hexie every day and using a lot of cute prints so it's fun to browse the hashtag once a day and see what's new!

If you are on Instagram, you can check it out by visiting @sewfoxymama or the hashtag #100hexies100days2017.

Mary


Tuesday, November 15, 2016

Kaffe Hexie Pillow Finish

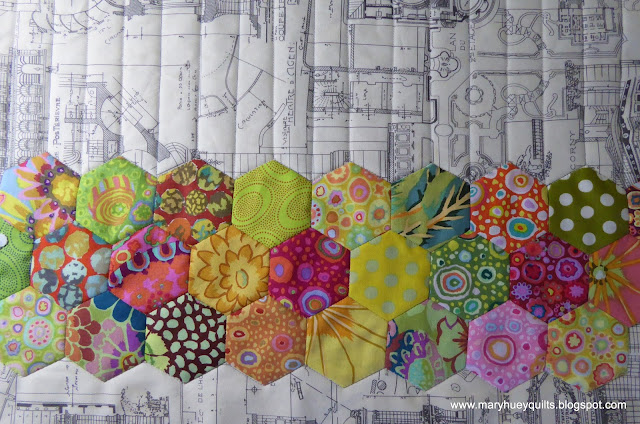
In the spring, I created this neck roll pillow as a teaching sample for an introductory EPP workshop using a random assortment of Kaffe prints on an architectural background print.
There were leftover hexies, all basted and ready to play so when I began to redecorate my living room this summer, I decided to finish them into another neck roll pillow.
 That pillow shape is very comfortable for resting my left arm when I'm stitching on the couch plus it looks nice!
I took the hexies along on a late summer trip and pieced them into this motif.
I decided the motif I created would not fit on a neckroll pillow form but that was okay because I found a 14" by 28" rectangle form which I liked!
That meant the quilted cover was not large enough or the right shape but I have lots of fabric.
A couple days of "intuitive" auditioning and I was ready to finish the pillow cover!
I added fabric (and batting and backing) to both sides, then more to the top and bottom to make a quilted piece large enough to cover the pillow.
While this isn't a route I would encourage for making a pillow cover, I wanted to share how I enlarged this piece after it was quilted.  My process is an adaptation of techniques gleaned from Marti Michell's book, Machine Quilting in Sections.

I began by adding more backing fabric -- in this photo, I've pushed the top layer and batting to the left to stitch it in place.  I pressed the backing away from the finished section pressing the seam towards the new piece of backing.
In this photo, I'm adding batting. I've trimmed the edges of batting straight with a rotary cutter and butted them together.  This "butted seam" is to the right of the backing seam about 1/2" to minimize bulk and I used my walking foot with a wide, long zigzag to stitch the batting edges together.  The stitching goes through the backing fabric which wouldn't work on a quilt but is fine for a pillow.  If I were doing this on a quilt, I would use a fusible batting tape to join the seam.
Finally I added the "border" fabric to the sandwich to expand the size of the top.  Notice that this seam is to the left of the batting seam.  I've learned through trial and error that having the three seams -- backing, batting, and top -- staggered rather than piled on top of each other makes a better finish.
I quilted the side border sections.
And repeated the process to add top and bottom borders. 
After these were quilted, I was ready to finish the pillow cover. 
At this point, my completed cover is 29" square. 
I used my serger to finish all four sides of the piece. 
Then I inserted a 22" zipper in the back seam just the way I learned to do it in a dress 50 years ago.  I stitched the quilted piece into a tube from end to end, switching to a basting stitch for the section where the zipper will fit and then back to a standard stitch length. 
At this point, I realized I was taking the awkward route -- stitching the zipper in place inside a tube was a bit of challenge. 
After the zipper was in place, I took out the basting stitches and pulled the zipper open before centering the zipper on the back side of the pillow cover and stitching the ends of the tube closed.
 
Happily, it worked!!  And now I have two new pillows for the couch!  There is third piece in this set that is still in progress -- check out my fourth quarter Finish Along list HERE.  It too won't be what it was intended to be and I'll share that with you next week!
I made another apple cake, too!  It will be donated to the refreshment table at a club meeting tomorrow evening.  I tried reducing the oil to 3/4 cup and used only 1 1/2 cups of sliced apples, but added 1/2 cup of fresh cranberries.  It's nice!!
If you missed the recipe last week, you can find it HERE.  If you copied the recipe last week, be advised that I left out "1 teaspoon of baking soda" -- it's corrected in the blog post but be sure to add it or you'll be irritated with me and my recipe!!

Tomorrow I'm committed to doing some "good deed" stitching -- very utilitarian and not at all interesting.  Vinyl covers to hold upholstery foam in place on some metal poles in my church's fellowship hall.  I hope it goes smoothly and doesn't take more than the day!!

I hope your week is off to a good start!!

Mary


Tuesday, June 14, 2016

Hexie Pillow Finish!

Do you wander around Instagram? 
I do because it is loaded with inspiration. 
Last week while making that cute Jelly Clip purse for an upcoming workshop sample, an idea drifted into my head for another EPP project sample using a slightly larger hexagon (1 1/4").

My head is currently swimming with dozens of images from Australian quiltmakers whose fabric style I've dubbed "Aussie Bohemian" -- it's fresh and exciting to me.  One thing I've learned in the past 40 years of quilt making is learning to work in a new fabric style takes practice so I'm experimenting with fabric I already own in hopes that I'll absorb some of the essence of this style's spontaneity and whimsy.  Once I accomplish that, my fabric shopping will shift to build up more flexibility.  I learn more via that "trial and error" route than I do buying kits with all the "right" fabrics.

A stack of Kaffe Fassett charms provided a quick starting point and I spent an afternoon cutting and basting my hexagons.  I did all my calculation for 1" hexagons and . . . . . 
then used 1 1/4" papers.
That's what happens when I get too excited. 
So too many hexies, but in the end it was fine as I had more flexibility in my design.   
I pulled out most of the cool color pieces -- another project?
My goals were not to exert too much control over the fabric arrangement (there is that mostly yellow hexie flower near the middle) and to use an edgy (for me) background fabric. 
It was fun to realize how many background options I owned!
In the end, I settled on this soft graphic print.
Once the band of hexies was appliqued in place, I spent a hot and happy afternoon with this box of silk embroidery threads my mother brought to me many years ago quilting the hexies.
Some of the thread choices contrast with the fabric and some blend into them.
I planned to machine quilt the background with simple straight lines and in preparing to do that realized that my band has gone slightly askew during the applique process. 
 It wasn't perfectly aligned with the "grain of the print". 
 Arrrgh?!? 
So doing straight lines on both sides wasn't going to work because the background fabric "insisted" on straight aligned stitching!!
It took a few hours but I finally realized that using zigzag lines to echo the opposite edge of the band would camouflaged it perfectly.  Once again, a mistake leads to a creative solution and a discovery!!
The finished product is a neck roll pillow and by extreme good luck, I was able to create a band that would connect continuously around the pillow. 
This isn't really a tutorial, more of a recounting of what I did -- it took a couple days to think through things and come up with a way to achieve it.  There was quite a bit of measuring and testing as I proceeded.

The fuchsia/orange and the upper half of the green hexagons are not appliqued in place yet.  After quilting, I trimmed the background, batting, and backing to allow a 1/2" seam allowance as seen here.  More seam than usual just in case it's needed!
The top edge (in this picture) of the center green hexagon will join to the other end of the band right on top of the seam needed to create the tube for the pillow, so I stair-stepped the hexagons at both ends because I "felt" it would be easier to merge them after the background was seamed.
I also trimmed the batting out of the seam and used fusible batting tape to attach it to the backing fabric so the seam would be less bulky.  This is a great idea from Marti Michell who sells the tape in 1" and 2" widths.  I explained how I use it in THIS TUTORIAL.
I was nervous about stitching that seam in the backing so I machine basted it first.  All my fussing paid off, the hexies aligned perfectly!  Now to applique everything in place and hand quilt the remaining hexies at the joining seam.
I lifted my sewing machine up to access the free arm easily and machine quilted around the tube with  lines echoing the edge of the hexie band.
Right side.
Wrong side.
I used my tutorial from last spring on making a neck roll pillow -- boy, am I glad that I wrote that out, it came in handy!!  It's HERE.  And what fun to find a twill tape tie from a fabric bundle in my ribbon stash -- the colors and the twill tape are perfect!
It's hard to send it off to the shop, but it will only be gone for six weeks.
And those left over hexies won't go to waste!  How about this?
Or maybe this? 
So what is the next thing I'm going to do? 
Why order a fat eighth assortment of new Kaffe Fassett fabrics that SHABBY QUILTS brought to my attention in an e-mail this morning!!

And then I better layer up a quilt and quit procrastinating all the FMQ staring me in the face!

Have a good week!

Mary Huey

P.S.  The Orlando Modern Quilt Guild has put out a call for help making heart blocks and quilts to cover survivors and victims' families of the massacre on Sunday.  If you are so inclined, follow this link to the blogpost with information and a link to a simple pieced block.


I documented how I finished this style of pillow last spring while making gifts for my grandchildren -- click HERE to revisit it!