Thursday, June 5, 2014

Trying out the new camera!!

My dependable little camera has decided to retire from active duty -- they say it's her sensors.  I'm heading out on a BIG birding trip and so a new sidekick was needed.  Two professional photographers recommended a Panasonic Lumix to me and my research agreed. 
 
So yesterday before the rain I took it on my morning walkabout around my garden and grabbed these shots. 
 
The marsh marigold at the end of my little pond has given way to the primula japonica.
This is one of my local permanent residents -- great zoomed shot of him. 
Love this fuchsia -- I hope the hummingbirds are enjoying it as well since I got it for them! 
Primula viiali -- destined for the edge of the pond -- aren't they unique. 
 The window box is filling in nicely and seems to match the weigeila bush in bloom. The white flower's name just slipped out of my mind, but they smell luscious right now!
 This iris must love this spot as it is twice as big as last year.  I hope some day the large pink rose behind it will bloom with the iris -- won't that be lovely?

 This little pot of creeping thyme has really expanded and the bloom this year is spectacular.

I still have lots of little buttons to figure out on the camera, but at least I have the basics -- wonder if I'll get some good birding pics?
 
Enjoy your day!
 
Mary Huey


Wednesday, June 4, 2014

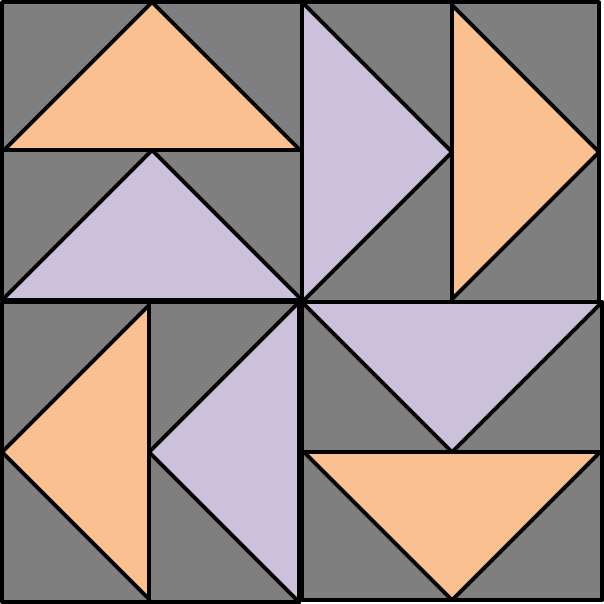
QCQAL Block #7 -- Versatile Templates!

 
It's time to "whip" out another block for Little Bunny Quilts QCQAL -- this is #7 -- Dutchman's Puzzle.  As I type that I find myself wondering "where did that name originate"?
Alison always links her post to an interesting assortment of fabric and color variations on Pinterest and I appreciate exploring those before I begin my own version.  With Alison's blessing, I've been sharing how to use Marti Michell's templates to cut the blocks for this QAL.  So far, Sets A and B have provided just the right templates.  Many quilters have invested in one of these sets to participate in a BOM at some time but never get them out again?!  I hope to change that by the end of this series!!
 
This QAL is focused on 12" blocks.  Dutchman's Puzzle is laid out on a 4 by 4 grid -- four equal increments on each side.  Divide 4 into 12" to determine that each "flying goose" unit needs to be 3" by 6" finished.  Set A is designed for making 3" finished units -- perfect!  But on pulling the templates out, we realize there is no template for the "goose" triangle.   Template A2 works for the background triangles . . . . but we can use it to cut a "goose" triangle as well!!   
Or we can use her Flying Geese Ruler to cut both triangles for the complete unit!  A6 is included in the photo because I will use that one to make the 6" block for my second group of blocks.
 
First I'll show you how to cut the "goose" triangle with a template -- I'm using A6 but the same technique applies to A2 or any one of Marti's triangles.  Begin by trimming the end of the strip as shown below.
Now rotate the triangle 90 degrees until the corner of it matches perfectly to the upper edge of the strip and snugs up against the first cut.  You can see that this is the right shape for the "goose". 
Cut on the diagonal edge and trim the lower corner -- you are done!  The engineered corner is the magic piece that allows you to cut this shape easily and correctly -- no need to do math beyond determining the template to use and the size of strip to cut. 
The Flying Geese Ruler is multi-sized giving you both triangles for five sizes -- 2 1/2" by 5" to 4 1/2" by 9" in half-inch increments.  Once again, one strip size is all you need thanks to the engineered corners.  The number to the left above each line is the strip size needed.  The black lines are used to align the tool for cutting the "goose" triangle.  Note that the blunted tip at the top sits on the edge of the strip and the line for the size sits on the opposite edge.
Once the "goose" is cut, move the tool to trim the lower corners of the triangle -- eliminates trimming later and minimizes the "sucking into needle holes" aspect of these points!
Switching to cutting the background triangles is simple -- the strip size is the same, but use the purple set of lines!  If you notice in the photo above, the little diagram of the "goose" is printed on the tool in black (use the black lines to cut) and the diagram of the background triangle is purple (use the purple lines)!
The photo below is a comparison of using the Flying Geese Ruler and A2 -- both give you the same results!
So here I am -- cut and ready to stitch my 12" block.  The instruction leaflet that comes with the Flying Geese Ruler is shown and if you get one, don't cut the little pink gizmo -- it's designed to be "undone" so you can re-attach the instructions to the tool for future reference -- great idea!  How many tools do you own that are permanently separated from the instructions?
Last week, my son measured the windows in my studio for replacement and moved my ironing board.  When I put it back, I was in a hurry and got it "backwards".  Still in a hurry when I started to press my pieces, I just used it "backwards".   I've rediscovered the big end of my ironing board and plan to leave it this way!!  I don't have space for a "big board" but this is almost as good!
So here are my finished blocks -- 12" and 6"!   Once again, I managed the layout by keeping the warms and cools opposite one another -- I like the balance of doing that! 
Each of these blocks has gone together so quickly and the sizes of them are very uniform thanks to Marti Michell's templates.  Have you given them a try?
 
Linking up with Lee who has a guest hostess this week over at Freshly Pieced for WIP Wednesday!!
 
Mary Huey


Monday, June 2, 2014

What I did in May!

Remember that overwhelming list of goals I set for May?  Well, it was successful in that it overwhelmed me!  But nothing ventured, nothing gained.  I still made good progress especially since I was away from my home studio for 11 days (2 guild lectures and 4 workshops)!

This is finished and ready to share with someone!  Once I finished the quilting, one of my charity quilting sidekicks did the binding.
 
I blogged here about how my group uses the Scrappy Bargello pattern for tops we piece with the help of the women living in a local skilled nursing unit.  It was a bit narrow for our goal size, so we added "borders" in between the panels to stretch it out a bit.  I like the effect!
 
And apparently so does Willie!?!
 
Machine quilting all our charity quilts has helped each of us grow better skills -- I tried out this new (for me) design on this quilt.  It broke up the straight line quilting nicely!
 
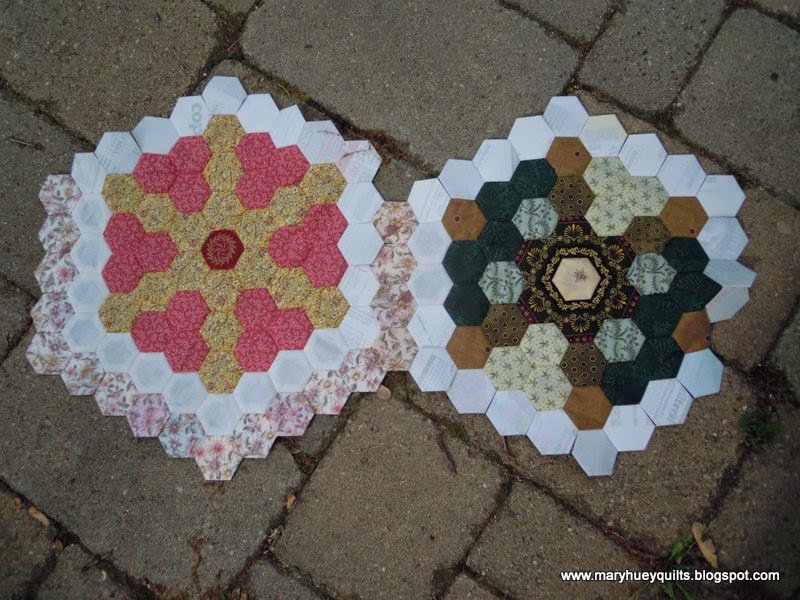
I also stayed caught up with the two QAL's I'm following!  The hexie one from Faeries and Fibres traveled with me and I'm also adding on as much of the "paths" as I can so when it's time to join the blocks together, I'll be a bit ahead of the game.  Block #2 is one the left and #3 is on the right.  I think I enjoy puttering with the fabric combinations and fussy cutting as much as the stitching!  #4 will leave town with me this month.

The sampler from Little Bunny Quilts continues to grow -- this is the set of 6" blocks I'm making parallel to the 12" ones which are the basis of Alison's instructions.  It's an evening's work and I'm having fun using a stash of polka dots!
The quilt that I'm hoping to take with me to my kid sister is still hanging on the back of the chair at the quilting machine -- can I quilt it in the next 5 days?  But I did get one of my teaching samples layered and 80% quilted -- only 3 borders left to go -- more about that finish in a couple days when it's finished!!
 
What to do in June?   Set goals or just slide along -- I'll only have access to my studio for 14 days this month?  Right now I need to transplant a couple iris before the rain that I hope is headed this way arrives.  Check back later for my June "goals" decisions!
 
Mary Huey


Friday, May 23, 2014

Diamond Star Playtime Sew-Along -- Step 7 -- Straight Setting

I've decided to set this group of three stars into a table runner and I think they look more interesting with the points touching rather than the flat sides touching.  There are large triangular voids and they could be filled in with a large triangle.  If one choses that route, the fabric needs to be an interesting one, possibly something that can be fussy cut.  The other option would be to use a very simple print or solid with the idea that the quilting would stand out more.
I have decided to use a group of four smaller triangles that will create a unit large enough to fill the space.  If you are working with Set G or Set H, it's the equilateral triangle that is half of the diamond template you used for the stars.
Since I'm working with a small assortment of prints, I've chosen four and each unit will be arranged identically.  It's easy sewing -- all straight seams.  The only mistake you can make is to sew the wrong two sides together because there are three choices, but only one right one.  So start carefully and be sure you chain piece correctly -- there is nothing more frustrating that an entire chain of "wrongs".
This is how they will be placed with the stars and I have separated them into three construction segments in order that all these seams will be straight -- no set-ins.
Before I stitch them together, lets look at a couple other arrangements that can be used for a quilt with several rows of stars.  In the one below, I've staggered the stars.  The "void" is the same and I can use the same large single triangles or units of four smaller ones.  If I used a larger fabric assortment, I'd make the units of four "scrappy".  I could also have experimented with rotating the orientation of the darkest point so it was the farthest from the center star to achieve a second larger star around a center star block -- can you see that?  I didn't see it on the work wall -- just saw it in this photo.  I do like how crisp and defined this setting makes each star look.
If I stack the stars as in the photo below, the "void" is a large diamond but to keep the straight seams during the setting process, I would still work with equilateral triangle units.  You do need to be careful when joining the points of the adjacent stars -- go slow as there is lots of bulk at those points.  I have more success when I press away from the points (towards the background diamonds).
This is the setting I used for my first diamond star sampler.  Because of the variety of star backgrounds and the scrappy triangles used in the setting units, I liked stacking the stars in this one.
A smaller star could also be used to fill that diamond shaped void.  It's made with the smaller diamond template in the set you are using and adding an equilateral triangle that matches the large diamond in your set to finish it into a diamond unit the right size.  You will however need to set these blocks together with set-in seams -- no long straight seams here.  I do think it would make for an interesting setting though.
As I was setting the table runner together, I laid an end unit (look back at the fourth picture) down wrong.  I took this picture before fixing it because it made me think that might be a fun center for a cluster of star blocks -- to have those triangle units all facing to the center.  I'm not going to explore that idea now but want to recall it later and the  photo will help. 
I hope you are pleased with your progress so far!

Mary Huey

If you are having trouble finding the templates locally, you can order them directly from Marti!


Wednesday, May 21, 2014

UFQ Assault evening!

Last evening, I made time to layer up a quilt top that I'd like to finish this month!  I often talk with quilters who do their layering on the floor -- I've only done that once and don't like getting onto the quilt.  These days, I use an extra tall table and have developed a one person strategy.  So come along with me as I get it done.  Maybe it will give you a new perspective on this odious task! 
 
First, set up the table.  I used two tables years ago and discovered I always got a pleat where the two tables met -- so it's only one table.  The weight of the quilt holds itself smooth once you get it smooth.
 Second, find a good movie to watch while you work.
Third, Harry, get off the table!!
I have marked a small + in the center of my table and I use it to center the backing. 
I fold the backing into quarters with the right sides out and lay it on the table with the center at my mark. 
Now I can unfold it and it will be centered -- I also put a mark at the center of the backing to help me center the batting.
The batting is also folded into quarters.  I match it to the center mark on the backing.
I unfold the batting carefully so as to minimize wrinkling the backing.  You can clamp the backing firmly to a table but my table is too thick for the clamps.  Half the batting is unfolded in this picture and the metal yardstick is stabilizing the backing temporarily.
Once the batting is unfolded, I fold the quilt top in quarters with the wrong side out.  Once again it is centered on the first two layers and unfolded carefully.
I make a quick check on all four sides to make sure I have extra batting and backing.
I pin baste, but before beginning that, I place my hand at the center of the layers and give JUST THE BACKING a firm tug.  I move my hand a bit further and give the backing another tug and continue to work my way all along each side of the quilt until I've pulled any wrinkles out of the backing.  (Yes, I'm in my jammies.) 
Now I'm ready to start pinning! 
I place the pins every 3 to 4 inches in a grid and don't close ANY pins until the entire quilt is pinned.  If I close the pin as I put it into the quilt, I'll lift everything slightly and the backing will shift. 
Once the portion on the table has pins inserted (but not closed), I shift the quilt and bring up the next section.  Once again, I smooth out everything and tug the backing again before continuing to insert pins.  This quilt is 48" by 60" and it took about an hour to pin baste while I watched episode four of the Masterpiece version of Mansfield Park from the late 80's. 

Get off the quilt, Harry!!
I plan to quilt a simple equilateral grid in the body of the quilt and something swirly in the border.  Another UFQ assaulted!!
 
Mary Huey


Tuesday, May 20, 2014

QCQAL Block #6 -- Churn Dash with Marti's Templates

The journey continues!!  The winner for the sixth block in the QCQAL over at Little Bunny Quilts is Churn Dash.  Alison provided instructions for 12" blocks -- one using four 6" blocks and the other for a single 12" block.  Since I definitely have too many oars out of the boat at this point, I chose to do the large 12" block rather than the four smaller ones.  For that size, I used B8 and B9.  It didn't take long to cut and so I also made another 6" block using B12 and B13. 
I fussy cut a square for the center -- still haven't used all the figures on the focus print!!
To cut the rectangles, I cut a strip 2 1/2" wide and used B8 to trim rectangles to the correct length for the block.
I chose not to use all the polka dot colors for the 12" block and arranged two warms (yellow and orange) and two cools (lavender and green) to balance the block visually.
For the 6" block, I went totally scrappy and used 8 different polka dots -- funky!!  Cutting and piecing both blocks only took an hour -- my kind of project!
Here's my gang of 12" blocks so far -- starting to think about what I'll use for the sashing -- it would be fun to use the coffee cup print with polka dot cornerstones, but I'm not sure I'll have enough of it left when I finish the rest of the blocks.
Here's the 6" blocks.  I might make a small quilt or I might put groups of four together to make three more 12" blocks so the quilt will be a bit larger.  The quilt is destined to be a donation to a child.
All but the first block (Sister's Choice) can be pieced with Set B -- did you notice that?  Pretty versatile template set and none of them are included in Volume 1 of Marti Michell's Encyclopedia of Patchwork Blocks which is a companion book for Sets A and B. 
 
Now let's talk about your vote over at Little Bunny Quilts.  I want to do CARD TRICKS, so let's all get out there and vote for it!!  Poor block has come in second in the last two polls. 
 
Mary Huey