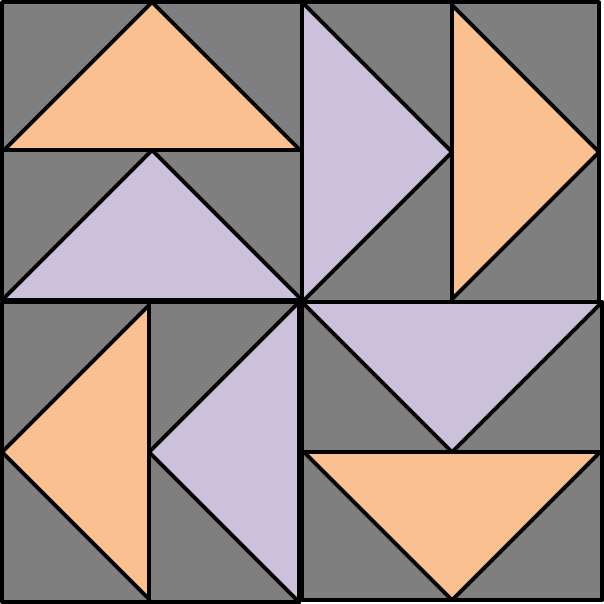
It's time to "whip" out another block for Little Bunny Quilts QCQAL -- this is #7 -- Dutchman's Puzzle. As I type that I find myself wondering "where did that name originate"?
Alison always links her post to an interesting assortment of fabric and color variations on Pinterest and I appreciate exploring those before I begin my own version. With Alison's blessing, I've been sharing how to use Marti Michell's templates to cut the blocks for this QAL. So far, Sets A and B have provided just the right templates. Many quilters have invested in one of these sets to participate in a BOM at some time but never get them out again?! I hope to change that by the end of this series!!
This QAL is focused on 12" blocks. Dutchman's Puzzle is laid out on a 4 by 4 grid -- four equal increments on each side. Divide 4 into 12" to determine that each "flying goose" unit needs to be 3" by 6" finished. Set A is designed for making 3" finished units -- perfect! But on pulling the templates out, we realize there is no template for the "goose" triangle. Template A2 works for the background triangles . . . . but we can use it to cut a "goose" triangle as well!!
Or we can use her Flying Geese Ruler to cut both triangles for the complete unit! A6 is included in the photo because I will use that one to make the 6" block for my second group of blocks.
First I'll show you how to cut the "goose" triangle with a template -- I'm using A6 but the same technique applies to A2 or any one of Marti's triangles. Begin by trimming the end of the strip as shown below.
Now rotate the triangle 90 degrees until the corner of it matches perfectly to the upper edge of the strip and snugs up against the first cut. You can see that this is the right shape for the "goose".
Cut on the diagonal edge and trim the lower corner -- you are done! The engineered corner is the magic piece that allows you to cut this shape easily and correctly -- no need to do math beyond determining the template to use and the size of strip to cut.
The Flying Geese Ruler is multi-sized giving you both triangles for five sizes -- 2 1/2" by 5" to 4 1/2" by 9" in half-inch increments. Once again, one strip size is all you need thanks to the engineered corners. The number to the left above each line is the strip size needed. The black lines are used to align the tool for cutting the "goose" triangle. Note that the blunted tip at the top sits on the edge of the strip and the line for the size sits on the opposite edge.
Once the "goose" is cut, move the tool to trim the lower corners of the triangle -- eliminates trimming later and minimizes the "sucking into needle holes" aspect of these points!
Switching to cutting the background triangles is simple -- the strip size is the same, but use the purple set of lines! If you notice in the photo above, the little diagram of the "goose" is printed on the tool in black (use the black lines to cut) and the diagram of the background triangle is purple (use the purple lines)!
The photo below is a comparison of using the Flying Geese Ruler and A2 -- both give you the same results!
So here I am -- cut and ready to stitch my 12" block. The instruction leaflet that comes with the Flying Geese Ruler is shown and if you get one, don't cut the little pink gizmo -- it's designed to be "undone" so you can re-attach the instructions to the tool for future reference -- great idea! How many tools do you own that are permanently separated from the instructions?
Last week, my son measured the windows in my studio for replacement and moved my ironing board. When I put it back, I was in a hurry and got it "backwards". Still in a hurry when I started to press my pieces, I just used it "backwards". I've rediscovered the big end of my ironing board and plan to leave it this way!! I don't have space for a "big board" but this is almost as good!
So here are my finished blocks -- 12" and 6"! Once again, I managed the layout by keeping the warms and cools opposite one another -- I like the balance of doing that!
Each of these blocks has gone together so quickly and the sizes of them are very uniform thanks to Marti Michell's templates. Have you given them a try?
Linking up with Lee who has a guest hostess this week over at Freshly Pieced for WIP Wednesday!!
Mary Huey


I love the mini version!
ReplyDeleteI'm not usually a small block quilter, but I sure like this bunch! Thanks for stopping by, Jennie!
DeleteThat is a great looking block!
ReplyDeleteThanks, Mom!!
DeleteTwo very cheery blocks! I purchased Set A templates for her BOM in the early 90's! I have not pulled them out in a long while, but will keep it in mind - I do love how trim the pieces are, making a bit less bulk in the patchwork
ReplyDeleteThanks, Heidi -- look by through the posts labeled QCQAL from Little Bunny Quilts to see the first six posts I did using the templates. I'm like a "reformed smoker" -- strip piecer converted to making about 90% of my work now with templates!!
Delete