Showing posts with label Diamond Star Playtime Sew-Along. Show all posts

Tuesday, January 31, 2017

Diamond Star Sampler Finish

I woke up Monday morning feeling overwhelmed. 
Too many deadlines (and perhaps too much upsetting news) are making it hard to prioritize a day's demands. 

There was a little downy woodpecker in my pantry and I needed to take him to the wildlife rehab center.  He's "my" little downy who comes to the feeders faithfully every day.  This fall, I watched him work hard for a week to enlarge the hole on my chickadee house so he could get inside.  Then the clever little bugger figured out how to land on the finch feeder and gobble up chipped sunflower seed.  Sunday evening, I found him on the ground under the feeders at dusk.
Once I determined that he could not fly, I scooped him up and put him in a cat carrier. 
He ate some suet after I put him in the carrier and spent a quiet warm night in my pantry.
So he was my first priority!

Off we went to the local wildlife rehab center where I was warmly greeted -- I'm something of a regular visitor -- and on examination, they found a broken wing.  The swelling needs to come down before they will be able to determine the exact location of the break and his recovery potential.  If it's not treatable, they will put him down but if it is and he responds well, there is a chance he'll be able to return to the neighborhood!

UPDATE -- 3/10/2017
Two days ago, I headed back out to the rehab center to pick up "my" downy woodpecker!!  He was much admired by the center's staff for his feisty resilience and making such a good recovery!  I released him back into "his" yard and have been waiting for 36 hours to catch a sight of him. 
At 8:30 a.m., I was delighted to see him land on the finch feeder for a quick feed!!
Yea!!!

We had fresh snow overnight and since I was in a park, I headed down the trail to get a bit of exercise (walking in the snow is a good aerobic activity). I was delighted to discover that I was only the third person to walk the trail and as is always the case, the beauty around me soothed my soul and prepared me to head back into the studio and tackle the next priority
 In 2014, I ran a series here on the blog, the Diamond Star Sampler, to show how to apply the techniques featured in Set-In Piecing Simplified, my DVD workshop that teaches how to chain piece through y-seams. 
All the posts are gathered together under that tab up at the top of the page -- Diamond Star Playtime!

This set of stars appeared in many of those posts to demonstrate working with strips, fussy cutting, and using other shapes related to 60 degree diamonds plus more.
When I assembled the blocks into a quilt top, I chose to use a honeycomb setting with half stars to complete the center row. 
And this is where I left it two years ago -- auditioning possible border fabrics.
This past fall, I pulled the stars out again as I began to plan and prepare for a two-day workshop in March, Studying the Stars.  One of my goals for the workshop is to provide multiple setting examples for hexagonal blocks to inspire my students.
Finally I had the motivation (and a deadline) to make a decision about the border fabrics and quilt this piece.

I've been chipping away at the quilting since the first of January and finally finished over the weekend.  Monday's task was to bind it and get it ready to display in the teacher's gallery at the Lake Metroparks Farm Park annual show which opens February 17.
There were still four openings in the workshop, Studying the Stars on 3/17 & 3/18 if you can come!!
It was my intention to confine the quilting to basic straight lines or a simple grid.
But when I sat down at the machine, arcs started happening on the stars.
And a stylized trillium appeared in the background hexagons.
I finally got around to the straight lines to frame the central part of the quilt and in the border.
Now it just needed binding and tying off some odd threads to get it ready to display.
I finished listening to Jane Austen's Persuasion on Hoopla (perhaps my fifth "reading" of it) while working.  
(Much as I love Pride and PrejudicePersuasion is my favorite Austen story!)
Then I rushed to get outdoors for some photos before the good light disappeared.
Happily my yard is encircled with split rail fencing, but avoiding all the garages and sheds in the background can be a bit of a challenge.
How about hanging in a tree?
Finished!! 
Bonus -- it is one of my 2017 Finish Along goals for the first quarter, too!!
Check out the first quarter link-up HERE!
Here's one more photo from the park this morning.
One of my favorite winter scenes is when the snow sticks in the trees and outlines the architecture of the trees.  I love the way it highlights their structure.
I'm seeing lots of "impatience" expressed on Instagram -- folks (in the Northern hemisphere) are anxious for spring -- but I find it beneficial to my mental health to enjoy winter -- and we still have a couple months of it to go!!

Mary  


Friday, August 26, 2016

Revisiting 6-Pointed Stars

Two years ago, I posted my first (and only come to think of it) Sew-Along -- Diamond Star Playtime.
 
Right now, I'm away from the studio for a few days and since I have lots of new followers these days, I encourage you to revisit the basic process post from that series. 
 
 
The entire series is collected together and listed under the Diamond Star Playtime tab up above, but this post is a good first read on the process which I use and teach.
I'm currently putting the finishing touches on my teaching plan for the new two-day workshop for this winter which focuses on designing, cutting, piecing, and troubleshooting hexagonal blocks.  It's booked for a local regional show in March but I travel!!  Perhaps your guild or shop would like to set up the workshop in your area.  Talk to me!!


Next week, I'll be catching up again of course!?!
 
Have a stitching weekend.
 
Mary

Friday, August 15, 2014

Diamond Star Playtime Sew-Along, Step 11 -- Considering the quilting

Good heavens, it's been a full four weeks since I wrote about this ongoing Sew-Along.  I didn't mean for it to be such a long gap, but between some traveling and the fact that we've arrived at my number one stumbling block -- the quilting -- I guess it's not surprising. 

Let's look again at the top I set together for Step 10 -- doesn't look any different, does it?  I've been auditioning border options off and on over the past month, but nothing is clicking . . . . so I'm beginning to think -- "no borders on this one".  I find that when I can't make a "decision", what is often really happening is my intuition is saying "it's fine just like that" while my alter-ego is saying "this could be fabulous if you could just find the perfect . . . . ".    I'm trying to listen to my intuition these days because in general I find it creates a lot less work for me than my alter-ego.  And I have a pretty long "to-do" list all the time so I don't need "bigger" jobs -- I need doable jobs.

Regardless of the "border" outcome, staring at the quilt top on my workwall has me thinking about the quilting and at this point, it revolves around something simple and big stitch hand quilting.  But that could change -- those hexagons of background fabric could handle an interesting quilting motif. 

I'm not going to tell you "how" to quilt once of these pieces.  Rather my intention is to share what I've done and hope it stimulates your own ideas.  So lets start with the first sampler I made using the chain piecing through set-in seams technique. 

It's a very busy quilt -- lots of variety of prints and textures -- no blank space.  I can take one of two approaches to this type of quilt -- keep the quilting simple because the detail won't show up OR use it as an experimental canvas for quilting designs because the detail won't show up (no one will see the goofs).  I took the latter approach and I'll try to show you some on my design experimenting.
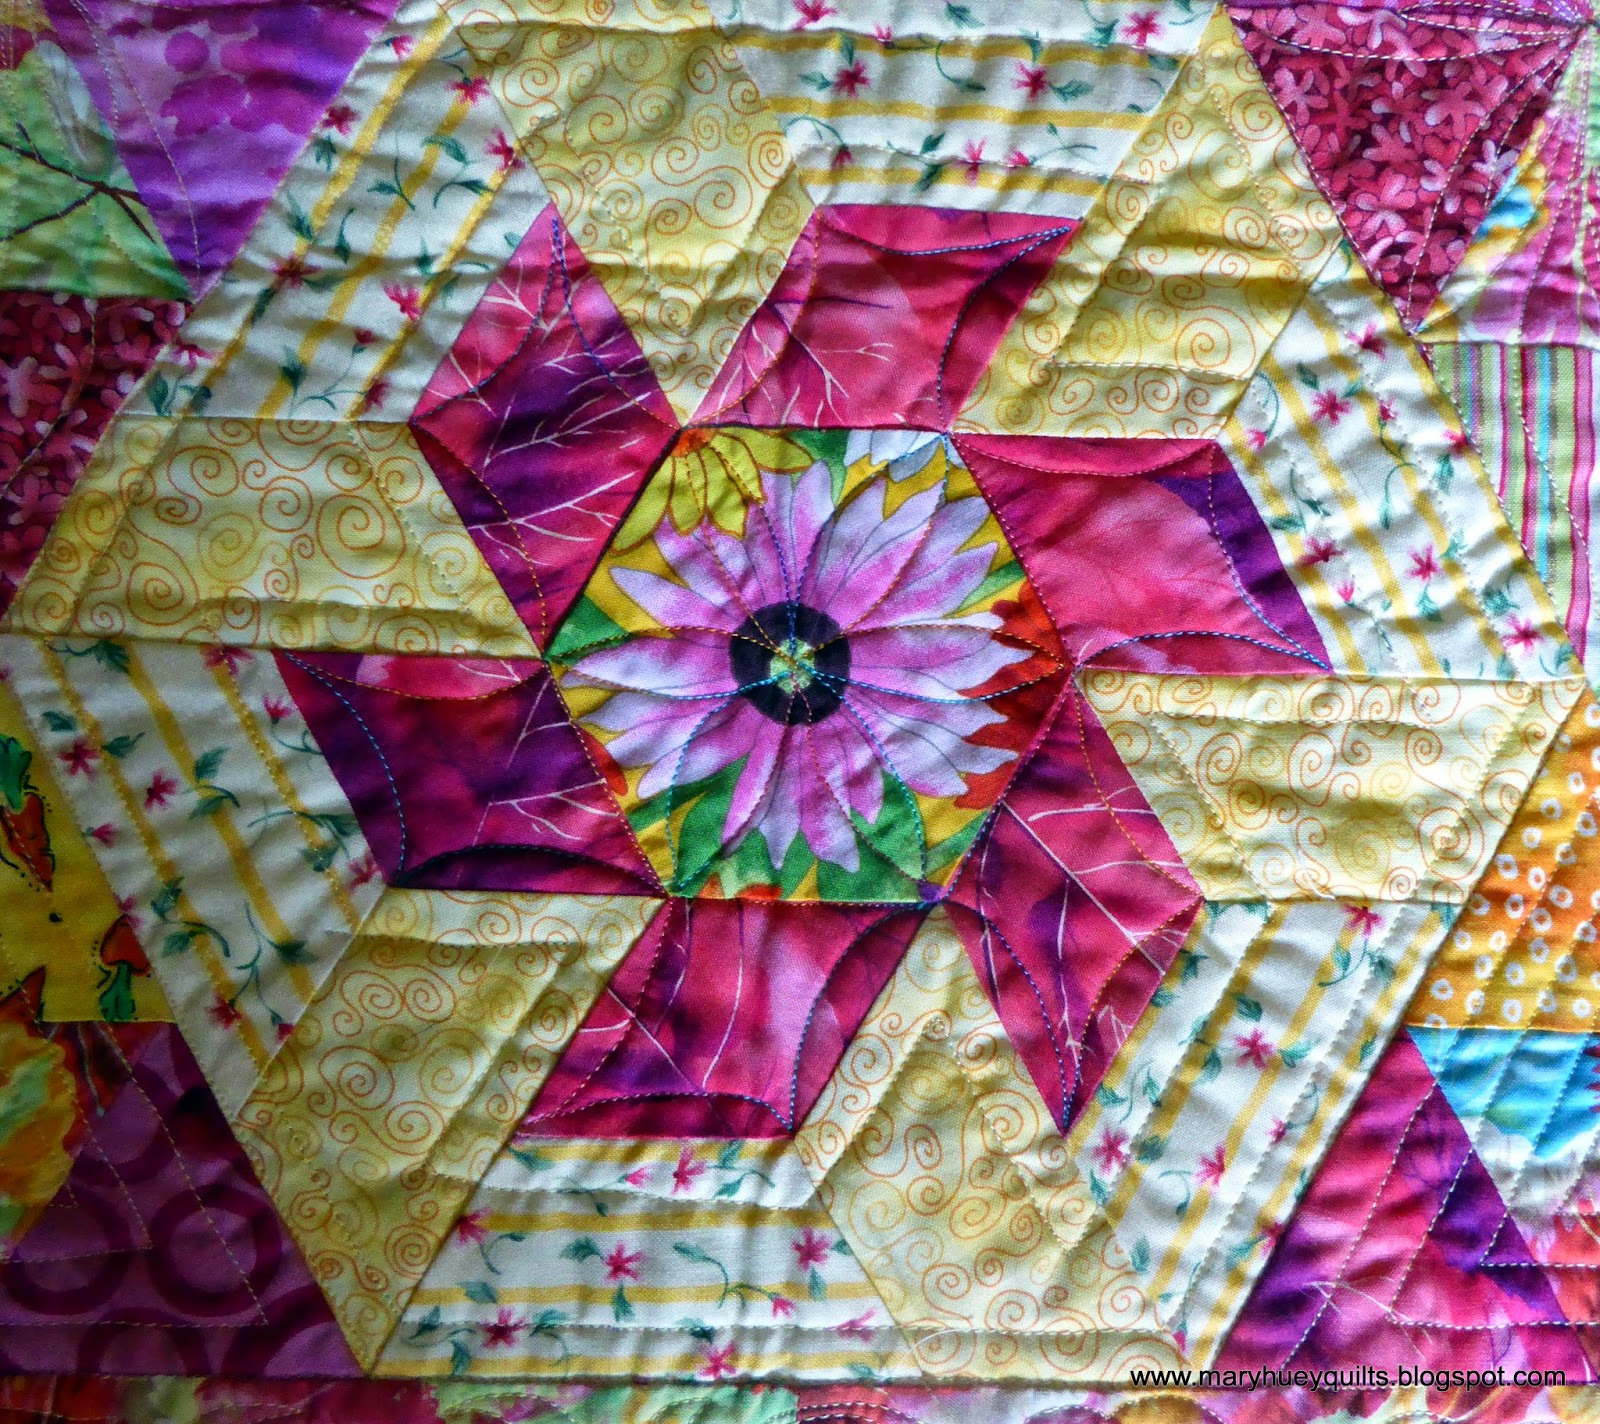
When doing free motion machine quilting, the most comfortable stroke for me is the continuous curve arc from corner-to-corner of a patch.  So each star's quilting is based on that arc but a bit different.  I think the next few close-ups are self-explanatory.
The "background" diamonds in each star are all quilted with the same "maze" trail -- it meant more stops and starts than I like but apparently I couldn't figure out how to get "in and out" in a continuous line and get that look.   I wanted to flatten the background down more and liked the contrast of the angular maze with the soft arcs.
This is without a doubt my favorite quilting motif for 6-pointed stars -- I've use it over and over and have adapted it in other blocks.
Here it is again but this time the petals are echoed and there is an extra inner petal in the small stripped diamonds.
It reappeared in my second sampler as an alternate design.
I also have used a spontaneous flower design like the center of this block a great deal -- the concept of "echo" quilting these really improves their appeal.  This one started out with the continuous "heart" shapes around a center. 
On this quilt I left the "filler" diamonds to the last.  This six-petalflower motif was perfect once I added the "leaves" and it reappeared in my next sampler as the border design.
I drew a grid with chalk of equilateral triangles and then stitched the arcs to fit the grid -- the alternate center stitching helps define the design better and was added during the practice phase of creating this design.
On this piece, I echoed the outer arcs in the background diamonds to define the periphery of each star.   
I hope some of these ideas stimulate your approach to quilting your own Diamond Star Sampler.  If you can only figure out how to quilt one aspect of your piece, go for it.  I find that is often the case and if I start, other ideas will present themselves as I engage with the quilting process.  Some of them don't work, but most of them do.  And nothing happens without you, so get in there and do it!!

This completes the Diamond Star Playtime Sew-Along. 
I hope you are happy with the quilt you are creating!!

Mary Huey


Friday, July 18, 2014

Diamond Star Playtime Sew-Along. Step 10 -- Looking over my shoulder

This week, I've been escaping from my deadlines by setting this Diamond Star quilt top together.  I thought you'd like to look over my shoulder and see the order of assembly I followed.  Lots of pictures and not many words -- hopefully, it will be helpful to you as you approach this phase of your own Diamond Star quilt.  I've been looking at it for almost a week and am still happy with the layout, so I'm ready to stitch it together.
I'm going to start in the upper left corner by stitching these two blocks together.
Next I'll add the half block from the upper edge.
It's the same process I explain in  Set-In Piecing Simplified -- using "dot-to-dot" seams.  I pull the seam allowance back to the end of the previous stitching line. 
Then I can see to match the corner of the piece I'm attaching to the lower piece. 
How do you like that orange?  It's one of the stuffed hearts I'm stitching as my "leaders and enders" so I can maintain the chain piecing momentum.
I'm zigzagging across the setting so that I only need to work with two seams to get a block attached. 
Here's the next one (and Coal's tail).  I'm doing the photos on the carpet so you can see the order of things easier -- tried the work wall and the background fabric blend into the color of the flannel.
Now the right side edges -- first the lower piece and then the corner piece.
One more edge piece and this band is finished and ready to go back up on the work wall.
Now to begin the second band -- scroll back up to the top picture and you can see where these two blocks are positioned.
Next.
Next and next. 
And again I'm zigzagging so that I'll only have two seams for each block.
Last block in this band. 
Add on the right edge unit. And where has that corner unit gone?
Here are the two bands and the lower left corner all assembled and waiting for my return.
This is a closer view of the upper left corner -- the bands will fit together easily and be a series of "dot-to-dot" seams. 

Still to come, a discussion of quilting ideas for this quilt!

Mary Huey


Friday, July 11, 2014

FINALLY -- Diamond Star Playtime Sew-Along, Step 9 -- Filling in the Edges

So thanks for your patience while I procrastinated about how to organize this phase of the Sew-Along.  No doubt, I should have thought about this more at the beginning.  Yesterday I wasn't fit to be out among people for a variety of reasons, so spent the entire day in my studio and now I'm ready. 

By this time, I hope you've settled on the style of your setting -- honeycomb or straight.  In this step, I'm going to walk you through the process of organizing the units to create straight edges around the outside of the quilt. 

Let's revisit my set of star blocks -- I stopped at 11 blocks and after much moving around on the work wall, I've settled on this arrangement.  It feels balanced -- notice that the boldest star is in the middle -- no matter where I put it, it always draws my eye to it, so it needs to be centered.  The other stars are organized in "pairs" more or less that sit opposite one another and that keeps it balanced to my eye. 

There are two deep gaps at the center of the top and bottom edges and I'm going to fill them in with half-stars.
Happily, I didn't have to cut much to make these -- most of the pieces were left over from cutting the main stars.   These half-stars will make the top and bottom edges of the quilt straight so standard borders can be added.
Now I need to decide how to fill in the sides to make them straight.  I auditioned several prints since there is not much left of any of the fabrics in the stars.  I found one yard of this busy but subtle print (in my bulging stash) -- the colors are perfect, the scale and density of the print differ from the background print giving a subtle contrast which I like, and the motif is compatible with the theme of the prints in the stars.
When I pinned it up against the blocks and stepped back, I liked it right away! 
To minimize the depth of that space, I decided to add a diamond of the background print. You can begin to see the shape and configuration of the units that can be made to set into the quilt top -- in my experience, this piecing approach is simpler than appliqueing an edge full of points to the border fabric.   
Time to cut some fabric!  As I ironed the fabric, I realized it was a directional print, so the first cuts were 4" strips cut crosswise on the fabric for the top and bottom borders.  That may not bother most people, but it would bother me to have the roses going every which way.

I used partial hexagons to straighten the edges and create a border at the same time.  Since I used Marti Michell's 60 Degree Diamond Tool to cut the stars, I used the companion tool, the Multi-size Hexagon Ruler to cut the side pieces.
First, measure the depth of the partial hexagon from the tip (on the right) to any place on the left that gives the finished border width wanted (this will make sense as we go).  It's so close to 6" that I cut strips that width -- a little extra can't hurt, right? 
 Once the strips are cut (on the lengthwise grain to control the directional print), I measured the "width" of a 3 1/2" hexagon -- it's 6 9/16" -- or half way between 6 1/2" and 6 5/8".
 I cut rectangles off the strips -- one for each partial hexagon I need.
 Then I center the tool on the rectangle with the 3 1/2" lines aligned perfectly on the left and the right.  The point of the hexagon tool just touches the top edge.
And I trimmed the left and right top edges as shown.
 I'll need dots on those three corners for the set-in piecing process, so I did that while still at the cutting table.
Time to sew -- it's a set-in seam where the diamond is inserted between the two hexagons.
And these are the units I made -- 3 for the left side and 3 for the right side.  The diamond is the same size I used for my stars.  You can press the seams open between the two hexagons to make it less obvious.
This is how they will be positioned along the sides of the quilt.
I also needed corners units for the upper and lower ends of each side.  They were easy -- just use one of the partial hexagons and a 60 degree triangle -- be sure to position the straight grain of the triangle so it will be on the outside edge of the quilt.  Here are my four corner units.
So everything is in place and ready for me to assemble tomorrow . . . . or the next day
Once I have it assembled, I'll contemplate and audition for another border, maybe, and the binding fabric. 

While I work spontaneously on the work wall in my studio, you may find it helpful to use graph paper to lay out the edges of your version.  I find the "equilateral triangle" paper that can be printed from this website the easiest to use for that.  If you are stumped on how to proceed with the setting of your stars, don't hesitate to get in touch with me at maryhueyquilts@hotmail.com.  We can exchange photos and chat about ideas via e-mail.  It may just take one little idea to get you moving on your version again!

The final step for the Sew-Along is next -- contemplating the quilting!

Mary Huey