Saturday, November 29, 2014

Some thoughts on efficiency for stitchers!

With Thanksgiving past and marketing wizards trying to whip up the annual American Christmas shopping frenzy, I realize my plans for making Christmas gifts may have exceeded a realistic level.  To assure that I succeed, I rely on my daily habit of stitching every day!
 
And the most important key to being able to maintain that daily habit is to always leave something ready for my return the next day!!  I started this habit many years ago when I was still operating my quilt shop.  I discovered that taking a few minutes to set up the next day's work enabled me to come home and no matter how tired I was, it was easy to pick up something and begin to stitch. 
 
The hardest part of staying motivated for me is getting started when I'm tired.  If I don't have to think about "what to do", it's so much easier to start.  And once I start, the work calms and soothes me.  When it's time to stop, it's easy to decide what needs to be done next and lay it out for tomorrow.
 
I have three sewing areas (what a luxury!) and generally, there is something going on in each of them.  I invested in an APQS George quilting machine a year and a half ago.  It lives in my office adjacent to the kitchen.   I work there in 30 minute spurts to prevent neck and shoulder discomfort.  If I'm not working on one of my own pieces, there is usually a charity quilt on the table.  My machine quilting skill remains well honed if I quilt regularly so a bit every day is best.
Then there is my studio with my beloved and reliable Bernina 1031 - I've used it so much over the past 25 years that I wore out the feeddogs and had them replaced last year!  I never leave without setting up the next phase of the current project. And I never work on a project without something there on the right to use as "leaders and enders" (ala Bonnie Hunter). 
And finally there is my little cozy hole in the living room where I do all my hand stitching.  It is stocked with everything I might need -- fine scissors, a variety of hand sewing needles, basic threads, pincushions, and thimbles.  None of those items are allowed to leave there under any circumstances!!  If I'm traveling with hand stitching, there is a separate pouch with another set of those items.  Right now, I'm spending most evenings knitting for my family -- sweaters for the grands and socks for everyone who has ever said they "love them" to me.
So if you are under the gun to get too many Christmas gifts made in time, try this approach to keeping yourself motivated.  Let me know how it works for you!!
 
Must go piece!!
Mary Huey
www.maryhueyquilts.com


Wednesday, November 26, 2014

Machine Quilting Baptist Fan

Today I'm going back and forth between baking for our Thanksgiving feast tomorrow, cleaning the house up a bit and machine quilting.  I have a goal of finishing three of these quilts before Christmas!! One is finished, I just passed the halfway point quilting the second one and the third is ready to layer.
To stay on track, I need to complete two rows of Baptist fans across a quilt each day!  My office (where my APQS George is set up) is adjacent to my kitchen so it's easy to do a bit of this and then a bit of that. 
I'm using HandiQuilter's Half-Circle Templates to layout the fans.  There are other tools with multiple circles that you can use to lay it out but this is the one I own.   When I posted a progress report on my Facebook page (Mary Brower Huey if you want to follow me) a couple hours ago, several questions popped up and another idea for a post was born!?!  And it's more fun to write something than it is to clean something!
After some drawing experimentation, this has been my strategy for stitching the fans on the machine.
For an odd number of arcs, I begin at the right edge of the quilt with my smallest arc and travel left and down to the bottom edge of the quilt. 
I travel left along the lower edge of the quilt to the next arc and travel up and to the right, back to the right edge of the quilt.
Then up the edge to the next arc, turn left and stitch down to the bottom edge. 
Over to the beginning of the fourth arc and up and to the right again. 
And back down to the left.   One fan completed!
To begin the next fan, I travel back along the end of the last arc (see the green arrow) until I reach the beginning of the smallest arc for the second fan.  One of my technique goals for these quilts is to improve my traveling lines so they aren't noticeable -- not quite there but getting better.
Now I repeat the sequence traveling over previous lines of stitching to get from the end of an arc to the beginning of the next arc.
When I reach the left edge of the quilt, I cut the thread and go back to the right edge and begin the process again (the blue lines).  The bottom ends of all the arcs will touch the final arc of the previous row -- more chances to improve my traveling skills!! 
If I were using Baptist fan on a smaller quilt, I would use fewer arcs to make a smaller fan.  The strategy needs to be adjusted slightly for an even number of arcs.  I begin at the bottom edge of the quilt, and work up to the right side, then down, then up, and finally down so I end each fan along the lower edge of the row.
To travel to the starting point for the next fan, I travel to the left traveling along the top arc of the previous row. 
My arcs are about 1" apart and the 5 arcs give me about a 6" tall row.  My quilts are 72" square so 12 rows from top to bottom gets the job finished.  So two rows a day means 6 days to quilt one of them.  Since I have arthritis in my neck and shoulders, I minimize stress in those areas by working at the machine in 30 minute spurts.
 
When I have them all finished, I'll share the complete story of these quilts with you.  And if you are baking today, too -- I hope your pies are glorious!!
 
Linking up over at Freshly Pieced's WIP Wednesday!!
 
Happy Thanksgiving!!
Mary Huey


Saturday, November 22, 2014

Remote Trouble Shooting!!

A week ago, I introduced you to Nathalie.  We met on Facebook through Marti Michell.  We both teach with and sell Marti's line of rotary cutting tools.  Nathalie is outside of Paris, France and I'm outside of Cleveland, Ohio.  When I mentioned my DVD workshop about chain piecing through set-in seams, she ordered it immediately.  Once she received it, she tried it out by piecing a tumbling block quilt using Marti's Stripper Template set.  In less than two weeks, she had a finished top.

While she was learning to apply the technique, there were questions of course.  And so began daily chats with her via Facebook messaging.  I received her questions while she was sitting at her machine and was able to respond with photos to clarify things for her.  She pieces in the afternoon which means I'm up and moving around, so most of our communication is almost instant.  That's so exciting.  It's been easy to help her and I encourage those of you who've purchased the DVD to "friend" me on Facebook at Mary Brower Huey.  That will give you easy access to me when you encounter questions. 

So lets look at a couple of questions from Nathalie and others about this technique. 

One comment left by a quilter on Nat's post was "how do you decide" referring to choosing fabrics for the quilt.  My version is very scrappy and choosing fabrics might seem overwhelming.  But this quilt started in my box of leftover 2 1/2" strips -- they were pulled from it so there was no need to pull a big assortment in the beginning.  Then by focusing on one tumbling block unit at a time, I made combinations of three diamonds that looked pretty and had the light/medium/dark value contrast. 

Once all the "blocks" were finished, I pick three off the top of the pile, organize them into a larger unit, and stitch them together.  Now if I don't like the way two fabrics look next to each other, I change them, but VALUE is the primary factor in choosing fabrics for this quilt.

Nathalie's first tumbling block quilt (it won't be her last) has a more controlled color scheme of blue and brown. 

 You can see it here -- http://www.lesouvragesdenat.com/  Her choices were light beiges, blues, and browns -- a simpler strategy that give a very clean contrast and works well for quilters as they build the confidence to go the "all scrappy" route.  I didn't start making quilts that were all scrappy, I evolved into that style.


Once Nathalie had her tumbling blocks together, she began to assemble them into the two units I suggest in the DVD. 

The Y's went together easily for her, but the reverse layout challenged her and she wasn't happy with the intersection of the six diamonds in the center.  I pulled out my teaching samples and did a little stitching myself to be sure I understood what might be giving her a problem.  Soon, I was able to get a close-up photo that clarified things for her and off she went!!  (Sorry the picture isn't larger, but it's from my phone and the larger I made it, the blurry it got in the blog.)
I'm thrilled that we have had such an easy time communicating.  Fortunately for me she speaks English because my French is non-existent (typical American).

Questions are valuable to me.  They help me understand how to present ideas and concepts better in the future.  As I travel farther from home to teach, I have learned that quilters have a lot in common but they also have differences, too.  So if I assume everyone will understand everything I teach and write, I am bound to have problems.  Not everyone takes the same approach to a task .  So I'm grateful for the questions since it helps me become a better teacher.

So if you already own my DVD and something has puzzled you about my demonstrations on it, please contact me and let me clarify it for you.  It will help both of us!!

Mary Huey


Monday, November 17, 2014

First Robin Round!

A couple weeks ago, I received a package in the mail with this cool fellow as the start-up for a round robin with five other quilters!  It's the first round robin I've done in about five years and my first long distance one!!
I pinned him up to my work wall and spread out the fabrics that Kathy sent along with him and waited for inspiration for the border of 3" blocks as the first round. 
Hmmmmm . . . . . . ???????
 
Aha!!!  I can't tell you what my idea was but I can show you a little bit of what I did!  It involves triangles and so I revisited using triangle paper instead of templates.  I still have a good supply of the various sizes of paper and because you stitch before you cut, it is a quick process. 
 
I prefer Mimi Shimp's Quiltime Triangle Paper -- the configuration of the sewing lines makes for  quick tidy stitching and the paper she prints on is easier to remove. 
You also don't have to worry about your seam allowance!!  If you can follow the line, it's perfect.  If you haven't used it, there are two layers of fabric right sides together under that paper.  Using a rotary ruler as my guide, I trim around the outside edges of the cluster I've stitched.
Then I cut the squares apart and finally the triangles. 
I take the time to pull the paper back and crease it along the stitch as it makes the paper easier to remove. 
Over the years, I've discovered if I start to pull the paper away at the center of the seam, it goes faster and the paper comes away cleaner.  
In no time, I have the HST's ready to trim and press. 
I take the corners off before pressing -- that eliminates bulk! 
Match the HST's up to a third print and a little more cutting!
Ready to stitch!! 
And that's all I can show you!  It's on it's way to Bea for the next round!!  The quilts will be traveling through the winter and will come back home in April.  I'm looking forward to seeing what everyone else's pieces and the challenge of creating the perfect next step!!
 
Bea over at Beaquilter is our leader and she has dubbed this a "planned" round robin in that the size and placement of each rounds blocks is dictated from the start.  This time is 3" blocks all around the 12" starter block.  December will be 6" blocks top and bottom.
 
Linking up over at Quilt Story's Fabric Tuesday!!
 
 
Mary Huey


Wednesday, November 12, 2014

Gracious Purging - a strategy for UFO control!!

Good morning, all!!  Purging seems to be a popular topic in the blogosphere -- no doubt a manifestation of the fall cleaning spirit.  During October, A Bowlful of Lemons posted a 31 Day Purge series.  I followed it, didn't make much progress, and was relieved on the days that I didn't have any of the targeted stuff to be purged because I didn't have to feel guilty that day for not participating enthusiastically.
 
Bonnie Hunter just issued a 5-minute purge challenge.  I might be able to do 5 minutes a day and the studio could certainly use thinning out a bit.  So today, one of my primary tasks is to purge some UFO quilting projects! 
 
Nine years ago when I closed my shop in Northeast Ohio, I had 72 finished quilt tops (in assorted sizes) ready to be quilted.  I felt confident that I could work down through the pile at the rate of two a month (after all I would have more time to quilt), and I would be done with them in a couple years.
 
Mmmmm, sure?!   
 
Fast forward to 2014 and you see I still have quite a long list.  33 to be exact.  The ones on the list that aren't highlighted with a blue circle were all made/started before 2005 (oh, my).  And this list doesn't include the ones in a yard sale box that I decided several years ago to let go. 
So, today is the day!!  Four finished tops and backings plus one project that I really stalled out on a long time ago. No, I'm not going to show them to you because you might try to talk me out of letting them go.    
Quick!!  Into the box they go.
Close up the box.  
Print the mailing label and put it into the car to be dropped off at the Post Office on today's errand run!!
 
I'm sending them to Vicki at A Quilter's Mission!!  I don't recall how I found her blog but she works with a Mennonite relief group and they accept donations of quilt UFO's and finish them to be used either to raise funds for their work or to bless recipients of their work.  You can read more about it here.  
 
Vicki gave me permission to share the address for sending things, but do take the time to read her blog so that you understand her mission and what they can use.  As a coordinator for a small charity quilt making group myself, it's beneficial to get donations, but they need to relevant to the work we do.
 
Vicki Posten
c/o North Fresno Church
5724 N Fresno St
Fresno, CA  93710​
 
The way I see this is it's a shame to leave them laying in my piles when they could be doing some good -- raising funds for emergency relief or warming someone in need.  Plus letting go of five pieces lifts some guilt off my shoulders not to mention the time I've saved in the future.
 
There are many good causes out there for us to bless with our quilts and I'd love to hear where you donate your good work!!
 
Linking up today at One Project at a Time, a link party over at Bowlful of Lemons and at Freshly Pieced!!  So many new ideas to be had!!
 
Is anyone else smiling at the title of their linky party -- I don't think I can manage just one project at a time?!?
 
Mary Huey
 

Monday, November 10, 2014

Introducing Nathalie

Nathalie Delarge is a new connection I've made through my work with Marti Michell's templates.  She is a quilter part of the time (her day job is dental surgeon) and has been working with Marti's templates since around 2005, teaching since 2010 and selling them in her online shop since 2012.

She and I originally connected on Facebook through our common work with Marti's templates and last month, she ordered my DVD workshop, Set-In Piecing Simplified.  It's been interesting and fun troubleshooting back and forth with her as she applied the technique in the video to her current interest in 60 degree diamonds using the templates. 

One of the aspects of our exchange that is so exciting is that Nathalie is in France and I'm in Northeast Ohio, USA.  She speaks English and I'm embarrassed to admit that my French is non-existent (though I am beginning to pick up some bits as it applies to quilt making). 

We've discovered that using the "messenger" option on Facebook has allowed us to communicate quite quickly.   Quite often, we are in our sewing spaces at the same time -- it's afternoon for her and morning for me.  I'm also able to send detailed pictures, too when needed for clarification.  If you've purchased the DVD, I encourage you to keep that in mind.  If we are friends on Facebook, it will be like having me along side as you try out the technique for the first time.   

The quilt I use in the DVD to illustrate the technique and the steps is a tumbling block made from lots of scraps.  I selected that block because it's the best pattern to cover all aspects of the chain-piecing approach. 

So on October 18, she sent me a photo of her beginnings.  Then on October 29, fourteen days after the DVD arrived in her mailbox, Nathalie sent me a picture of a finished tumbling block quilt top -- 120 tumbling blocks in beige, brown, and blue!   I love the crisp look of her top. 

Now it's time for you to go meet Nathalie at her blog for a look at her first project using the technique.  If you use the Google toolbar, there is a button on the upper right end that gives you the ability to "translate" text in other languages -- that's how I read what Nat has to say to her followers in Franch.  Makes it more fun to visit with bloggers around the world.

Mary Huey
www.maryhueyquilts.com

Thursday, November 6, 2014

My first block for the Sew Sweet Simplicity BOM!

I've had to cut myself off from signing up for sew-alongs in the blogosphere for a while -- how about you?  My eyes are always bigger than my time it seems.  So today when I went into my studio to make the first block for the Sew Sweet Simplicity BOM, I decided I better put the QCQAL from Alison at Little Bunny Quilts on the ready-to-quilt shelf first. 
 
Here's an aerial view of my top laying out on the patio before the rains arrived!
Love the border fabric -- there was just enough of it left from another project to get all the way around this top! 
I had a pile of leftovers from the piecing to use up for part of the backing and a full length of white from my mother's stash that was just 8" too narrow. 
It didn't take long to put together a band to insert and the best part is that I used the wrong size block and all the rest of the focus print which looked like a piece of Swiss cheese from all the fussy cutting for the blocks. 
This quilt has always been destined for one of my charity donations and now it's all ready to quilt when a need arises!
 
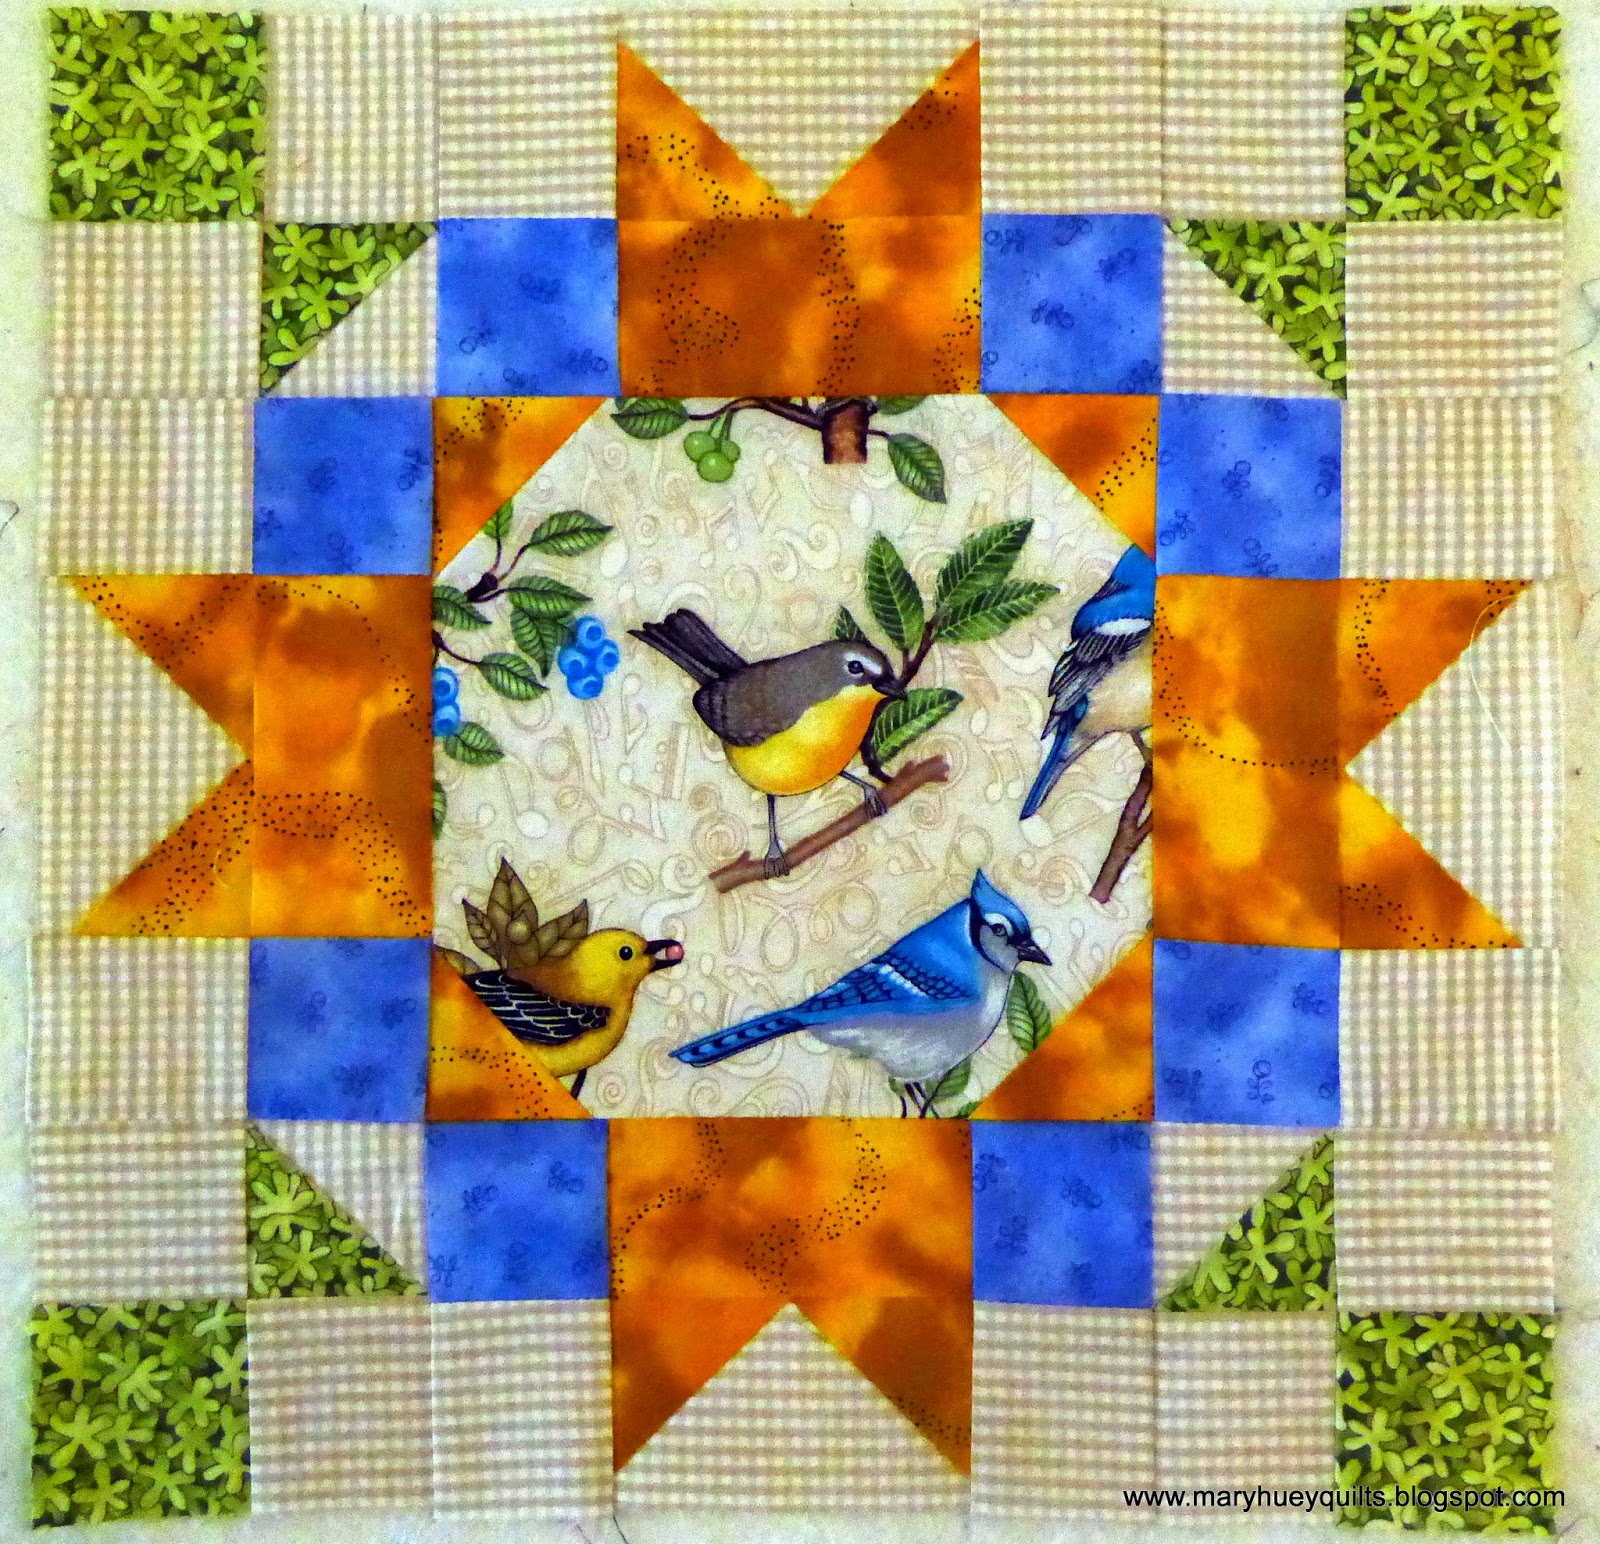
With all that cleared away, I could focus on starting a new quilt top!!  And this is the fabric I chose for my focus print.  It's not "sweet" like Jacquelynne's model but I just bought it and am eager to cut it up.  I did try to resist it, but the birds are so realistic and it's such an interesting selection of species.  All are native American species, some quite common and others rather uncommon.  Then right there in the middle is an English robin?
This is the assortment I pulled to begin -- no doubt I'll find more to add to it as I go.  The "blues" are actually periwinkle -- I have a few and they never get a chance because they don't play well with other blues, so I decided to give them center stage on this quilt and let the blues be the rejects. 
The BOM just began so if you want to jump on board, it's not too late -- just click on the Sew Sweet button to the right.  Jacquelynne's instructions are very thorough and include both an optional applique or embroidery motif to use in the center of each pieced block where I used the fussy cut bird.  I'll be using my Marti Michell Template Set A for as much of the cutting as possible!
Here's a closer view of my substitution notes.
The beauty of using the templates is that all the pieces needed can be cut from the same strip size -- 2" wide.
If you decide to follow my lead, remember to pair up strips for triangle right sides together so once they are cut, they are ready to pick up and piece -- no need to fumble around with matching edges.
And using a small mat on top of your large mat works like a rotating mat and makes it easier to trim all the corners of the pieces.  The trimming is a good habit even when you don't think you need to do it -- it eliminates bulk in your finished blocks and when you do need that trimmed corner, it will be ready and waiting for you. 
Jacquelynne's instructions lead me through the piecing of each unit needed for the block.  Every unit was perfect for size as I finished them.  Here's a tip -- I learned to piece snowball corners from Mary Ellen Hopkins and her caution to us was to just trim away the middle layer of fabric as show below leaving the base fabric intact.
Then if your corners aren't perfect when you press them out, you still have the perfect square corner of the base fabric to use when assembling the block.  Three of mine were fine, but on this one, the gold triangle hung off the corner and would have made it hard to keep things aligned. 
I made the flying geese units the traditional way instead of with snowball corners because I get better results. 
Then when I went to the ironing board, I kept the chain intact until after I pressed them -- it was easier to get them all laid out in the best orientation. 
Once the seams were set, it was quick to flip up the rectangles and press the seams to one side.
In about an hour, I had cut and pieced the block.  I like the way the layout of the block frames up the yellow-breasted chat -- that's the bird.  Our largest warbler, it nests in trees along the edges of old fields throughout rural areas in the East.  This spring, we were thrilled to discover them setting up territories in a large new park along the Lake Erie shoreline here in Northeast Ohio. 
 One block done, five to go!!  The pace is going to be leisurely it sounds like with the blocks being released over five months.  I don't know what the destiny of this quilt will be -- since there are birds involved, it might be a keeper!
 
Mary Huey