Friday, August 25, 2017

Layering a Quilt -- another viewpoint

Layering quilts is not one of my favorite pastimes!
But it's a necessity if one wants to finish quilts, so I try to make it as pleasant as possible.
That means not doing it on the floor!

My approach is based on what I learned from Mary Ellen Hopkins, one of my longtime mentors, thirty-plus years ago.
I use a single table -- size doesn't matter.
When I had the shop, I worked with a larger table but this 2 foot by 4 foot table is light weight and easy for me to handle alone.  It's important that the table have either a scratch proof surface or is one that you don't care about scratching.
I have a couple of these tables, one of which has "expandable" legs that bring the table up to a comfortable standing work height, but a set of "bed lifts" (shown here) will accomplish the same thing. 
"+" marks the spot!
This is the center of the table -- marked here with a sticker -- this first step is always helpful but especially important when working solo.
After pressing the backing, I fold it into quarters with the right side out.
When laying it on the table, I match the center of the backing to the center of the table.
Then I begin to unfold it -- halfway.
And completely open.
Because I folded it with the right side out, it is correct when I unfold it and there is no wrestling with it trying to get it flat and centered.
You can use 1" or larger binder clips (from the office supply) at this point to hold the backing taunt, but my clips don't work on this table.
Don't worry, I'm going to take that into account before pinning -- keep reading.
The batting is also folded into quarters -- you can't see the "dot" I put on the wrong side of the backing fabric, but it's there to guide me in placing the batting.
I'm working with batting off a roll so there aren't any contrary folds to fight.  If you are working with a batting out of a package (how long has it been living in there?) try putting it into the dryer for 5 minutes on a low setting to relax most of the folds out of the batting -- worth the extra time!!
Same process -- unfold the batting into position.
Once the batting is opened up completely, it saves time to check and be sure that the backing and the batting are evenly aligned up on all four sides.  There is nothing more infuriating that discovering the backing is an inch short after you've started pinning!!
Here you can see the dot I put on the batting to help center the quilt top.
When I finish pressing the quilt top, I fold it into quarters with the wrong side out.
Not as pretty, but it is easy to position and simply unfold onto the top of the quilt sandwich!
Once again, take the time to be sure everything is aligned.  
I've learned not to assume the quarter folding process keeps everything as it should be.
And here I am -- all three layers in position -- backing and batting are evenly distributed.
Time to baste?
One more step.  
(It was a challenge to get a good picture of this step so if my explanation isn't clear, say so!!)
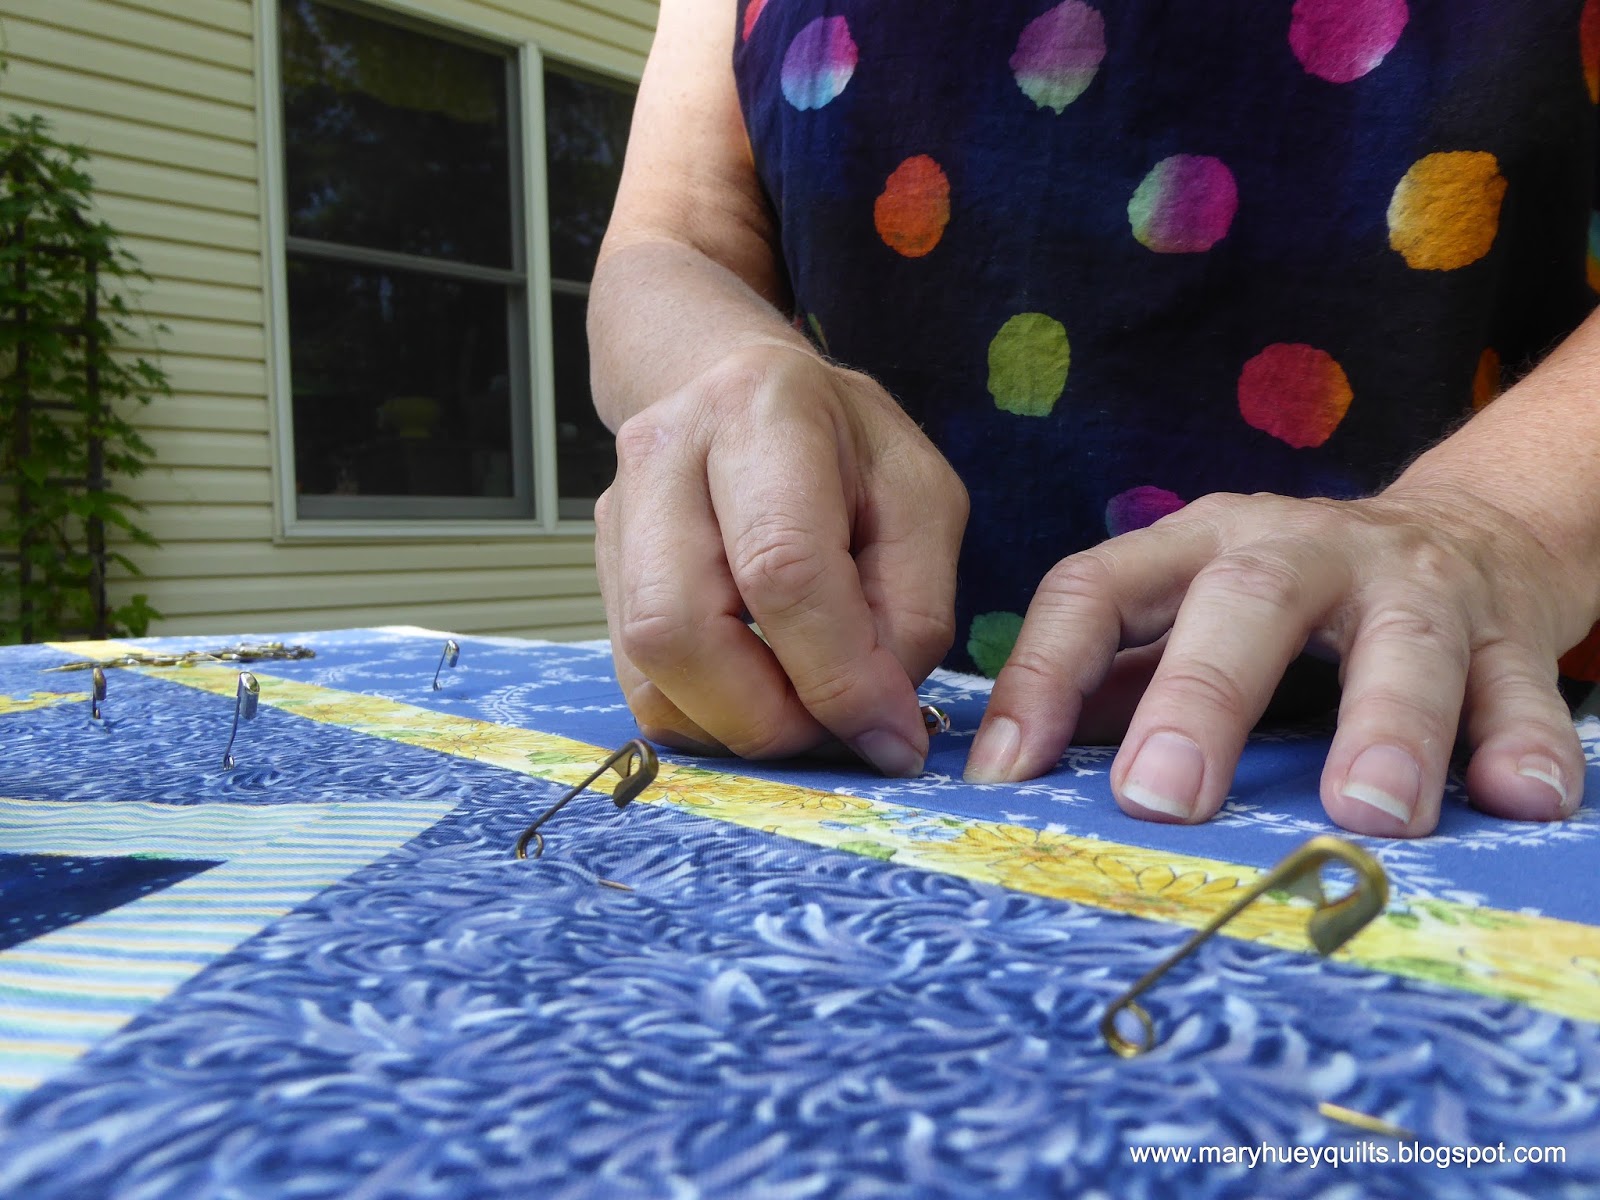
In the picture below, I have my left hand pressing down on top of the sandwich at the center of the table.
With my right hand, I'm taking hold of just the backing and giving it a tug.
If there are any pleats, wrinkles, etc. in the backing -- they pull right out.
I work my way along the entire side in approximately 8" intervals and around all four sides of the quilt.
Once you've done this, the weight of the quilt hanging over the edge of that table does a good job of keeping everything smooth.
Now I can baste!
I pin baste using 1" safety pins.
When they aren't working in a quilt, they live in a little tub -- open.
Yes, they get a little tangled up but I find that less aggravating than having to open a couple hundred pins.  
Now I think this is the deal breaker!
Let the table "push" the pin back up to the top -- don't lift the fabric -- and leave all the pins open like this until the entire quilt is pin basted.
You may not realize that in the process of closing a pin, we lift the quilt sandwich slightly.
(Go try it -- I'll wait.)
That lifting can cause a shift in the backing fabric.
And those little shifts can lead to a rumpled backing.
If you wait to close the pins until they are all inserted, you can move the sandwich around as much as you want and the backing isn't going to budge!
Now the fun begins -- pinning.
(Cue the movie or the book on tape, please.)
Once a section is pinned (but no pin closing yet), I pull the hanging part of the quilt up onto the table.
There will be rumples.
Smooth them out and then repeat the backing tugging process before you continue to pin.
Mary Ellen advised pinning a "fist" apart in a grid -- that is about 3" to 4" between pins -- and after 25 years of pin basting, I've found that to be a good guideline.  On a big quilt, that might be 400 pins.  It is a lot of pins but needing them for the next quilt means I'm more inclined to finish the quilting so I can use those pins.
Here's the back of my quilt -- pretty smooth.
Another UFO ready to quilt!
And I'm not crippled up from crawling around on the floor basting or pinning!
So to review, the important points!
1.  Fold the layers for easy unfolding to minimize wrestling.
2. Mark the center of everything for easy alignment.
3. Check alignment before basting!!
4. Tug the backing smooth before basting.
5. Use a 3" to 4" interval for pin basting.
6. Leave the pins open until all are in place -- don't cheat!!

So there you go. 
What do you think?
I hope some of my tips help make your layering process easier.
It's so important to do this step well but it's so tedious that it's easy to go too fast.
Perhaps you'll have time to baste up one of your UFO's this weekend and give it a try!

Almost forgot -- the quilt featured is my first merger of batiks and florals done back near the turn of the century (-; when Karla Alexander's book, Stack A Deck, was first published!!

Mary

Linking up today at WHOOP, WHOOP


Tuesday, August 22, 2017

Finish #3 for the Quarter!!

Over the past week, I've been steadily quilting this scrappy trip around the world lap robe.
A simple grid of (mostly) straight lines 1/4" on each side of all the seams was just right.
Not much thinking required, no threads to bury!!
I used orange thread (Aurifil 50wt/2ply) to highlight the orange in the plaid of the backing fabric.
I cut it close on the binding, but I made it!! 
My daughter graciously held it up for me on the front porch this morning before she left for work.
Close-up!
And one more shot because Willie showed up for his cameo.
Now I've reached the halfway point on my third quarter Finish-A-Long 2017 list!!

I spent the afternoon checking out the eclipse -- Northeast Ohio was in the 70% zone.  My science teacher daughter secured the correct eye gear and so I stayed outside most of the afternoon checking the status every 15 minutes and creating this page in my Haiku journal.
Apparently, I have no memories of past eclipses even though folks tell me I have experienced them.
Probably wasn't impressed because there were no birds involved?
The birds and animals didn't seem effected by the event.
This female/immature ruby-throated hummingbird spent 5 minutes scouring every flower in the patio pots for nectar.
I also added another species to the list of neighborhood animals that eat from Willie's outside dinner bowl -- a little short-tailed shrew -- lives under the back steps and darts out and grabs bits of dry food from the dish!?!

Several readers asked so I'm working on a post for Friday showing how I layer my quilts on a single table without a helper.  

Hope the week is off to a good start!!

Mary

9/26/2017 -- linking up to the 3rd quarter 2017 Finish A Long!!


Tuesday, August 15, 2017

NNP August?

NNP stands for NO NEW PROJECTS!!
I am trying to have pass through the month of August without beginning any new quilting projects!
There is so much temptation out there but I'm determined!!
Don't worry, I won't be bored -- there is plenty in production already.
While I do have a little trouble staying with a project when it is no longer challenging, I should be okay.

The straight line quilting I'm doing on this piece is only interesting for about 5 lines and then I'm ready to do something else!
I'm pleased with the results -- stitching 1/4" on each side of all the seams.
To hold some focus, I'm trying to work on improving the consistency of my stitch length and eliminate "jiggles" at my start/stops.
Theory is if I improve in those two areas on this quilt, it will translate to the next one?!?
I'm not going to start the ZenChic Triangle QAL via the Bernina blog even though I've pulled such a great stack of fabric to go with the little bundle I bought last week of Down by The River by Lewis and Irene.
Found the fabric at www.fabricworm.com!
It's quietly sitting in a chair in the studio waiting for September 1.
The first step is simple work so catching up should not be a problem.
I really should sew up this blouse -- all cut out and wouldn't take an afternoon!!
I finished three more dodecagons while visiting my youngest daughter and her family last week!
Only 5 more to go, fabric combos all picked out, just need to cut!!
Monday morning when I stumbled across the #100days100hexies2017 on Instagram (the enabler is @sewfoxymama), I did not start a new project -- I decided to use it as an excuse to prep lots of black hexies for bordering my dodecagons!
I will be overachieving though and do 10 a day (cause I need a lot).
Every evening, I'm putting about an hour's worth of stitching into the quilting of a previous hexie masterpiece, Karen's Value Proposition FAL from 2015 (or was it 2014?). 
And I won't do more than one of these blocks a day . . . . aren't they fabulous??
It's @lorena_in_syd's fabulous design, Opal Essence!!
Well, I needed something up on the design wall -- can't just stare at a blank wall?!?
I only have to be strong for 16 more days!!
Back to the quilting!
Mary


Friday, August 11, 2017

It Takes Work to be Creative!

My oldest daughter, the librarian and I made a quick trip to visit my younger daughter and her family this week to celebrate the 11th birthday of my granddaughter.  It's a longish drive -- 7 hours when including all the stops I need to make for stretch -- and so as many of you do, we listened to a book.

The book is titled Vincent and Theo, The Van Gogh Brothers by Deborah Heiligman.  (She found it on Hoopla.)  It's the story of the two brothers personal relationship and is drawn from nearly 700 letters written by Vincent to his younger brother.  We are a bit more than halfway through it and I'm in awe of the depth of their conversations with each other via the letters.  

I was reminded of an account of DaVinci I read 15 years ago.   He was never satisfied with his work and left behind enough UFO's to mentally cripple most people.  Yet, we admire his work and the legacy of ideas he left for our benefit.  He didn't know that would happen, he was working through ideas in his head and some worked but most didn't.  

We left off yesterday at the end of a chapter about a period in Vincent's journey to the paintings we know him for during which he was striving to expand his understanding of color. 
He had to learn to use color? 
What? 
He was an artist, isn't that part of their genetic make-up?

Of course it isn't.  It's a skill built through the creative process of learning.  Learning is experimenting, trying out ideas, imitating others who we admire -- in other words, it's work.   Vincent had some innate talent for drawing but he didn't rely on that to become an artist.  The author relates many examples of how he worked through the same drawing exercises repeatedly in an effort to learn and improve the skills of his trade.  

This particular chapter was discussing Vincent's discovery of complementary colors and he made the comment in a letter to Theo that using complementary colors "enriches the colors".  This occurred five years into his journey to become an artist.  Wow, I thought.  I use complementary colors to create contrast quite often but had not realized they also enrich one another.

I've been looking through some pictures I took last week on a walk around the perimeter of a large local meadow which is bordered on three sides by a lush forest of hickory, beech, and maple.  Just for fun, I've been naming the color schemes used by nature and focusing on the impact those color schemes have on what attracted me to photograph them.  

The meadow was alive with tiger swallowtail butterflies -- at one point, I could see nine fluttering over various parts of the meadow at the same time!!  
I took quite a few pictures but the ones I like best are when they were posed on this red-violet swamp milkweed with a rich green background of foliage.
The contrast of the complementary colors -- green and red-violet -- make the whole photo more vibrant.
These crabapples caught my eye as I walked past -- complementary colors!
I also made a mental note of how large they are this year -- time to make crabapple jelly!!
I think this shrub is in the dogwood family -- look how these berries stand out on their red stems. 
Compare that to how much less obvious these blue berries appear -- analogous colors.
Complementary colors -- does nature use them so things stand out?
Did I notice this grass because it stands out against the green background or because it was so different from everything around it?
Perhaps some of each? 
So if Vincent had to work at learning how to use colors, I should not be intimidated by the fact that using color is not intuitive for me.
It's work!
And it's work that I love!

Enjoy the weekend!
Mary


Tuesday, August 8, 2017

A Full Moon Means Focus on Finishing!!

I'm not really superstitious but I do believe that the full moon agitates my insides more than I like,
So several years ago I developed a "full moon strategy" to combat the negative impact I feel for the few days surrounding this monthly cycle.  One aspect of it is to finish projects rather than start projects.   I get such a positive vibe from finishing something that it just makes sense to manufacture good vibrations to counteract the turbulence of the full moon.

So I dedicated this past weekend to finishing!!

Finished the Meteor Shower wall hanging the I made for Emily Breclaw's Adventures in Hexagon blog tour -- yea!!!  (Read about that finish HERE).

Then I turned to the two twin size quilts that came back from Sarah at Quilting by the Mill the end of May and the binding that was already cut -- been setting right there for two months patiently waiting!
 Got those bound -- yea!!!
Took all of three hours and now they are ready to put up for sale in my Etsy shop!!
Go HERE to look at them!
I think they will look charming in a young girl's bedroom -- soft blue walls, white furniture!!
Plus getting them finished is another goal reached on my third quarter 2017 Finish A-Long list!!
While I'm (smugly) crossing that off the list, I realize that one third of the quarter is gone and I still have four quilts to quilt and bind on that list?!?
(The LIST with full frontal pics of the quilts!)
So Monday (sturgeon moon day) was all about layering and basting!

Number one.
A scrappy "many trips" for my nephew-in-law.
Done!

Number two.
A charming crib quilt that is destined for the Etsy shop.
Done!!

Number three.
My Smorgasblocks top from last summer -- destined for a niece-in-law.
Done!!!

Wow, I'm so impressed with my stick-to-it attitude.
I even know exactly how I'm going to quilt one of them and the other two are beginning to make suggestions -- love it when the quilt talks to me like that!!

Next challenge?
Quilt them of course!
I hope that stacking them up next to George will be a nagging reminder to "come quilt us".

I can't believe I did that -- layered three quilts in one day?!?
Whew?!?

Mary

9/26/2017 -- linking up for the 3rd quarter 2017 Finish A Long!!


Friday, August 4, 2017

Another Look at Meteor Shower

It's not often that I push all the way through a project from beginning to end but apparently having a quilting design idea was enough motivation to keep me moving on this piece!
Sometime in the past couple years, I came across a quilt on Pinterest quilted in concentric circles like a huge target and it inspired me.  The swirling design of Meteor Shower called out for concentric circles as soon as I started the final stages of piecing! 
Eager to try it out, I fiddled with my set of Handi Gadgets Half Circles.  
The first circle fit right inside the center hexagon!
Once I had finished the 12" circle, it was obvious I would need a new strategy.
In the spring, I watched a gal demonstrate the Westalee Ruler Foot Echo Guides for Cindy's Sew Easy Shop here in Cleveland (Ohio) during a local show.  The tools are distributed in the USA by Sew Steady and HERE is a little video about the echo guides.  I was very impressed so I bought a set and hoped that my APQS ruler foot would work with them.  It didn't, but happily, APQS introduced a new ruler foot -- exactly 1/4" from the needle to the outer edge and with a new shank design (look back up at the first picture) that accommodates rulers all the way around the foot -- and the guides do fit on that foot!!
I experimented with drawing circles -- that didn't work.
So I used my Fine Line arc ruler to keep my stitching (fairly) steady and on track.
The key lies in stopping every 3" or so and adjusting the ruler to line up with the next section of the previous circle.  I'm not going to share close-up pictures of the stitching -- you'll see all the hic-cups.
As I neared the point at which the ever larger circles would intersect the edges of the quilt, I decided to stop the circles once I was past the last group of teal diamonds and finish the corners with straight lines to create the appearance of a burst of light.
A sheet of paper laid on the quilt helped me experiment with how that might look and how to proceed with the stitching order.
I switched to the straight ruler and zigzagged around the center creating a series of points.
After the first complete pass around the quilt, it did not lay completely flat outside the circle.
I needed to add more quilting to match the density of the center of the quilt. 
A second trip around the entire quilt with zigzags that overlapped the first round and were shorter took care of that.  As I was finishing the second round, I thought it would have added some more interest to have changed colors of thread and perhaps add a third row with a third thread color.
Next time?
Or you could do that and let me know how it looks!
Here's a close-up of one corner so you can get a better idea of how it looks.
The edges were not quite as flat as I want for a wall hanging so I spread the quilt out and laid a soaking wet towel over top for a couple hours -- that flattened it out nicely.
It's laying out on the porch drying overnight -- thought I would get it bound today, too.
But there is no point rushing it -- it will be good and dry by morning and tomorrow, I'll have a FINISH!!!
I love the movement the concentric circles create!
I'm not sure I would do a big quilt with this design and I think most quilters who do circles use a walking foot and a guide, but George doesn't walk, he only runs!!

If you missed leaving a comment on my last post to enter my Adventures In Hexagons giveaways,  keep going down the page and read Tuesday's post.
Winners will be picked on Saturday evening, 8/5/2017.

Enjoy your weekend!!
Mary