Saturday, July 12, 2014

HEXIE Update

Hexies seem to have become quite a distraction for me.  This week I've been finishing up the background pieces on a couple of the blocks from Faeries & Fibres Value Proposition QAL.  That is the boring part of this project so I need to get them added as I finish each block.  If I leave it, it is very likely it won't happen! 

I think this is Block #6
Block #5 -- I think this is my favorite so far!
Block #4
Block #3 -- I didn't photograph with the top up so just tilt your head to the left a bit.
Block #2 -- I even added some of the path to this one.
Block #1
Here are the first six playing together nicely!!

And Block #7 -- well, Karen just posted it yesterday!
I'm working out of my "blended" hoard of fabrics which I accumulated during the last couple years I had my shop.  They've been "resting" every since?!  I was thinking yesterday that what doesn't get used in this project may find itself being moved into the general stash or liquidated altogether.  If I haven't touched the stuff during the past 9 years, it apparently isn't that compelling.  For sure, I have enough for a pieced backing!

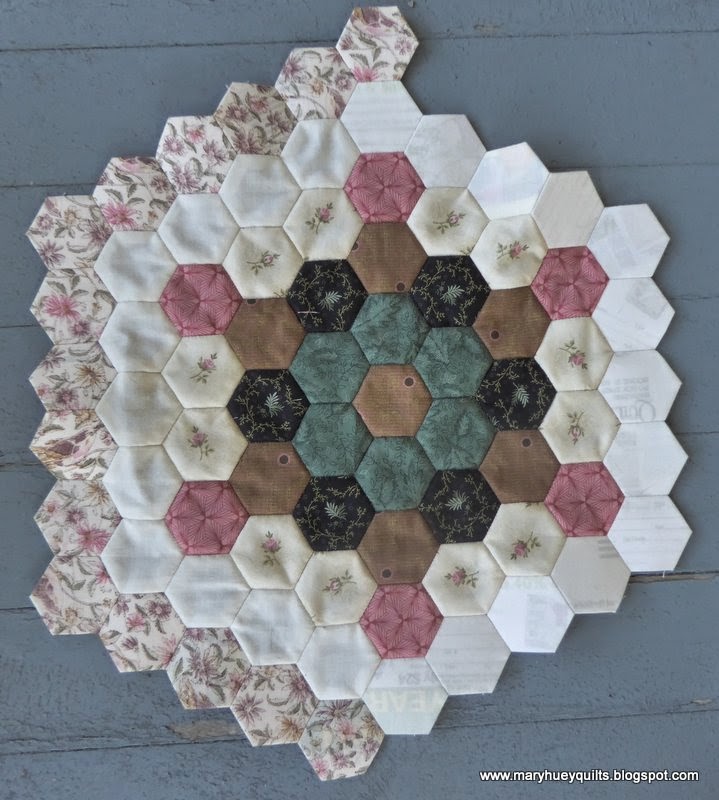
And this week, I've been making some progress on machine pieced hexie project -- 1" hexagons just the EPP project above.  And using the piecing technique featured in my workshop DVD,
This is the center motif -- it gets one more round.  I'm also working on a set of six smaller motifs that will surround this center one.  I pretty fast with both techniques but I like the machine piecing approach because I can do the seams as my "sew-offs" when I'm working on the deadline work!
Linking up over at She Sews! just for fun today -- love seeing all the fun stitching going on over there!!

Mary Huey


Friday, July 11, 2014

FINALLY -- Diamond Star Playtime Sew-Along, Step 9 -- Filling in the Edges

So thanks for your patience while I procrastinated about how to organize this phase of the Sew-Along.  No doubt, I should have thought about this more at the beginning.  Yesterday I wasn't fit to be out among people for a variety of reasons, so spent the entire day in my studio and now I'm ready. 

By this time, I hope you've settled on the style of your setting -- honeycomb or straight.  In this step, I'm going to walk you through the process of organizing the units to create straight edges around the outside of the quilt. 

Let's revisit my set of star blocks -- I stopped at 11 blocks and after much moving around on the work wall, I've settled on this arrangement.  It feels balanced -- notice that the boldest star is in the middle -- no matter where I put it, it always draws my eye to it, so it needs to be centered.  The other stars are organized in "pairs" more or less that sit opposite one another and that keeps it balanced to my eye. 

There are two deep gaps at the center of the top and bottom edges and I'm going to fill them in with half-stars.
Happily, I didn't have to cut much to make these -- most of the pieces were left over from cutting the main stars.   These half-stars will make the top and bottom edges of the quilt straight so standard borders can be added.
Now I need to decide how to fill in the sides to make them straight.  I auditioned several prints since there is not much left of any of the fabrics in the stars.  I found one yard of this busy but subtle print (in my bulging stash) -- the colors are perfect, the scale and density of the print differ from the background print giving a subtle contrast which I like, and the motif is compatible with the theme of the prints in the stars.
When I pinned it up against the blocks and stepped back, I liked it right away! 
To minimize the depth of that space, I decided to add a diamond of the background print. You can begin to see the shape and configuration of the units that can be made to set into the quilt top -- in my experience, this piecing approach is simpler than appliqueing an edge full of points to the border fabric.   
Time to cut some fabric!  As I ironed the fabric, I realized it was a directional print, so the first cuts were 4" strips cut crosswise on the fabric for the top and bottom borders.  That may not bother most people, but it would bother me to have the roses going every which way.

I used partial hexagons to straighten the edges and create a border at the same time.  Since I used Marti Michell's 60 Degree Diamond Tool to cut the stars, I used the companion tool, the Multi-size Hexagon Ruler to cut the side pieces.
First, measure the depth of the partial hexagon from the tip (on the right) to any place on the left that gives the finished border width wanted (this will make sense as we go).  It's so close to 6" that I cut strips that width -- a little extra can't hurt, right? 
 Once the strips are cut (on the lengthwise grain to control the directional print), I measured the "width" of a 3 1/2" hexagon -- it's 6 9/16" -- or half way between 6 1/2" and 6 5/8".
 I cut rectangles off the strips -- one for each partial hexagon I need.
 Then I center the tool on the rectangle with the 3 1/2" lines aligned perfectly on the left and the right.  The point of the hexagon tool just touches the top edge.
And I trimmed the left and right top edges as shown.
 I'll need dots on those three corners for the set-in piecing process, so I did that while still at the cutting table.
Time to sew -- it's a set-in seam where the diamond is inserted between the two hexagons.
And these are the units I made -- 3 for the left side and 3 for the right side.  The diamond is the same size I used for my stars.  You can press the seams open between the two hexagons to make it less obvious.
This is how they will be positioned along the sides of the quilt.
I also needed corners units for the upper and lower ends of each side.  They were easy -- just use one of the partial hexagons and a 60 degree triangle -- be sure to position the straight grain of the triangle so it will be on the outside edge of the quilt.  Here are my four corner units.
So everything is in place and ready for me to assemble tomorrow . . . . or the next day
Once I have it assembled, I'll contemplate and audition for another border, maybe, and the binding fabric. 

While I work spontaneously on the work wall in my studio, you may find it helpful to use graph paper to lay out the edges of your version.  I find the "equilateral triangle" paper that can be printed from this website the easiest to use for that.  If you are stumped on how to proceed with the setting of your stars, don't hesitate to get in touch with me at maryhueyquilts@hotmail.com.  We can exchange photos and chat about ideas via e-mail.  It may just take one little idea to get you moving on your version again!

The final step for the Sew-Along is next -- contemplating the quilting!

Mary Huey


Tuesday, July 8, 2014

The versatile Log Cabin Block and a FINISH!!!

As of 8 a.m. this morning, this quilt is on it's way!!  It is a gift for my youngest sister's 60th birthday.  In an effort to disperse some of my backlog of quilts, I started "gifting for 60th's" several years ago.  This one completes that goal -- all siblings gifted!! 
It began life as a teaching sample using log cabin blocks and an idea first shared with me by my very creative teaching mentor, Mary Ellen Hopkins.  She pointed out that basic log cabin blocks are two triangles of color.  Therefore any quilt block could be the setting for a group of log cabin blocks. 
I taught a beginning quilt making series called It's Okay To Sit on My Quilt (based on Mary Ellen's ground breaking book) for about 20 years.  This project was one of my challenges to my students -- pick any block in the book and interpret it using log cabin blocks. 
Do you recognize this block?

It's Martha Washington's Star -- if I add lines to create an 8 by 8 grid of half-square triangles and squares rather than the obvious 4 by 4 grid, I can see how to get that pinwheel at the center.  Now I make each "square" a log cabin block.
 
Some will be the traditional two-color blocks for the HST's and some will be all one color for the plain squares.   Can you see the individual log cabin blocks?  This is my layout guide from EQ and I'll work up a PDF for you to download with some basic info if you'd like to try it yourself.

It makes no difference what size the blocks are or how many logs are around the center or what size the center is or what size strips you use to build the blocks.  They just need to be log cabin blocks.  Obviously, the size of the log cabin blocks matters in terms of the finished size of the top.  Mine were 6" blocks so the top was 48" before borders.  But they could have just as easily been 12" blocks if I wanted a larger quilt. 

This is a close-up of one of the "points" of my star -- made of 4 log cabin blocks -- the upper right one uses only the red print, the lower left one uses an assortment of white-on-white prints, and the remaining two are half red and half whites.
This is a center section -- 4 blocks again -- can you decipher the combination?
I do advise stitching the log cabin blocks made with just one fabric where no one can see you working -- they already think we are a bit crazy to cut fabric up and sew it back together, but when you only use one print, that might be too much for them.  I have tried just using a plain square instead of going to the trouble of making a log cabin block, but it just doesn't look right.

Now with Marti Michell's terrific Log Cabin Rulers in my arsenal, I'm thinking I'll revisit this idea! 
If you haven't tried these tools, they have improved the accuracy of that block for me more than I expected.  The uniformity and consistency is remarkable.  I was a skeptic but it only took one small quilt to win me over.  There are four rulers at this point, each working with two strip sizes (ranging from 1/2" finished to 2" finished strips) and making multiple block sizes.  I own all of them and use them frequently -- the cutting takes a bit longer but the time saved during the piecing process is ample compensation!

If you can't find the rulers in your local shop, you can order them directly from her at http://frommarti.com and you might want to visit the cutting demo video on Marti's website.

So bring on the next UFQ!!  This reduces the pile of quilt tops to only 37!!

Mary Huey


Sunday, July 6, 2014

Quilting interrupted!!


My main goal today is to finish this quilt to send off to my youngest sister for her (60th) birthday tomorrow! 
I've tailored this garden border outside my office window into a pleasant view of wildflowers (milkweed) and hanging baskets. 
As my daughter and granddog returned from their morning walk, they made a discovery and knocked on the window to get my attention!! 
I had my first Monarch butterfly sighting just 4 days ago -- one was nectaring among the milkweed which just came into bloom.  And here was a 1" long caterpillar. 
For the past 8 or 9 years, I've culled eggs and small caterpillars to raise to adulthood with some success until last summer.  The adult butterflies were late arriving and few and far between -- I didn't find any eggs or caterpillars in my garden at all.  So to have one in early July might be a good sign that it will be a better summer for this amazing butterfly.
 
Interestingly, there was no sign of eating on the leaf where Alison found the caterpillar.  On the adjacent stalk, it was easy to find where it was last eating.
I set up our little brooding enclosure and moved the caterpillar into it with a vase full of young milkweed stalks.  I'll change them every day.  It will take about a week more for this one to morph into a chrysalis.
Then I went back to the patch to see if there were eggs or more caterpillars.  I only found one egg but there is another patch to be searched this afternoon.
And I found a newly hatched caterpillar -- the older the caterpillar gets, the better it's chances of surviving, but at this size (not quite 1/4"), they are often eaten by spiders and other insects.  I moved it into a plastic zipper bag with a fresh leaf.  I'll give it fresh leaves daily and when it's large enough, I'll move it into the enclosure.
Look at the camouflage of this critter!  Same exact color as the new leaves on the milkweed stalk!
And I wonder if this is a unique lady bug -- have to try to find my ID leaflet from the Ohio Lady Beetle project monitoring that I did a couple years ago.  (Note -- here is a link to that PDF on-line -- http://kbsgk12project.kbs.msu.edu/wp-content/uploads/2013/08/Lady_beetle_ID_Sheet.pdf) and I was right -- it's a 14 spotted -- unfortunately, non-native to Ohio.
To learn more about the amazing life cycle and journeys of this migrating species of butterfly, visit www.monarchwatch.org or www.monarch-butterfly.com
 
And look for this little book at your local nature centers -- Milkweed, Monarchs and More by Rea, Oberhauser, and Quinn -- it's packed full of information about the interesting community of insects that inhabit milkweed patches in North America.
 
Milkweed Monarchs and More ,Field Version
 
 
Back to the quilt!!  Must make the deadline!!!
 
Mary Huey


Wednesday, July 2, 2014

Dispersing a few quilts!

Welcome to my visitors from Lily's Small Blog Meet -- I'm looking forward to meeting some new friends myself!!
 
About twenty years ago, I decided that I couldn't indulge myself in such a pleasant career (quilt making) without including an aspect of useful compassion to it.  At that point, I began to donate quilts as often as possible to variation charities and missions.  Sometimes the purpose of the donation is to raise money and sometimes it's meant to bless someone with a quilt.
 
A group of the latter left here on Saturday.  Nine quilts went with the Chardon United Methodist youth mission team to Appalachia Service Project (ASP) on their annual summer trip.  The quilts will be used to bless the lives of the families the team works with during their week in Kentucky.  These quilts are made and donated by an assortment of my friends.  I insist they are cheerful and machine quilted as they are intended to lift people's spirits and be durable, long lasting comforts to them. 
 
It was hard to let this one go but I hope by the end of the week, it will be delighting someone new!
 I donated this wall hanging to the annual fund raiser at Holden Arboretum in Kirtland, Ohio.  It's one of the largest private arboretums in the United States and I'm fortunate to live so close.  My family and I have enjoyed many hours hiking and exploring there over the past 40 years. 
This piece is based on the book Circle Play by Reynola Pakusich.  I found her website but can't tell if she is still active.  I've taught classes off and on using this book since 2004.  This version is called EXOTICA.  It's 26" square, machine pieced, hand appliqued, and hand quilted.  I have attached a sleeve and there is a rod included with the quilt. 

And you can bid on it!!
 
Just click over to www.holdenarb.org and click on WOODLAND TWILIGHT On-line Auction.  Once you get to the Auction page, it's listed in the ART section (I am pleased that they included it in that section!).  On-line bidding continues through July 10 and all the details are outlined.
 
So if you've want to own one of my pieces, this is a good chance!  I don't sell very many pieces.  And if you are ogling the blue/rust border fabric -- save your energy.  It's long gone!
 
To the kitchen!  My quilting friends will be here soon -- we are re-booting for the next round of quilts to be donated.  I'm going to surprise them with a rhubarb cobbler!!  If you live on the eastern side of Cleveland, Ohio and would like to join our happy little group, let me know!
 
Mary Huey
 
P. S.  First Monarch butterfly sightings here today -- hope it's a good summer for them!!
 

Tuesday, July 1, 2014

QCQAL Block #9 -- Card Tricks at LAST!!!

Finally, Card Tricks won the voting for Little Bunny Quilts QCQAL -- it's been nominated several times.  This has been one of my favorite blocks for many years so it's fun to have it become part of this quilt!
If you are a new follower, I've been blogging alongside Alison at Little Bunny about how to make the blocks for the QAL using Marti Michell's rotary cutting templates.  In general, every block has used either Set A or Set B -- not surprising as these two sets are the foundation of the entire system of tools.  I always start by doing a bit of basic math (12" divided by 3) to determine which templates are needed.  The upper pair of templates (#9 and #11) will make a 12" block and the lower set (#13 and #14) will make the 6" block.  Notice that I've written down how many of each piece I need to cut -- I don't trust much to memory anymore because sometimes I just can't get into my "cloud".  (-;
The larger triangles are cut from a strip as you would expect.
The smaller triangles though need to be cut with the grainline of the template on the straight grain of the fabric so it lays on the strip like this and the measurement of the strip equals the distance from the long flat side to the opposite corner. 
Since I don't need much of the polka dots,  I decided to just layer up the four colors and cut a stack of each from a clump of fabric rather than cutting strips. 
It seemed like a good idea until I laid the blocks out and realized I needed two clumps of each size.  Isn't it comforting to know that I don't read my own notes?  (It does say to cut TWO of each template from the polka dots.)
That's better!
After I stitched together the half-square triangles for the corners of the block, I laid out and stitched the remaining triangle groups.  It's important to lay this block out at every stage. 
And then one must actually look at it, because . . . . . this is WRONG!
I, of course, had the 3 part triangle sets stitched together before I realized it.

 Teaching opportunity!!

This is how I "rip" (unstitch) bias grain seams to avoid stretching. 
Snip every fourth or fifth stitch down the entire seam.
Flip the piece to the other side and poke along gently along the mid-section until you find a place where the thread pulls loose easily.

Now pull gently and the entire thread should come up easily without stretching the edge of the fabric!

This time, I have everything where it should be.  My mistake was in not laying the center square of 4 triangles in place. 
 
Block #9 is finished -- three more to go.  The voting is open for Block #10 at Little Bunny Quilts! 
And here's my assortment so far!  Rather busy, but I hope that the sashing I chose will calm it down when I get to that point. 
Back to the studio -- it's cool in there and we are having one of those 80 degree days with 85% humidity.  Love it!?!
 
Mary Huey