Showing posts with label 8-pointed stars. Show all posts

Monday, February 8, 2021

Momentum?

 Hello!!  How are you doing?

We seem to be finally having a bit of winter here in Northeast Ohio.  There is snow on the ground with more coming and it's cold enough that it's staying.  All the small lakes are frozen over and Lake Erie is freezing up, too.  We've even had some February sunshine -- not a typical part of winter here on the south shore of Lake Erie.

And I've been able to build up some momentum working on quilting up that pile of tops.  Last week I finished this little 30's version of my Mississippi Mud pattern.  I know lots of you have bought this pattern from me so I decided to try a new to me quilting strategy for this one and I'm quite pleased with the outcome.

It was a simple process of stitching point to point arcs from one edge of the quilt to the opposite edge doing a separate pass down the right side of the seams and then down the left side.  I'm always reluctant to mask the stars with the quilting and while this idea does that to some extent, I'm okay with it!
And there's a lot to be said for a finished quilt!!
And look at this cute print I've been sitting on forever -- there was enough for the backing and a little leftover to play with another day.  I'm determined to use up all the beautiful prints in my stash instead of leaving them for the big yard sale.
I took a short break from machine quilting to put together a simple little piece using some perhaps 125 year old hand pieced quilt blocks that a friend passed off to me last month rather than shove them onto the shelf where all the antique treasures live.
After looking at them on the design wall for a couple weeks, I decided they would need to be trimmed in order to set them together easily.  That's always a hard decision for me, but it was trim them and use them or put them on a shelf for another 10 years.
As I worked with the blocks, I realized these were perhaps pieced by my friend's grandmother as her mother taught her to stitch.  Grandma Saffron grew up to be an excellent seamstress and although her skills didn't move down the family line any further, the memory of the things she made for them is special.
The finished result is a simple little tabletopper with no batting, lined with a vintage piece of fabric.  It tells a story of a mother teaching her daughter a life skill using bits and pieces of leftover garment fabrics that would have been familiar to her as a woman.  The fact that she saved them for so many years (she died in her late 80's) speaks to their meaningfulness to her.
And now my friend will be reminded of a beloved grandmother daily.
It was time to layer up #4!  My choice of the next quilt top was spontaneous and influenced by all the "arcing" on the Mississippi Mud.  I'm sure you notice when you are quilting that it's always better by the end of the project, so while the arcing was flowing, it made sense to keep it going.
This 8-pointed star was pieced from a jelly roll using Marti Michell's Stripper Template Set which contains an assortment of templates sized for 2 1/2" strips.  These blocks were demonstration blocks for my Set-In Piecing Simplified workshops and set together with leftover strips from the jelly roll, so the sashing and cornerstones are random! Fun, fun, fun!!

And look at the backing!?!  This print has been on the shelf for at least 15 years and I could never cut into it even though I had "a plan".  It wasn't quite long enough so I cut the bands apart and inserted strips of the polka dot.  There was scarcely enough polka dot so it needed to be stretched with the bands of bright prints.  So at last, I got to use this print myself!!

I expect to finish this quilt by the end of the week (keeping it simple is the key) putting me around the 20% mark towards my goal.  Almost every evening finds me hand quilting for an hour or so on the big dodecagon quilt -- steady progress there, too!!!

I'm feeling confidently cocky at this point but maintaining the momentum to reach big goals is always a challenge.  I'm sure you've experienced being puzzled about why it took so long to get around to something when it was such an easy task once you tackled it.  So in truth, I'll be happy with any progress made this year!

I'll leave you with a picture of a special place and a special bird nearby.  A local farmer has planted and left standing about 20 rows of sunflowers down the middle of a large crop field.  And he's gone one step further and welcomes birders to wander in the field during the winter months.

Generous man!!!  

So my daughter (who I raised to bird with me) and I stood in the middle of this field Saturday morning and watched several hundred common redpolls and American goldfinch swoop in and out of the field.  The longer we stood, the closer they came!

Delightful!!

Here's to all of us finishing something this week!!

Mary


Friday, February 14, 2020

Working Quietly

 Greetings from the snow globe that is currently Northeast Ohio!
We haven't had much snow this winter (embarrassing when one lives in the "snow belt of Ohio",
but yesterday we were delighted with a few inches of soft wet snow that clung to everything. No matter where I went or who I talked with yesterday, everyone was exclaiming about how lovely our world looked frosted from top to bottom!
Delightful!!

As for me, I've been quietly absorbed in several projects -- not much finished, but progress just the same.  Those little 8-pointed stars I share in my last post have evolved into this bright cheery child's quilt!
I know strong colors aren't the current baby decor fashion but I hope this quilt will be a cheerful blessing to a new baby and their family someday soon.

One of the little laments that often is evoked by my scrappy use of fabric is "I don't understand how you do that" meaning how I can set two pieces of fabric side-by-side that don't match, that don't look pretty together, that in fact may look harsh together.  So today, I thought I'd share my simple piecing strategy with you.

In my last post, I shared my scrappy pull from the yellow stash.  In the end I cut squares from nine prints.  
There are only four of the cute farm print (the last precious bits of it).  The other prints were selected because the shade of yellow blended with the farm print's yellow or they had a bit of red in the print or they just looked "right", i.e. the daisies!
Here they are sorted and stacked on my sewing table ready for piecing!
I started with the farm print and stitched it with four different yellows.
Then I worked down through each stack, one at a time - pairing each square with a square from every one of the other stacks until all the stacks were used up. 
No judgement made about matching or pretty or anything - just pick two up and sew together!
I didn't press the pairs at this point.
The next step is to sew the pairs together into groups of four squares -- only rule is not to repeat any print in each group of four! 
Still not pressing!
As I clipped the bands of four apart (chain piecing, of course), I laid each one open on the sewing table.  That way, as I joined the groups of four into groups of eight squares I could make sure two squares of the same print weren't too close to each other. 
Then groups of eight together and now I press the seams of the entire band in one direction.
As always, I'm anxious to see how it looks so up on the design wall they go.
I didn't do any math before cutting the squares so needed to cut more as the plan evolved.
Here's a trick I use when my math is a bit sloppy or non-existent!
I use a rectangle for the ends of the bands! 
Once the bands are stitched onto the quilt top, I can trim the ends and they "fit" perfectly.  
Honestly, no one has ever chided me for those corners not being perfect squares.
And I likely wouldn't care if they did because I have a finished quilt top!!
Do they??? 
I have shared this auditioning tip to eliminate frustration many times during my teaching career but it is always worth repeating.  
Stop auditioning one fabric at a time!
Lay up all the options you are considering at the same time.
Leave the room, go do something else for a few minutes and when you come back, pay attention to your first reactions when you look at the design wall.
Usually, my intuition tells me immediately what doesn't work and I can remove those.
Depending on how many options you have found in your stash, this process may have to be repeated until by process of elimination you arrive at the "best option available". 
"Best" and "available" are important words because they help me use up what I already own and they have helped me "stumble" onto new ideas and expand my flexibility.
In other words, it's a strategy that contributes greatly to my productivity because I don't have to stop and wait until I find the "perfect" fabric!!
Once I elongated the top with more bands of yellow squares and red sashing, I was ready to finish it up with cheery red print borders.
It ended up at 40" by 51".
One more UFO successfully managed!!
I'm hoping to be able to share photos next week of my huge English paper piecing Dodecagon quilt.  I'm currently working on it for a bit every day assembling the five large sections and it's so gorgeous.  My other project this week is the quilting of this twin size Sandstone quilt top (one of my patterns on Etsy) for one of my charity quilt group's projects.   It's slow going because of the size but a few lines every day will get me there by the end of February!
Now I'm off to spend the afternoon with this crew so their Dad and Mom can have a little Valentine's break!  Aren't they getting big?!?  And they are starting to move around!!
Oh boy!!

Have a pleasant weekend!
Mary

By the way, that quilt is not as crooked as it looks -- apparently, I don't hold my camera very level or straight or something?!? 
Promise, I'm working on that!


Friday, January 6, 2017

Project Quilting Season 8

If you could see my "blog planner", you would know that today's post is not in the plan -- it came out of nowhere and surprised me.  When that happens, I'm grateful because it often gives me some breathing space when I'm flailing around for topic inspirations.
This picture from my post earlier this week may have piqued your curiosity -- it certainly did mine!
Over the New Year weekend, I stumbled into information about Project Quilting, the brain child of Nikki at Persimon Dreams -- it will be easier for you to just jump over THERE and read about it for yourself.   There are already over two dozen finished projects posted in the linky at the end of the post.

If you are new reader from the Project Quilting "linky", thanks for visiting!  I'm Mary Huey, I quilt in Northeast Ohio and have a long history as a quilt maker -- teaching, owned a shop, and now blogging!

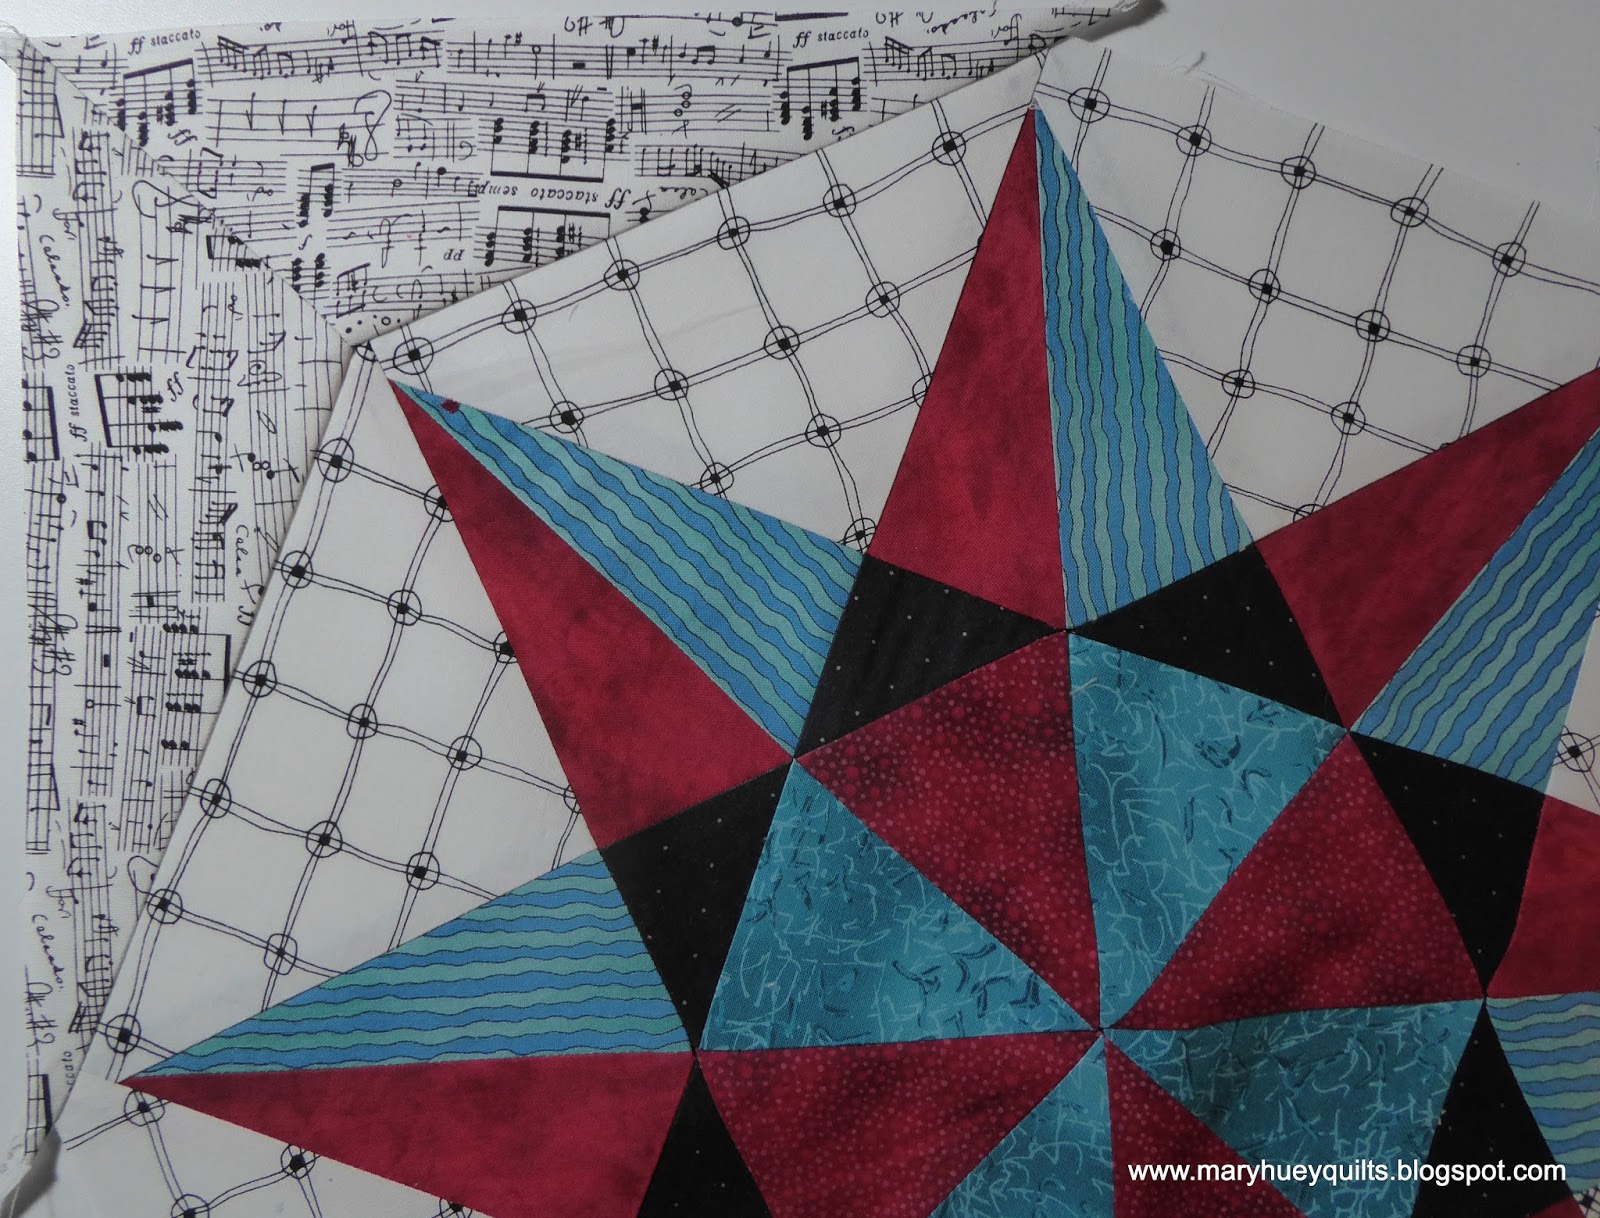
 The above diagram was included in the first challenge -- "eight is great" -- guidelines.  I was intrigued, as I am with all things "star", and a coloring session (unusual in itself) helped me dissect the sphere and experiment with color and value options.

The basic unit of the block is the "kite" shape associated with 8-pointed stars!
I teach with Marti Michell's Multi-size Kite Ruler so I used the largest kite to draft a pattern for a 17" block.  It's a little hard to see my diagram but as a result of becoming reacquainted with paper piecing last year, I decided the quickest way to achieve the dissected kites would be paper piecing.
I made 5 copies of my patterns -- one to use as cutting patterns (check out this post for my previous comments about this) and four for stitching.  I'm always challenging myself to use my expansive stash and this time, I elected to try interpreting a contemporary color scheme (aqua and red) with older fabrics.
Once the pattern was organized and the fabrics picked, it didn't take long to settle in at the machine and of course, I found a chain-piecing aspect to the process!
Once the paper pieced kite units were stitched, I used Marti's ruler to trim them to the perfect size. 
During the cutting process, I decided to piece the alternate points without paper (seems quicker in my mind).
After pressing the seams, I centered my pattern on the fabric, set the kite ruler on top of it and trimmed them to size. 
I opted for a single background fabric to maintain the clean line of contrast and they are actually simple right triangles (though they appear to be otherwise in the original drawing). 
I made them slightly larger than necessary to give me a cushion or float around the finished star.
Here are the two finished units ready for the final construction of the star.
Of course, it's a y-seam but piecing those are easier than you are thinking thanks to the "set-in piecing simplified" technique which I have been teaching for the past 4 years (thanks to the insight of Mary O'Keefe in Watertown, NY.). 
How many times have you read my rhapsodizing about this technique?
Are you curious yet?
Time to buy my PDF teaching guide, Set-In Piecing Simplified, and quit avoiding y-seam piecing!!
You'll have it in a week.  It takes 30 minutes to view (though I recommend doing it in two sittings with some trial stitching after the first segment).  With some practice, you'll soon be able to apply the idea to any y-seam block working with any of the many tools currently available. 
My final decision was to square up the block with the slightly darker background fabric.  It was in the running for framing the star, but it softened the edges of the star too much so this was a perfect way to get it into the finished block.  Those background pieces are half-kites and easily cut with the Multi-size Kite ruler.  I just had to be sure to cut each pair together with the fabric right sides facing to guarantee the necessary "right" and "left" orientation.
I love the block and I can see it as the center of a fabulous medallion but part of the challenge is to finish within one week -- a completed piece!! 
As I finished the piecing, I considered my options -- small quilt, pillow cover, table topper, tote bag.
The colors don't work in my home color scheme which revolves around neutrals and greens so using it for a "good deed" quilt was the best option.  But finishing a quilt in 4 days (during the designated week of deep kitchen cleaning) was not the best option.
And I don't like to make tote bags.

If you follow me on Instagram (@hueymary), you know this is where I headed out to shop (vegetables and bird seed) because I was struggling to decide how to finish it. 
On my rounds, I stopped at a local park for a (birding) walk and came to the conclusion that making a tote bag to donate during my church's annual Lenten collection for a local young families support ministry would be just the thing!

Rather than dig or search for a specific pattern, I cobbled together a large sturdy lined bag that I hope will serve as a cheerful tote for a young mother with limited resources.
The lining and this whimsical fabric for the pocket came out of boxes of fabric I culled from my stash last summer.
I'm not even going to show you how I constructed the bag -- there are so many great tutorials and patterns from stitchers who enjoy making them! 
The lines of the original grid drawing inspired most of the quilting and were done with the walking foot.
And here it is.  I'm pretty surprised with the results!?!
The best part was making it quickly -- four days -- and responding to lots of spontaneous ideas. 
When I got stuck, I stepped away and let the ideas sort themselves out.
Are you interested in the pattern drawing (just the block) so you can make your own version?
It finishes at 18" square with the final wedges. 
I'll organize a PDF to post on Craftsy this weekend.
I still think it would be a terrific medallion center block!

There are five more challenges during the three month run of Project Quilting.  I'll miss one while on vacation but I look forward to the discoveries waiting for me in the other four!
In the meantime, I need to finish a UFQ this weekend!!
How about you?

Mary

If you can't find Marti's Multi-size Kite tool locally, send me an e-mail.  I keep them in stock for workshops even though I don't have a selling website.
maryhueyquilts@hotmail.com




Friday, July 29, 2016

Another Finish for July!!

I've said it before and I'll say it again, there's nothing like a deadline!!
This is my second finish for the third quarter of the 2016 Finish Along!!
I'm still burying thread tails and stitching the binding down, but by the time you read this, it will be on it's way to the Appleseed Quilters Guild in Ft. Wayne, IN to recruit students for my workshop there in October.
I will be in Southeast Ohio cooking for my church's mission team for a week and this is my last task before I leave.

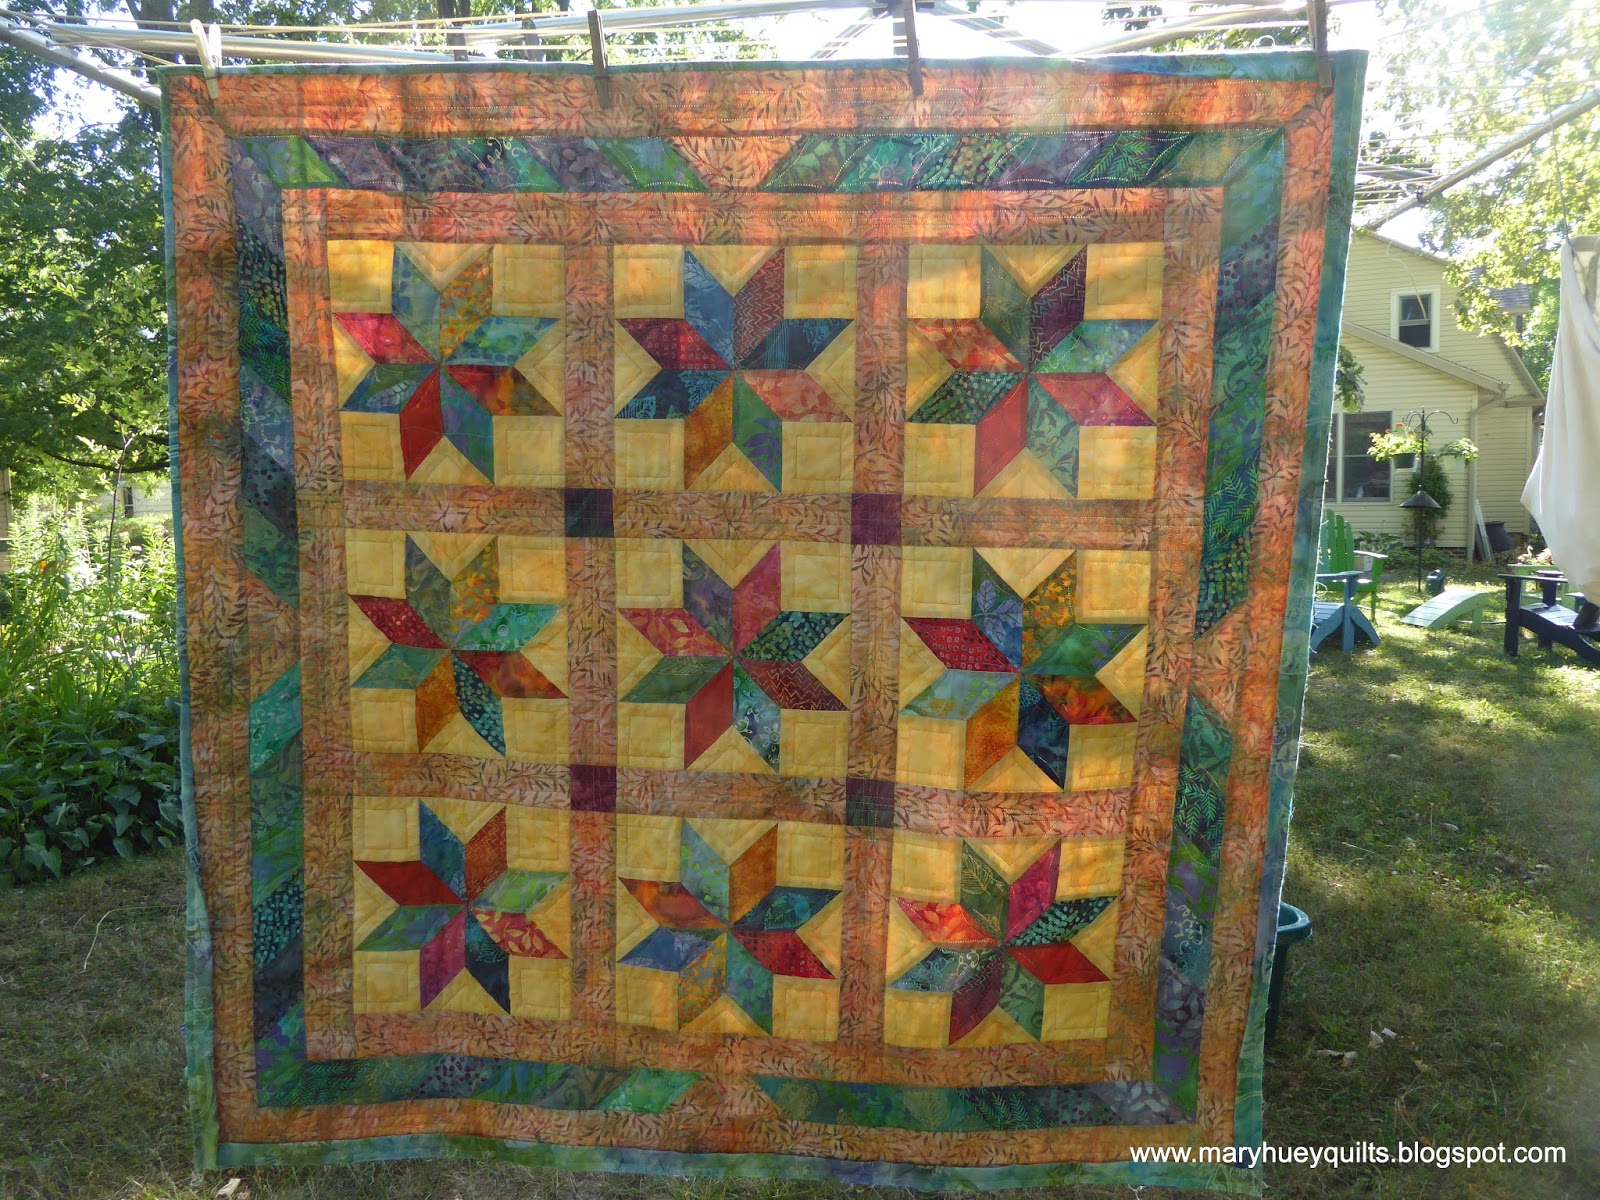
It only took three days to quilt -- I'm not able to quilt for hours on end thanks to arthritis but I can manage two or three hour-long sessions spread through out a day.  My standard design for 8-pointed stars is to do continuous curve quilting around the entire star.
I did some parallel lines through the sashing that intersect in the cornerstones and then took a pause to decide whether and if to quilt the background of the stars.  I didn't like the un-quilted look but it took a day to get inspired.
In the end, I settled on "simple" by expanding a box in each corner to a maze-like design that crosses over the sashing.  I like it!
I practiced the best route to take by finger tracing the design several times and then used my straight line guide for the stitching.  Love that tool!!
Keeping the designs simple meant I was trimming and ready to bind on schedule!
Happily, there was a good batik for the binding on my shelves that repeated the cool colors of blue, green, and aqua in the quilt.
I used Marti Michell's 2 1/2" Stripper Set to create these 9 1/2" stars and assembled them using the Set-In Piecing Simplified technique from my DVD.  Even after 4 years of teaching the technique, I'm still amazed at how consistent and perfect my y-seam blocks are!
If you don't have the DVD yet, you can order it HERE.

I've taken some hand-stitching with me for the week, but I'll be itching to get at my machine come tomorrow morning!!

Mary Huey

Linking up to the third quarter 2016 Finish Along Link-up HERE!!