Lichens, a unique group of plants, "typically live for ten years or more, and in some species the lichen
body can survive for more than a hundred years." according to "life of plant" blog (
HERE).
I first noticed them as "something interesting" on a walking tour in Dorset, England 15 years ago. One of the group members had taken several courses on lichen and was sharing what she knew while we explored a cemetery full of lichen covered grave markers.
Since then, I've taken photos of them whenever I encounter a "unique" specimen. I can't identify any of them but I know they are an excellent indicator of air quality, so if you don't see them where you live, that's probably not an endorsement for your local air quality.
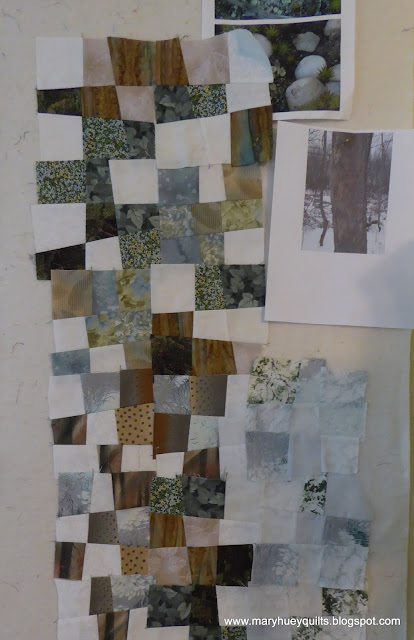
About 10 years ago, I came across a large tree after a windy snowstorm that made quite an impression on me. The lower portion of the main trunk was covered with lichen and the snowstorm had "iced" the trunk with patches of snow that was engrossing to look at. I had completed a couple of improvisational quilts using color palettes inspired by nature and set about doing the same with the colors of the tree trunk covered in lichen and snow.
For some reason long forgotten, the project stalled and the blocks I did make were put on a shelf along with the pile of fabric I had pulled for it. Perhaps my subconscious knew that they are a slow growing species and this idea would need time to mature? During my annual review of "stuff not finished" in December, the pile resurfaced and I put it on my first quarter list of goals for the 2017 Finish Along (my complete list is
HERE).
The blocks went up on my design wall along with a couple photos for inspiration and waited for something to happen!
This strategy sounds too simple but it always works for me!
The first step was stumbling across this wonderful fabric from Robert Kaufman's Sound of the Woods collection -- the print extends across the width of the fabric and the color palette is perfect!
Once this fabric joined the blocks on the work wall, my interest was sparked and I began to move the blocks around leaving them to "simmer" for a day or two and making adjustments until I began to see the trunk of a tree emerge! I needed more primarily dark blocks, so I pulled six prints from the fabric stack and cut a couple rectangles of each to make some quick six-patch blocks.
To do this, I stack the fabrics right side up and cut them into six pieces.
Then I "shuffle" them.
Leave the first stack alone.
Move the top piece on the second stack to the bottom.
Move the top two pieces on the third stack to the bottom.
Continue until there are six different fabrics on top of all the stacks.
Here they are sewn together and ready to add to the mix!
(For another example of how I used this style of blocks, read this
POST.)
Finally, last week, I was satisfied with the arrangement of the blocks and began to set them together.
The quickest way to work is to overlap two blocks and trim them straight.
Here are the trimmings and the blocks are ready to be stitched together.
Sometimes I simply added a strip of fabric to expand the length of a "row" when less than a "block" was needed.
Once the rows were assembled, I began to stitch them to each other. Here you can see some "freehand" rotary straightening to prepare for stitching.
The trunk of the tree has emerged!!
In the pile of rejects was a group of very light blocks which became a "layer of snow" that was plastered on the northwest side of the tree.
After two days of gazing and thinking about "how" to get all this together, I set about it (timidly).
The "band of snow" is slightly curved to define the left side of the tree and eliminate some of the random dark squares.
I carefully laid the band of snow over the edge of the trunk, checking and rechecking the alignment.
After several deep breaths, I trimmed away the left side of the trunk to match the right edge of the band of snow.
Whew, it worked!!
It's a very gentle curve so the stitching was easy!
At this point I am delighted with the results but it's time for another pause -- overnight should do it -- to organize the next phase of construction.
I had 3/4 yard of the gray tree scene and the rest of the bolt is 1000 miles away so I had to get this right. The plan is to put some of it on each side of the trunk.
How much on the left?
How much on the right?
Feeling (fairly) confident the next morning, I laid the trunk unit on the tree fabric.
More deep breaths and the cutting began -- smooth the edge of the trunk unit and cutting the tree print at the same time so the edges match.
Looks good!!
To the machine!!
Press and repeat for the left side!
And here it is!!
You'll notice the "extension" at the top of the tree trunk. When I aligned the pieces to trim the left side of the trunk, it was a couple inches shorter than the fabric, so I added a few "squares" and the "extension" is the result.
Now I'm back to a thinking phase.
How to quilt it?
My initial idea is beginning to expand so I'm going to let the piece simmer on the design wall over the weekend.
Here's to a productive stitch-filled weekend!!
Mary


