Wednesday, April 12, 2023

Spring - Time to Diddle Around

Spring is advancing here in Northeast Ohio -- we had lots of rain for a couple weeks and now it's warmer than usual but next week will be much cooler . . . so I don't want to do much in the garden.

And because I'm embracing the current movement to loosen up my control of nature in my yard, about all I can do right now is dig out noxious weeds and I've done what I can do of that today physically.  I watered the new strawberry plants and the bok choy seedlings and the pansies.  I've walked all around the yard (twice) to see what's coming up and who's coming out -- there are lots of small solitary bees on the native trout lilies which are at peak bloom.  (The bees were moving too fast to photograph.) 

 I've walked to the back fence three times (picking up sticks in the lawn each time) to see if the Screech Owl that lives in the big maple is out sunbathing.  She's not today but this is a (poor) picture I got of her a couple days ago (right in the center of the picture) -- looks like little bunny ears sticking out of the hole.
And I've made good progress on picking up sticks!?!
I spent forty-five minutes in my studio prepping appliques for a couple projects.  The Whirly Weeds series is at the halfway point and this week's plant is "bastard cabbage".  With a name like that, you know it has to be non-native and perhaps invasive in the southwest USA.

I figured out the arrangement of the leaves which I had prepped last evening,
chose the thread color I want to use,
and set up my machine so it's ready to go later today or tomorrow.
The remains of the prepping process -- still in a pile on the floor next to my recliner?!?
I pulled out the light table and prepped and positioned the next few pieces to be added to the fourth block of my Flourishes BOM project.  I've probably used the light table more in the past 3 months than anytime since I invested in it -- good investment!!
The designers of Flourishes are Becky Goldsmith and Linda Jenkins -- they suggest finger pressing the seams before positioning the applique pieces and it's a great trick -- makes the needle turning so much easier!

I came across my old stash of applique pins -- 3/4" long -- another seldom used but good investment.  Much less finger poking!!
Block 4 is progressing nicely and I think I'll have it finished in a couple days!  This project is going so much better than I anticipated.  I'm keeping up, I'm enjoying the process, and I'm surprised!!
Plus I talked myself out of starting a new piecing project -- now that's an accomplishment.

So a good spasm of "diddling" (as opposed to "dithering" which accomplishes nothing)!  
Now if I could just figure out what to fix for supper?!?

Maybe I'll go pick up the pile of trimmings.
Carry on!!
Mary


Monday, April 3, 2023

Accountability? First Quarter 2023 Review

     Earlier today, I was looking for something in a recent blog post and reminded of my (energetic) post from the end of 2022 laying out a few goals for 2023.  I can't forget about them because I leave my work journal open to the page with the list on the desk by my sewing machine so I will see it every day!

Just the same, perhaps a "first quarter" progress review would be a good idea to keep me accountable and rejuvenate my focus?  So this post is written mostly for my benefit which makes reading further optional for you.

  1.  Finish six more UFO's from the leftover 2022 list.  Excellent progress here -- two are completely finished, three are finished tops (instead of piles of stuff) and another one just came off the shelf to serve it's time as a "leader/ender" project!

Leftover blocks and a hoarded fabric finally used!!

2.  Quilt the new tops I made in 2022.  Moderate progress here -- no finishes but one is just past the halfway point of quilting.   And I'm giving myself a "pat on the back" for quilting three lap-size quilt tops that I've pieced since the beginning of the year!!   (That's so not me!?!)

A blend of machine and hand quilting is in progress on my version of Homage to Grandmother's Flower Garden.  I just finished the hand quilting last evening and will now do the machine quilting around the outside edges -- an April finish for sure!!

3.  Deal with all the antique/vintage quilt tops I own.  I sold two!!  And I have a firm plan for finishing a third one including a recipient when it's done!  Six to go!!

Perhaps I should move this stack to a place where I see it more often?

4. If/when I start new projects, chose from a list of seven that I've wanted to make for a while.  Looking at this one again, what a silly girl I was to say "if/when" -- of course, I'm going to start new projects?!?  Of the four piecing and applique projects . . . . no, make that five . . . . that are actively in process at the moment -- two are from the list.  But you get it -- it's so hard to resist a shiny new idea!?!

Three of my current "works in progress" -- two from the "list of seven" and one shiny new sew-along (lower left).  I'm "storing" them flat on the portable back-up design wall (seeing them every day is so inspiring!!).

5. Rehome twelve finished quilts.  Progress on this goal is a bit shaky.  I have let go of two quilts and have a short list of quilts and recipients on my desk, but as usual my follow through is a bit light.  What's my excuse?  I'm a quilt hoarder???  I just need to let go!!

As I'm writing this, I'm reviewing my potential recipient list and realize this quilt which I finished last month will be perfect for one of them.  It's in the washing machine as we speak getting ready for it's forever home!!

As I was looking for a picture of it to share, I realized I never showed off the finished quilt after posting the tutorial on piecing the honeycomb pattern HERE so here it is!!  A vibrant border was needed to balance the yellow but when I didn't have enough of the stripe, I had to get creative and plug in those two green prints.

I kept the quilting simple because "finished is the goal" but I did get courageous and use one of my (much neglected) quilting rulers to create that border design.

That was fun for me and not too boring for you, I hope -- I just put a sticky note on my July calendar to do a quarterly review again!

Our spring has achieved a normal pace thanks to see-saw temperatures, high winds, and lots of rain.  I prefer a slow bloom season myself.  Here's my best hellebore surrounded by deer fence (it's growing under a witch hazel bush that the deer covet) with a carpet of last year's leaves (hopefully harboring overwintering caterpillars and bumblebee queens) and flanked by stalks of Joe-pye weed from last year (hopefully to be the home of this summer's stem-nesting bees and wasps).

Back to the stitching!!

Mary


Thursday, March 23, 2023

A Layer Cake Idea!

Are you a layer cake sucker? 
I'm trying to use up a few (so I can buy more guilt-free?).
  I'm pretty good at talking myself out of them but this was one I couldn't resist -- I wanted it so badly, I had a friend buy it for me at QuiltCon in 2019.  
Forty exciting African prints!! 
 I think they came from Crimson & Tate in Indianapolis, Indiana?
Problem was that I could not cut them up!?! I auditioned several ideas, but never started anything.  What is the point of buying fabric you don't have the courage to use???  Then last week, while filing some old teaching handouts, I had a lightbulb moment.  
Make a ZIG ZAG quilt!

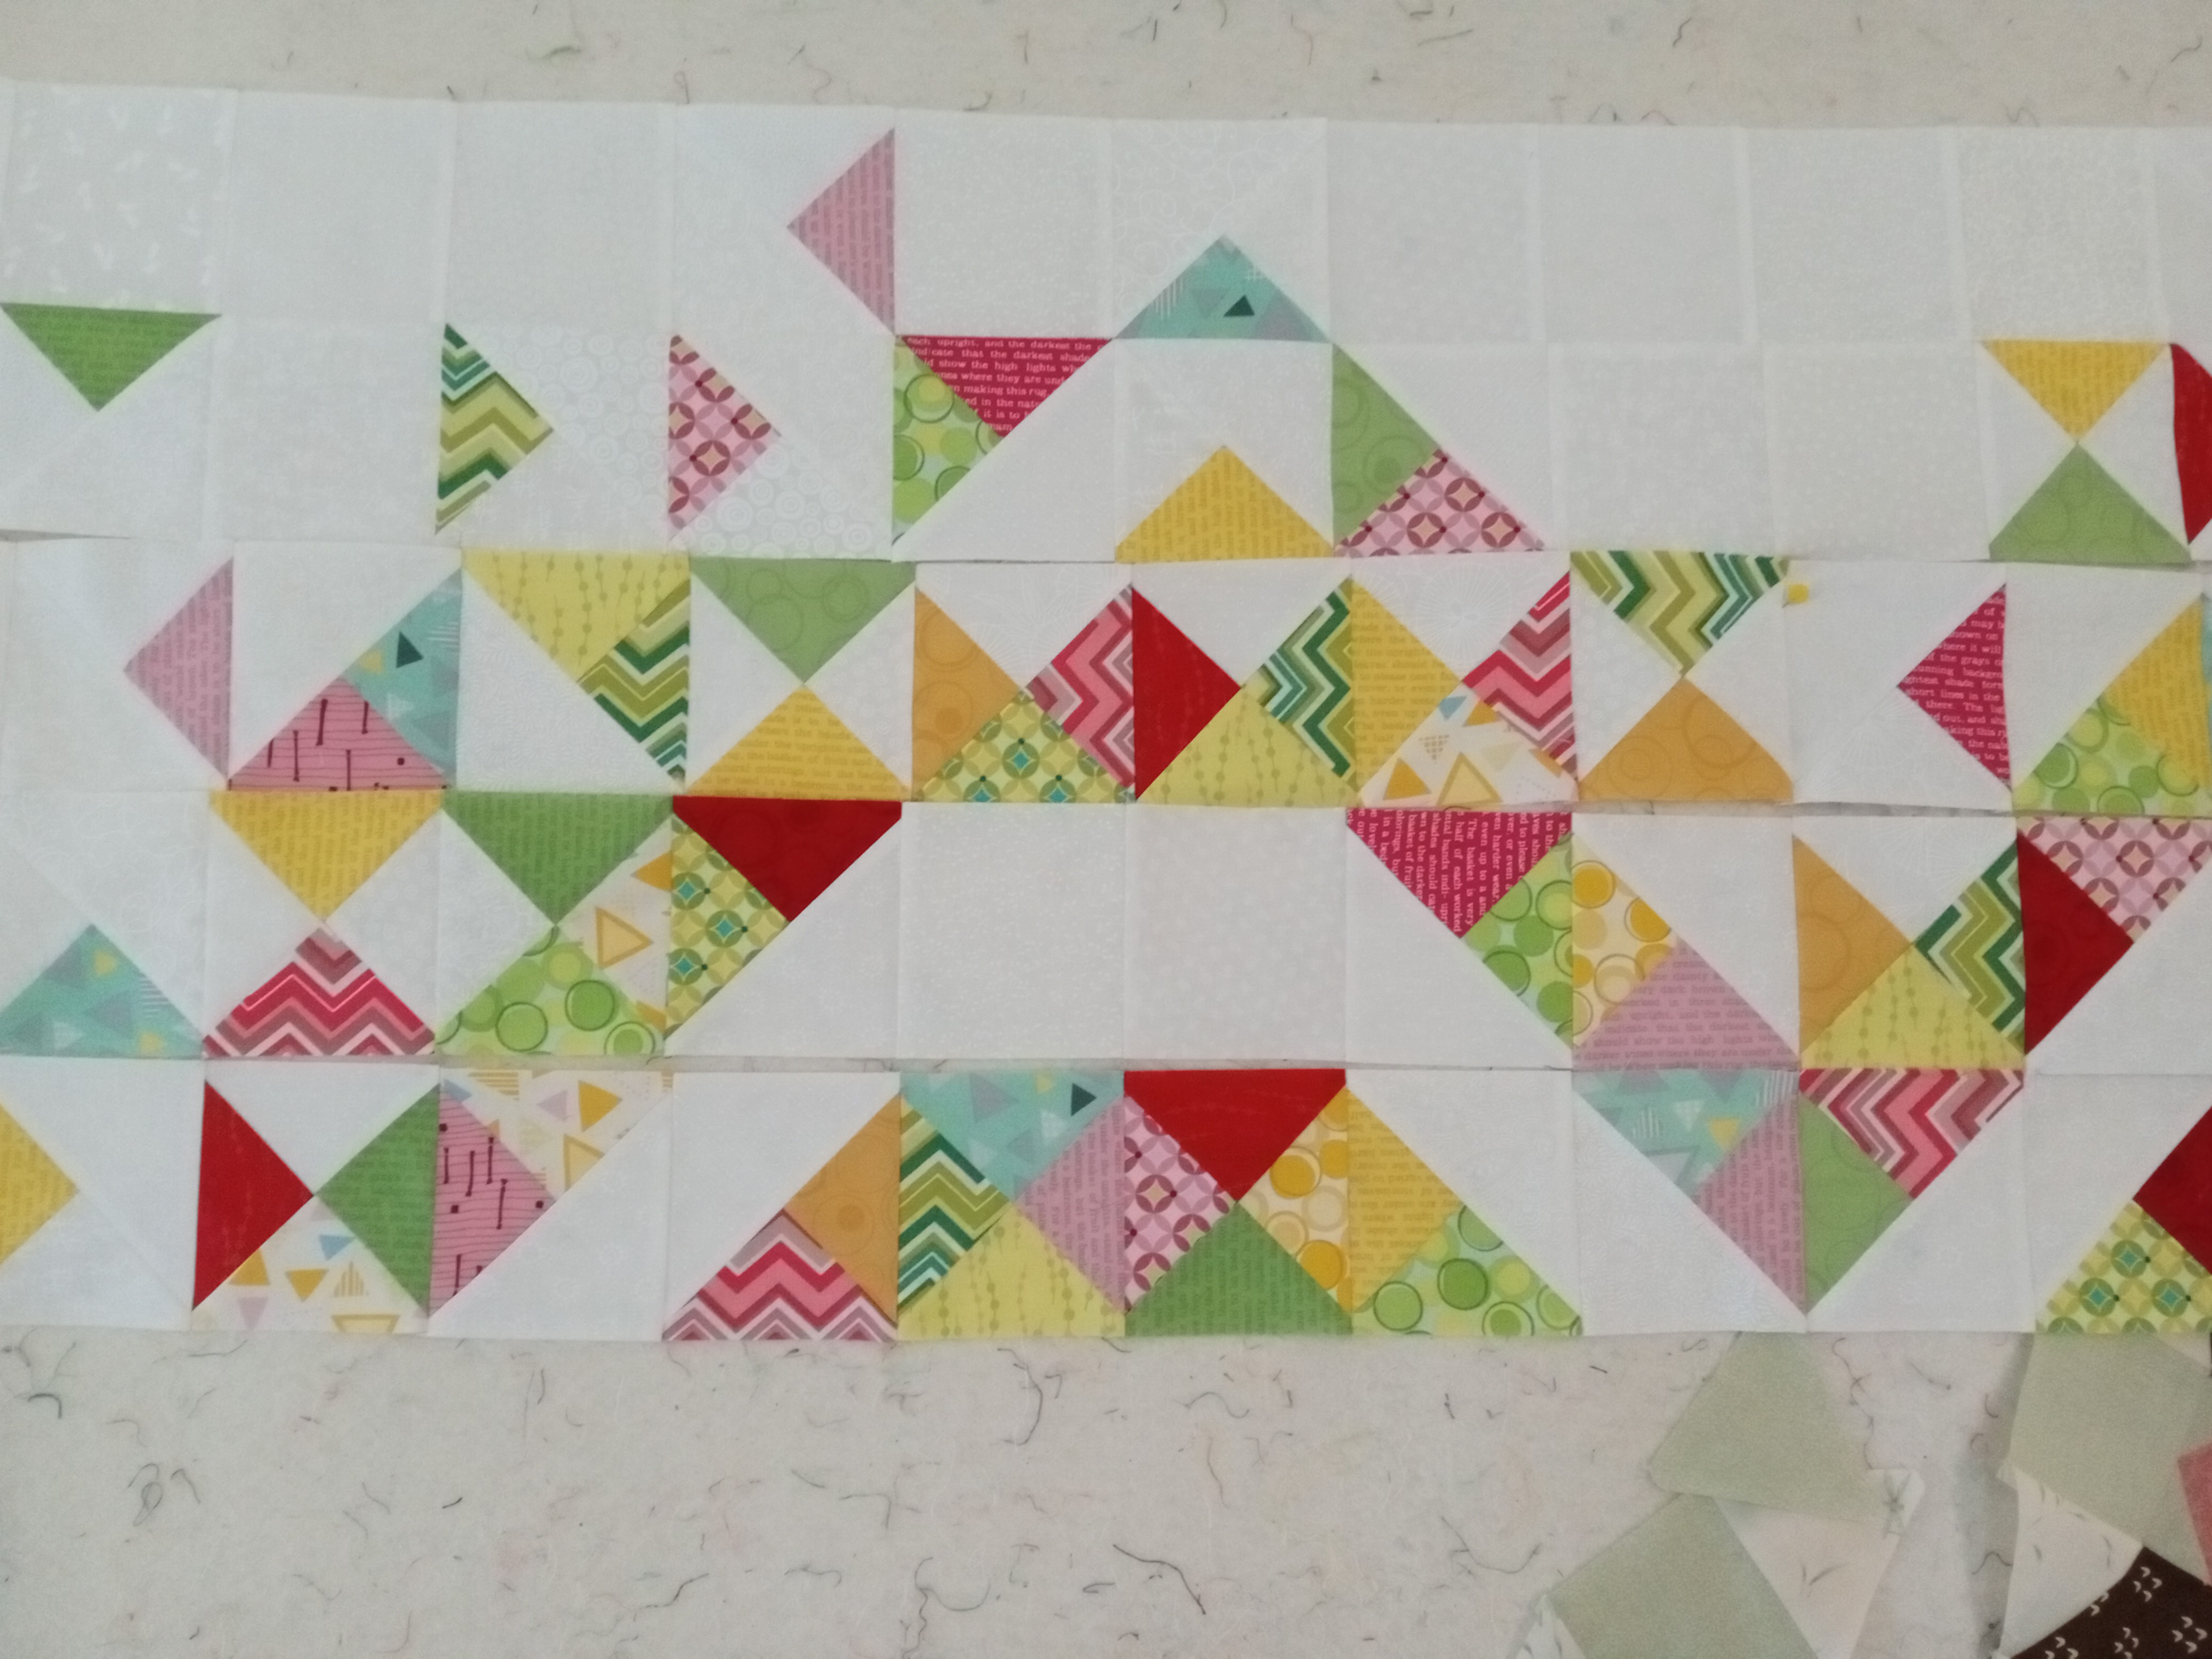
Step one -- cut all the 10" squares on both diagonals into four triangles.
Caution -- measure some of the squares to make sure they are actually squares.  The layer cake I used for the Exploding Heart quilt was 10" by 10 1/4".  It wasn't a problem for that quilt but it would have been for this one so trimming them to perfect squares is a good idea!
Keep each set of triangles together.
Step 2 - lay out the stacks so you can see everything.  I needed to determine the proportion of warm colors and cool colors -- that is a good color strategy when working with lots of prints that aren't "coordinated".
Two stacks of triangles make one horizontal row.  I chose two contrasting prints for each row.  Starting at the top, my first row is a mostly green print and a mostly red print.  For the second row, I start with another red print and chose a contrasting print, a cool color in this case, for the lower side of the row.  As I moved down the layout, I repeated the process -- the upper triangles in each row repeat the color (but not the print) of the previous row and the second color used for the lower triangles of that row contrast with it.

As the layout is built, the "zig zags" begin to appear!  If they don't, rearrange to get more contrast -- either of value (light vs. dark) or color.
Once I was happy with the layout, I took the right edge triangle from each row and cut it in half as shown below.  One of these triangles will square off the left end of the row and the other the right end.
Time to sew!  I pieced the units into pairs as below.
I was lazy and didn't trim the points, just eyeballed aligning them with the "dog-ear" sticking equally out on both ends.
The seam allowance should start and end at the intersection of a diagonal edge and a straight edge -- see below.  I pressed the seams to one-side and all the seams in a row go the same direction.
The rows go together quickly with just 8 seams!  My rows are about 32" across and 4 1/4" wide -- 10 rows will be about 42" -- a nice child size piece.  The plan is for no borders and a solid color backing.
I don't even have to figure out how to quilt it since I used this same design several years ago to make a quilt for my daughter's guest room.

I finished assembling the rows before lunch and couldn't resist sewing "just two" of them together as you see below . . . . . but I stitched the wrong edges so the first and second row (from the top) are flipped.  Arghhh!!  My "staff" will be ripping that apart later this afternoon so I can correct it?!?
I have enough fabric to make two of these quilts and my plan is to donate them to a local group that works to improve the birthing experience for women of color.

If you want to use this idea with a layer cake that is more coordinated, it seems to me you could sort the prints by light and dark and perhaps color depending on the assortment.  If the contrast between two zig-zags is good, a scrappy arrangement of the prints will work.  If all the prints in a zig-zag are assorted blues and the next one is assorted oranges, the uniform color families and the contrast of opposite colors makes the zig-zag work.   

If I were planning a lap size piece with a layer cake, I would add one set of triangles to each row for a width of about 40" and use thirteen rows for a length of 54".  Some quick math tells me that would need about thirty-three 10" squares so one layer cake would do that with a few leftovers. 
For every two triangles added to a row, the row will increase by approximately 8" and adding another complete row to the top will add about 4".

So I'm another layer cake down with just three more to use up!!
I hope you are inspired to use up one of your layer cakes!!

Daffodils starting to bloom here!!
It's so nice to look out the window and see cheery spots of yellow!!
Enjoy the first weekend of the new season -- spring or fall!!

Mary


Friday, March 10, 2023

Something Fun!!!

 Something fun has been happening in my space!?!
A couple weeks ago while tidying a shelf of fabric in my stash, a forgotten layer cake surfaced -- it had fallen behind the stack of fabric.  I recall ordering it on-line quite some time ago -- the flyer says 2015?  So it is properly aged at this point.  
It only took me about a minute to realize it would be perfect for a new make -- Exploding Heart!  I'm pretty sure I've save every picture of this quilt I've ever seen on Instagram so in January, I bought the pattern!
I found the instructions to be excellent (and as a pattern writer myself, I don't say that very often).  Laura of Slice of Pi Quilts is the author and she gives instructions for rotary cutting and using a "fabric cutter" machine.   That impressed me even though I don't own one of those.  

Since I was starting with a layer cake, I cut each piece into 5" squares until I had the number needed which only used 33 of the layer cake's 10" squares.  I used a muckled-up assortment of white-on-white prints from my stash for the  background and only cut the number specified for the "larger" background square.  I waited to cut the "smaller" background squares until I had trimmed all the pieced units -- since my colored squares were smaller than the pattern specified, my pieced units came out smaller and I needed to adjust that size accordingly.
Does that make sense?

You could also use four 5" charm packs of fabrics -- they wouldn't need to be the same collection but could be four different collections from the same designer since I've noticed many designers use a color palette over and over.  And it would be a lot of fun using scraps from your favorite designer -- Kaffe Fassett or Anna Marie Horner??  And four packs equals more squares than you need to begin, so you could eliminate the ones you didn't like as much?

At one point, a line needs to be drawn across the back of triangle sets -- make sure that line is perpendicular to the first seam!!  I lined up the "5 line" on my ruler with the stitching every time to be sure my units were easier to square up during the final trimming step!

Every day last week, I worked on one group of  the units -- since I try not to spend more than 45 minutes with my "nose-down" at the sewing machine these days, it was a perfect work flow.  I could do all the piecing and pressing for one group in less than an hour.

 I knew I wouldn't enjoy trimming the units to a uniform size - I never do.  Since I cut patchwork with templates and have pieced for so many years, my work doesn't need trimmed.  But I was determined to follow Laura's directions faithfully.  My finished units are 1/2" smaller than the pattern specified since I started out with slightly smaller squares and so my quilt top will be a bit smaller.

Happily, I was going to a retreat last weekend and only taking handwork, no sewing machine.  I took all the units with me and trimmed them in small batches, working on it for 15 minutes at a time to minimize shoulder strain that is now one of the perks of rotary cutting for me?!?
If you are a "trimmer", you already know that it's important to "center" the ruler correctly.  In this case, notice that the "4" line is matching the left side "corners" and the diagonal line is aligned perfectly.  If you don't take the time to do this, when you assemble the units, corners will not align no matter what you do!

I came home with all the units trimmed units ready to assemble into the top!

I emptied the design wall and started to work through the pattern, one row at a time.  It only took about 3 rows for me to see this was going to be wonderful!!  And when I got to row 5, it was hard to stop.
All week, I've been assembling two or three rows and adding them to the design wall.
It just keeps getting better and better!!

Today, I pieced the last row and started thinking about whether to add a border.  The pattern doesn't call for it, but it will upsize my version a bit and I like the idea of a white border to "float" the design.  Inspiration arrived in the form of "incorporated" borders which was a favorite tactic of my long-time mentor, Mary Ellen Hopkins.  Piecing the border will blend in with the "muckled-up" background better, so I cut enough rectangles to add a 2" finished border.  Since I haven't finished sewing the rows together, I'll add rectangles to the ends of each row.  A row of rectangles will make the top and bottom borders.  You can see them in place on the design wall (top edge and right edge).
I won't get the top completely assembled today (avoiding aching shoulders and neck) but I'm already envisioning a stripped fabric for the binding and studying my collection of pictures of other quilters versions for quilting inspiration.

I can see myself making this quilt again!!  The only thing I would do different is to cut the pieces with one of Marti Michell's Basic Template sets -- A, B, or T maybe?***   My unit size might be different than the pattern and so the quilt would be a different size, but I wouldn't have to trim any of the units.  And there would be no wasted fabric.  

I could have used B-9 and B-11 to cut the triangles for the size in the pattern, getting 4 large triangles and 8 small triangles from a 10" layer cake square for the 72" square top.
I could also use these templates with 5" charm square packs.
Use template B-8 for the background squares.
Others sizes would be easy to achieve using a different group of the templates.
Using these templates (below) from Set A (1, 2, and 4) would make a 54" quilt top.
Using the smaller templates from Set B (10, 11, & 13) would make about a 52" quilt top.
And the smaller templates from Set A (3, 4, and 6) would make a 38" quilt top
I don't own Set T (that's odd?) but looking at it on frommarti.com, using 102, 103, & 104 would result in a 90" quilt top.

Wouldn't this make a great graduation quilt?  
I might set out the templates for a 54" throw size and cut from scraps as I tidy up the overflowing scrap basket next to my cutting table?!?  Hmmm??
I love it when one idea morphs into another!!

Are you ready for the change of seasons?  I brought out some spring quilts to change the hangings around the house this coming week.  We haven't had much of a winter -- no snow to speak of, so I'm tired of the brown weather and ready for lots of green and pink!!

Talk soon!
Mary

P.S.  Let me know if you are rushing out to your local quilt shop to get the pattern!!

***EDIT April 2025
Marti Michel closed her business in late in 2024 and while some shops may still have a stock of her templates, you can also find them on Ebay and Etsy. 


Wednesday, March 1, 2023

Revisiting a Thoughtful Essay

 I hope you have some FUN planned for the upcoming weekend!

I'm packing my little blue Subaru for a short road trip to Amish country in central Ohio for a weekend of "retreating" with a small group of long-time quilting friends. 

But before I go, I want to point you back to a post I wrote in the summer of 2015.  I revisited it recently and thought it might be good to share it again with those of you who don't go back that far with me.  The sewing philosophy I shared still rings true with me today and is the reason I get "so much done".

So click on the link below to read it -- let me know if it helps you in anyway.

BUILDING MOMENTUM

And how about a triplet picture -- there hasn't been one of those for a while!

Have a pleasant weekend!!

Mary


Friday, February 17, 2023

Honeycomb Tutorial for Erin!!

On January 11, I shared a photo of a scrappy honeycomb quilt laying on the floor of my studio.  It came out of "hiding" (LOL) and I have been using it for sew-offs as I work on other projects over the past month.  It's the best way to me to make progress on a UFO when I've lost interest.  Since I chain-piece all the time, sew-offs are always in demand in my studio -- I may not be able to stand working on a project anymore but I can always muster up the interest to sew a 2" seam here and there while working on my "newest" love interest!?!

I started this in response to a question about whether honeycombs could be machine-pieced using the Set-in Piecing Simplified technique that I taught -- I can remember getting Erin's email, perhaps 10 years ago?  I was in California on a teaching trip so I sketched an idea on graph paper and was ready to try it out when I got home. 

I cut some pieces from the 2 1/2" scrappy strips that are always on hand!  
I stitched just enough of it to confirm that my idea was on target and then put it in a box.  
I'm not sure I ever responded to Erin with an answer???
So here's the answer, Erin!

All the pieces are cut with Marti Michell tools.***  The yellow squares are cut using template #12 from Set B and the honeycombs are 2 1/2" by 4 1/2" rectangles trimmed with the Evening Star end of the Sashing Stars Set  (linked HERE).
Position.
Trim.
Wa-la!!
Finally I marked the corners of the honeycomb pieces with dots using the 45 degree angle on Marti's Corner Trimmer tool.***

After a bit of fiddling to determine the best piecing order, I made all the 3-piece units with two honeycomb pieces and one square.  Once I find my rhythm, this is the type of repetitive work that makes a perfect sew-off. 
If you are familiar with Set-in Piecing Simplified, the upper left seam between the two honeycombs is stitched from the outer edge and stops at the "dot" as in the photo below.  The two seams attaching the square to the two honeycombs art stitched dot-to-dot.
144 sew-off's later, all 48 of the basic 3-piece units were stitched together!
Time to lay them out!

The easiest way to layout a scrap quilt is the same way you deal a game of Solitaire -- off the top of the deck in random order.  Once they are all laid out you can see where to tweak -- if there are 3 of the same brown print clustered together, un-cluster them.
My layout is six units by eight units -- each honeycomb and each square counts as 2" side to side -- so my piece is 26" by 34".   Once I was happy with the layout, I cut more honeycombs to finish the right edge and the lower edge and added those to the "design floor".  To make the edges straight, I cut triangles using the quarter square method and template #14 from Marti's set B -- the straight of fabric grain runs along the "diagonal" of the triangle so the outer edge of the piece will not stretch when I add borders.   

Now to assemble the units!  I've got lots of pictures to share.  Even if you never want to piece this, reading through the process and looking at the pictures might help you figure out the best approach to a project in your future?

I added a triangle to the lower edge of each left side unit.
I added a triangle to each right edge honeycomb.
And I added a honeycomb and triangle to the lower edge of each lower edge unit.
Once all those units were pieced, I started pieced in the upper left corner and worked across the piece to the right.  Once the first row was assembled, I returned to the left side and added the next row of units, one unit at a time.  This was much easier than assembling the units into rows and then attaching the rows -- just take my word for it!?!

After a bit of trial and error, I determined the best sewing order for the four seams needed to insert a unit was to start by attaching the intersection of the four honeycombs -- dot-to-dot seam.
Since this is the most critical matching point, it worked best when I did it first.
Second, attach the left side of the vertical honeycomb to the right edge of the adjacent square --  
dot-to-dot seam.
Third, attach the upper edge of the horizontal honeycomb to the lower edge of the adjacent square --
dot-to-dot.
And finally, attach the right edge of the horizontal honeycomb to the left edge of the vertical honeycomb in the row above -- dot-to-edge.
Repeat, repeat, repeat.
Soon, the top will be coming together and covering the sewing table!
The final corner (lower right) looked like this and notice, I added that last triangle to the lower right side of the honeycomb in the row above.  Also, I used two triangles in each corner because I like the way it blended instead of a bigger triangle.
Scroll back up to the first picture -- the top isn't finished.  I'm thinking a yellow frame next and then I don't know what?  It's on the design wall and percolating in my head.  If I had used a lighter print for the squares, the lattice created by the honeycombs would have been stronger looking but I'm just having fun here .

And that's the third quilt top from that 2 1/2" strip box this winter.  The 4-patch is all set together and a backing made -- planning to take it along to a retreat in a couple weeks and get it layered up!
Didn't it turn out great!  The black and white print alternate squares make all those scrappy 4-patches hang together beautifully.  I even got a bit artsy with the layout to get those diagonal rows of darker prints.  The main reason for the shifting value of the alternate squares was "I ran out of fabric", not just once, but twice?!?  And as usual, it looks all the better for it.
Running out of a print can be fun if you let it have it's way with you!!

If I've made you curious about the Set-in Simplified technique for chain piecing, see my face up there on the right -- click on it and it will take you right to my Etsy shop where you can purchase an instructional PDF (download it tonight) and try it out!

If you have questions about today's tutorial, leave them in the comments!

Mary


***EDIT April 2025
Marti Michel closed her business in late in 2024 and while some shops may still have a stock of her templates, you can also find them on Ebay and Etsy.