Are you a layer cake sucker?
I'm trying to use up a few (so I can buy more guilt-free?).
I'm pretty good at talking myself out of them but this was one I couldn't resist -- I wanted it so badly, I had a friend buy it for me at QuiltCon in 2019.
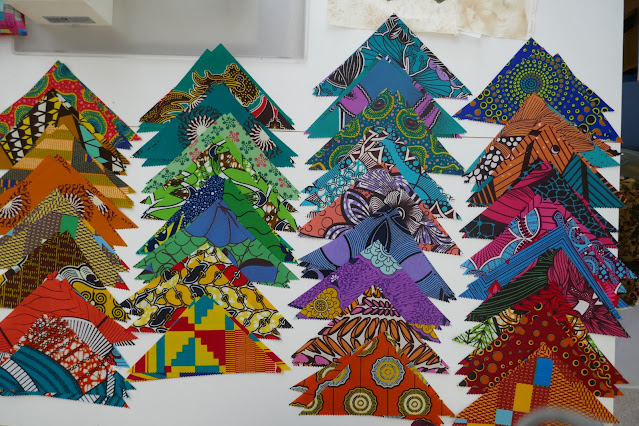
Forty exciting African prints!!
I think they came from Crimson & Tate in Indianapolis, Indiana?
Problem was that I could not cut them up!?! I auditioned several ideas, but never started anything. What is the point of buying fabric you don't have the courage to use??? Then last week, while filing some old teaching handouts, I had a lightbulb moment.
Make a ZIG ZAG quilt!
Step one -- cut all the 10" squares on both diagonals into four triangles.
Caution -- measure some of the squares to make sure they are actually squares. The layer cake I used for the Exploding Heart quilt was 10" by 10 1/4". It wasn't a problem for that quilt but it would have been for this one so trimming them to perfect squares is a good idea!
Keep each set of triangles together.
Step 2 - lay out the stacks so you can see everything. I needed to determine the proportion of warm colors and cool colors -- that is a good color strategy when working with lots of prints that aren't "coordinated".
Two stacks of triangles make one horizontal row. I chose two contrasting prints for each row. Starting at the top, my first row is a mostly green print and a mostly red print. For the second row, I start with another red print and chose a contrasting print, a cool color in this case, for the lower side of the row. As I moved down the layout, I repeated the process -- the upper triangles in each row repeat the color (but not the print) of the previous row and the second color used for the lower triangles of that row contrast with it.
As the layout is built, the "zig zags" begin to appear! If they don't, rearrange to get more contrast -- either of value (light vs. dark) or color.
Once I was happy with the layout, I took the right edge triangle from each row and cut it in half as shown below. One of these triangles will square off the left end of the row and the other the right end.
Time to sew! I pieced the units into pairs as below.
I was lazy and didn't trim the points, just eyeballed aligning them with the "dog-ear" sticking equally out on both ends.
.JPG)
The seam allowance should start and end at the intersection of a diagonal edge and a straight edge -- see below. I pressed the seams to one-side and all the seams in a row go the same direction.
The rows go together quickly with just 8 seams! My rows are about 32" across and 4 1/4" wide -- 10 rows will be about 42" -- a nice child size piece. The plan is for no borders and a solid color backing.
I don't even have to figure out how to quilt it since I used this same design several years ago to make a quilt for my daughter's guest room.
I finished assembling the rows before lunch and couldn't resist sewing "just two" of them together as you see below . . . . . but I stitched the wrong edges so the first and second row (from the top) are flipped. Arghhh!! My "staff" will be ripping that apart later this afternoon so I can correct it?!?
I have enough fabric to make two of these quilts and my plan is to donate them to a local group that works to improve the birthing experience for women of color.
If you want to use this idea with a layer cake that is more coordinated, it seems to me you could sort the prints by light and dark and perhaps color depending on the assortment. If the contrast between two zig-zags is good, a scrappy arrangement of the prints will work. If all the prints in a zig-zag are assorted blues and the next one is assorted oranges, the uniform color families and the contrast of opposite colors makes the zig-zag work.
If I were planning a lap size piece with a layer cake, I would add one set of triangles to each row for a width of about 40" and use thirteen rows for a length of 54". Some quick math tells me that would need about thirty-three 10" squares so one layer cake would do that with a few leftovers.
For every two triangles added to a row, the row will increase by approximately 8" and adding another complete row to the top will add about 4".
So I'm another layer cake down with just three more to use up!!
I hope you are inspired to use up one of your layer cakes!!
Daffodils starting to bloom here!!
It's so nice to look out the window and see cheery spots of yellow!!
Mary

.JPG)
.JPG)

.JPG)
.JPG)
.JPG)
.JPG)
.JPG)
.JPG)
.JPG)
No comments:
Post a Comment
Note: Only a member of this blog may post a comment.