Wednesday, November 6, 2019

The Calm After the Panic

 I know you have days like my Monday.  The time change always messes me up plus I was tired from a little two day road trip to take in the Vogue Knitting Live event in Columbus and visit my friends at Mercantile on Main in Coshocton, Ohio.  I woke up exhausted and fretting about whether to unravel a few inches of this knitting project to fix a sizing issue.  I was hungry and I rushed sloppily through my back stretches (never good) -- before I knew it I was teetering on the edge of overwhelmed.
(Totally, self-inflicted of course!?!)
I hate, hate, hate to waste time dealing with a negative state of mind.  Some would tell me to pray which I do but I keep it short because I'm out of sorts -- "get me out of this, Lord!"
It's rude but to the point.

Food, a proper cup of tea, and some stitching were needed to turn me away from the brink.
So I headed upstairs to do something in my studio. 

Last week, I cut this wine corkscrew fabric up for some 9" square cocktail napkins -- the serger was threaded and getting to work was a no-brainer!
Until the machine stopped right in the middle of hemming an edge!?!
The foot pedal seemed to have failed and I still had eight napkins to do.

So I switched gears to give myself time to think.
I cut out the pieces for this week's #littlemisssawtoothqal blocks.
All the tree trunks are vertical -- yea!!  And that porcupine in the center!!
I have only seen flattened porcupines (roadkill) so I have no idea if they are this cute?!?
And these foxes must all be kits (babies) because they don't seem to be aware that lunch is in their midst (the rabbit).  These are simple blocks and I'll be done with them in no time!!
Well, obviously I needed to recut the rust squares.  
Arrrgh!?!
The blocks got finished and I called a friend to see if she has a serger like mine.  
Yes, she did!  
Could I borrow the foot pedal?
After a quick trip to borrow the pedal, I was inspired to stop at this park overlooking the local river before heading home - God's getting the credit for this idea!  That helped calm me and I determined that since the sun was coming out for the afternoon, I would take advantage of the time to clear off the patio for winter.
By the end of the afternoon,  the patio was finished and the panic had subsided.  
Today, I can barely remember what the fuss was all about?
We all have our strategies for dealing with emotional low points -- some are bad and don't help -- like eating all the leftover Halloween candy (yep, I did that).
  I know that if I just sit down and stitch (there is always something available) or if I head to the woods, I'll perk up and move out of the valley.  I think it's worth while thinking about what perks you up so that you can consciously turn to it when you feel low.

I did unravel a couple inches of the cowl and finished it today -- much better and so glad I fixed it. 
I've spent the past couple days organizing yarn and needles for the annual Christmas sock knitting escapade -- eight pairs for grandkids and daughters!
(Three pairs will be tiny!)
I finished a small quilt top for my charity group's Christmas project!
These little projects where we turn someone's cast-off blocks into a usable quilt top give me such a lift!! 
This afternoon, I started to mass produce some little tea wallets for holiday gifts.
I shared all this because we all have crummy days, right?  I look at Instagram and see all the great stuff everyone else is doing and how cheerful they "sound" but it's just a 30 second sound bit from their life -- I can't see the rest of the day.
You, too?

Time to have a cup of tea and knit me some baby socks!!
Grandma's three peas in a pod!!

Mary


Friday, October 18, 2019

Moving Into Fall

 The cool weather has arrived here in Northeast Ohio.  While we haven't had a frost along the Lake Erie shoreline (one of the perks of living here), we had a cool enough night the beginning of the week to send me rushing outside at 9:30 p.m. to grab plants and bring them inside on an impulse!
I promised myself in the spring, I wouldn't keep so much over the winter this year.
We'll see? 
I finished the scrappy blue hexagon quilt this week!
The "tall ships" backing is from deep in my stash and I picked a red-orange binding because there was no way I'd be able to match these blues (in my stash anyway). 
I know for sure of one person who stitched along with me but quite a few of you took advantage of the special on Set-In Piecing Simplified -- so book mark this series of posts and plan to try it this winter!   If you did stitch along, you might want to read through all the posts gathered under the tab at the top of the page "Diamond Star Playtime Sew-Along".  
It will give you lots of ideas of other ways to use this technique!
The texture of the quilting is perfect.  I used Quilters Dream Machine Blend and my version is 36" by 47" using a 2" finished hexagon.
Stepping up to a bigger hexagon would expand the size quickly and still use the same number of hexagons.  For example, 4" hexagons would yield a 70" by 92" -- I'm thinking about all the florals in my stash and how pretty that would be!!

This quilt top is finished and the backing prepped!!
Yea, yea, yea!!!
It's my version of #100days100blocks2019 which just wrapped up on Instagram and Facebook last week.  If you are regretting not jumping on this sewalong, Angie @gnomeangel has just announced she will repeat the Kinship Sampler in 2020 -- you can sign up HERE for her newsletter.
Most of the piecing is simple and I pulled 85% of the fabrics from my stash. 
(That computes to using up 8 yards of stash - top and backing!!)
This is destined for one of my grand-daughters when they graduate to "big girl" beds and now I'm finishing this Rose Star top from a couple years ago for the other one. It just needs borders.
It's been sitting on my sewing table with it's pile of fabrics waiting for borders for months.  Part of the hold-up has been that the "perfect border fabric" isn't quite enough, so this week I started piecing some little 6-pointed stars to use for cornerstones and "stretch" that ideal print.  It's likely the girls will be sharing a room as they grow up and these two quilts will be good companions. 
Don't worry, there's one underway for their brother!!

All this progress in the studio has put me into the mood to focus on some UFO's and finish up as much as I can before the end of the year.  My Dodecagon quilt is at the top of that list and is currently occupying one corner of the living room so I can't ignore it!
I'm also determined to finish the last two tiles for the #sharksdinnerBOM on time (the end of November) and figure out my setting plan.  
This is the October tile -- fabric auditioning is finished and the basting is well underway!
Loving this fabric combination!!
The garden activities are slowing down -- the only thing still blooming in my yard are zinnias and mums -- the insects have been enjoying them on sunny days.  I was thrilled to spot this Buckeye butterfly along with four other species earlier in the week!
And just today, I found this intriguing spider!!
Eating a fly.
I-naturalist tells me it's a juvenile Bold Jumping Spider.
The fly is the lower half of the "bug" mash-up.
I'm pleased with my quick transition to the next project -- usually when I finish something, it feels like I'm spinning and may take me several days to transfer my attention to the next "thing".
But there's no time to be lost this year -- I have "ambitious" Christmas knitting plans.
Even the sewer back-up in the basement yesterday (it was minimal) didn't slow me down!!
The sun is shining here and I hope it shines for you this weekend!!

Mary


Thursday, October 10, 2019

The Quilting Has Begun!!

The quilting of my scrappy blue hexagons quilt has begun!!
Found the perfect thread in my stash and revved up my APQS George for the first time all summer!?!
  I'm keeping to a simple grid that follows the ditch of the seams and crosses through the center of each hexagon.  
I've used this approach before and like the simplicity, the sturdiness and the effect.
I can come and go from the stitching over the next few days and hopefully be binding this sweet little quilt next week!!
After a record fast trip to eastern Pennsylvania to watch my oldest grand-daughter play field hockey last week (soccer with sticks?), I was too tired to do much but sew over the weekend.  While I was finished assembling the scrappy hexagon quilt top, I thought of a few more things to share with you about the piecing process I used for this quilt along with some pressing tips.
  
My "go-to" Bernina 1031 had a weekend in the spa
and with the hexagons in four sections 
and all my #100blocks100days2019 block finished, it was easy to keep the chain piecing momentum going.  
The Bernina 180 which is my traveling machine, stepped into the void and we kept the flow going!
At this point, the piecing seems tedious -- so many short seams (only 2" at a time) and the stop and go work can be a turn-off for sure.  That's one of the aspects of Set-In Piecing Simplified that I really appreciate -- by bouncing back and forth between two projects to keep the chain piecing going, it reduces the tedium.  

Because the sections are getting larger and the rows of seams longer, I do more pinning at this stage to control the increasing bulk and prevent sewing the wrong two seams together.  (While that creates interesting two-dimensional surfaces, it does nothing to move me towards the finish line!?!)
I prefer to pin parallel to the seam
so I can leave the pin in place until the seam is stitched plus the pin is easy to pull out when in this position. 
It was a pleasant afternoon with lots accomplished -- two big sections joined and great progress on setting together the #100blocks!
With the completion of the piecing, it was time to press the seams.
Another (potentially) tedious task!
Here are a couple tips -- first, turn off the steam because there is lots of close to the fingers work.
When I'm working with smaller hexagons -- 1" or less -- I use my little travel iron. 
All the seams will swirl around the hexagon intersections.  If you don't get the cute little tumbling block on the back side, it could be that you didn't pivot far enough for the stitch off part of your seams.  But don't worry about it this time, just press for flatness now. 
The three seams coming into this intersection are swirling in a clockwise direction.
As you follow the lower left seam out of that intersection, it will set you up to swirl the seams counter-clockwise at the next intersection. 
I flatten the intersection (carefully) and then press the remaining two seams coming into that intersection.  
Then I work out of that intersection to the next one -- usually moving towards the left across the patchwork until everything on the surface of my ironing board is pressed.
It's beautiful when the pressing is finished!
Notice that all the horizontal seams are facing down.
If you trace your finger up the seams diagonally from the lower right to the upper left, you'll notice they all face the same direction. 
This uniform pressing means that as I stitch in the ditch, the ditch is always on the same side of the hexagons as I progress across the piece resulting in straighter lines and less jumping out of the ditch.
I have also seen quilters use a grid that avoids the ditches completely stitching across the hexagons at the center of each side.  The finished look is similar but I think my grid is easier to execute (no marking!!) especially if you are working with a ruler foot and edge guide like I do.

It seems like it might be good for me to stay in the quilting mode for the rest of the month!  I've gotten way ahead of myself with piecing over the summer and need to move some pieces off the "ready-to-quilt" shelf.

 But tomorrow is baby day!!
I'll be hanging with these three while their mom putters around in her garden for the afternoon.
The smiles are getting more regular and bigger!!
(Miss "middle" there already seems to know how to work the camera.)
So much fun!!

Have a good weekend!
Mary 


Tuesday, October 1, 2019

Scrappy Hexagons Progress

I'm still piecing hexagons -- how about you?
I had to stop stitching for a couple days last week to get ready for Auntie Alison's birthday dinner and the triplets first visit to Grandma's house!!
(it's a selfie)
They are getting cuter by the day and starting to smile!

Then I have to keep going to my favorite birding spots because it's fall migration and a new bird might have appeared over night!  If I had not been here at this exact moment, I would have missed the 22 turkey vultures sunbathing in the dead trees one morning last week!
I have made good progress on the sewing, too -- only about 65 short seams to go!!
But layering and quilting will have to wait until next week as I'm heading out for a quick 3-day trip to catch my oldest granddaughter's last field hockey game of the season!
It better not rain!!
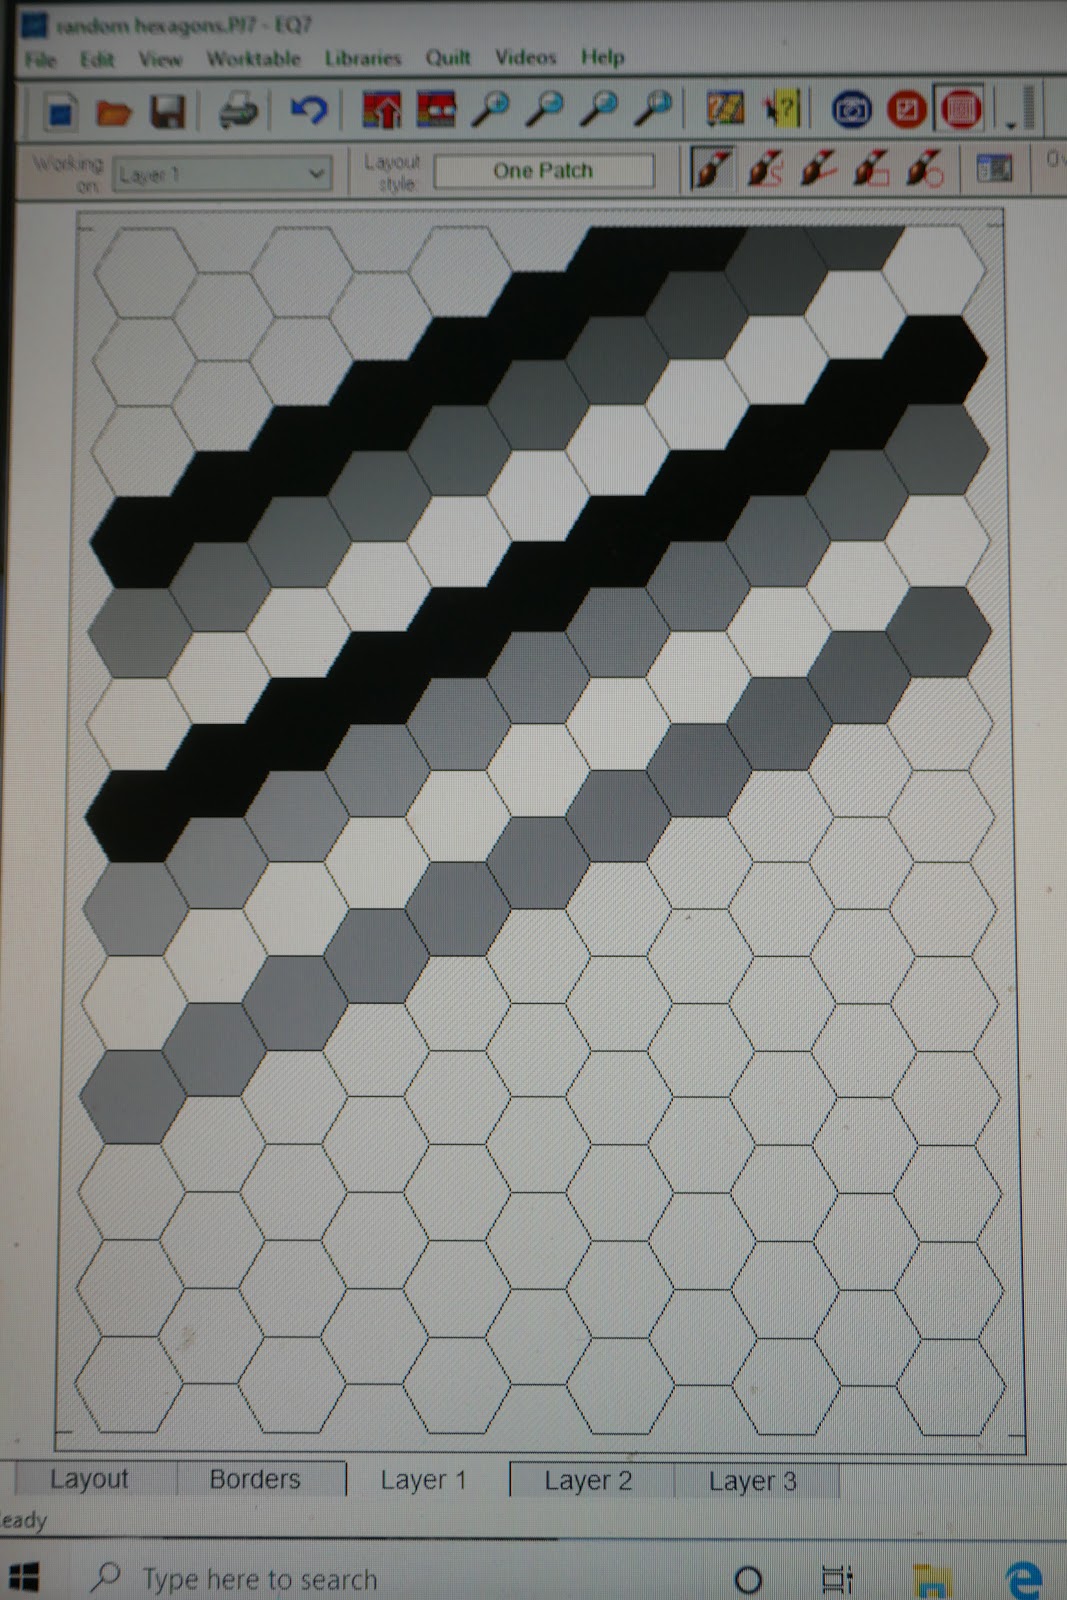
So since I'm not at the stage I had hoped, I am going to share some "sketches" that I generated in  EQ7 for other setting ideas for a random assortment of hexagons.
They are draw in white, gray and black to represent light, medium and dark. 
I prefer to design in a monochromatic palette rather than colors.
If I don't chose a group of colors I like, it can ruin a potentially good design for me.

The first one was inspired by some vintage quilt photos.  I would divide all my scrappy hexagons either by value (light, medium, dark) or by color families for these layouts.  
I like the lattice look of this one and fabric selection could be simplified by choosing one fabric for all the light/white hexagons.
This layout would be good with a large assortment of colorful hexagons to create a rainbow. 
This simple arrangement of hexagons sorted by value could be a striking way to showcase a special collection of prints. 
As so often happens when I start puttering around in EQ7, designs get more and more complex especially when I'm working with hexagons.  It would be fun to set this star askew or off-center and play with the values of each ring to emphasis or minimize the contrast.
Or how about a large medallion?  Add some fussy cutting using modern prints and there's no limit to the possibilities with this idea. 
I also had a "finish" this week -- my Shetland Wool Week #roadsidebeanie!!
Once this is blocked, I'm ready for cooler weather!
I love the way the top star worked. 
The pattern was designed as a free pattern for knitters going to the annual Shetland Wool Week.  I'm not there but it is too cute not to knit.  If you need a smile, click HERE to see a sea of Roadside Beanies on the heads of knitters who are there!
And if you are curious about this festival, click HERE.
(This might be a "bucket list" idea.)

I hope we all have a productive week and hopefully I'll be ready to share my quilting ideas for the Scrappy Hexagons next time!

Mary