Showing posts with label rose star. Show all posts

Monday, May 18, 2020

Birding Wins!

It's mid-May in Northeast Ohio and that means non-stop birding is in full swing as thousands of birds migrate through the region in their annual spring trip to their breeding habitats.
So sewing and the social media has been largely ignored for the past several days and the only reason I'm here with you right now is that my body declared a "day-off" this morning.
The weather is cooperating, too -- it's raining.
 So I'd rather stay inside and the birds that are just pausing here on their trip farther north are more likely to still be here tomorrow!!
(Long-distance flying in the rain is not a good option.)

The one thing I have been working on for the past week is machine quilting another "big bed" quilt for one of the triplets!  It's the rose star sample I pieced using Marti Michell's template sets.

I've divided the top into two sections and added just the top and bottom borders to begin.
I layered the top half last weekend and have almost finished the quilting.
Working in sections is so much easier on my body as there is less weight and bulk to manage.
(Peculiar angle of picture due to limited large area to spread it all out.)
Next I'll layer up the lower half and quilt it. 
You'll notice that the batting and the backing extend way beyond the sides of the quilt.  That is so I can add the borders and cornerstones after the two halves are assembled.
(I'll organize some pictures of that to share as I do it later this month.)

I started with some simple straight lines in the ditch to outline the perimeter of each block and the setting triangles.  As I was doing those, I realized that additional straight lines from edge-to-edge of the quilt would outline the star points and dissect the setting triangles.
Once that was done, I experimented with the best/easiest ways to add more quilting.
Outlining the hexagon arms of the blocks, the center hexagons, and doing simple flowers in the center were the results of that.
The flowers are simple "pumpkin seeds" radiating from the center of the hexagon to the center of each side which aligned nicely with any seams as some of the hexagons are pieced.
The setting triangles were divided into four triangles by the in-the-ditch quilting so I went back and added more lines to break it up into sixteen smaller triangles making them lay flatter and recede visually.  If a section is puffy, it draws the eye -- sometimes that is just what is needed but not this time.
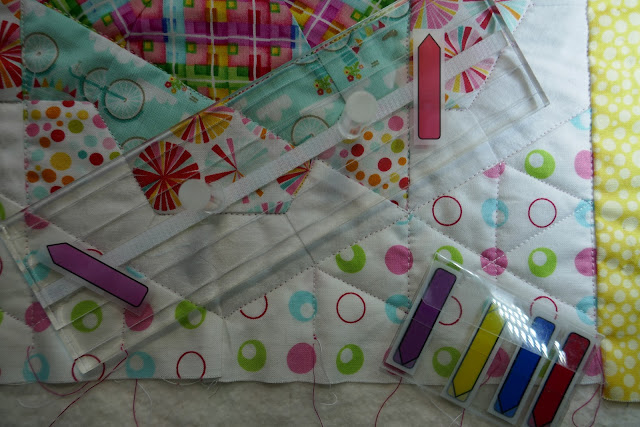
This morning as I began to quilt the borders, I had a "lightbulb" idea and want to share it as it might be useful to you.  The straight edge guide tool I use with my ruler foot only has straight lines (there are probably some that have more lines but I'm in a "make-do" mode here).
I wanted to stitch a diamond chain/cable in the second border using the sixty-degree angles of the patchwork and quilting in the center of the quilt.

I found this "pointer stickers" in my stash and used them to create two sixty-degree angles on my tool using the angles of the patchwork.  Having two lines going in opposite directions will make the next step easier!
 Now I can position the tool quickly -- the arrow edge is lined up with the edge of the border strip and I quilt along the upper edge of the ruler
 By having a line on both ends of the tools, it's easy to twist it to line up with the right, then the left, then the right and without any marking, I stitched a zigzag line down the length of the border strip.
In this picture, you can see the tool lined up on the left as I stitch a second zigzag line to create the diamonds.
 Everything lined up nicely -- there are a few little glitches but she'll be two when she gets the quilt so it's okay.  And I hope the quilt is worn with love by the time she might recognize that a few of the diamonds are not geometrically accurate.
I can't remember who taught me to "repeat design elements" throughout the quilting process but that's such an easy strategy!  Look at what is done and modify and build on it to do the rest.
Adding some fancy free-motion quilted flowers surrounded with "channel" quilting occurred to me over the weekend but when I got to that point this morning, I realized the flowers needed to be simpler.  
Time to pause and contemplate.
In the end, I enlarged the flower from the center of the blocks with the aid of the large hexagon template in Marti Michell's Set H and added some channel quilting following the white lines of the plaid border print.   This is the view from the back.
I'm pleased with the result but it will mean the borders are more densely quilted than the center of the quilt, so more quilting will need to be added to the center to keep the quilt flat.
Maybe some "big stitch" hand quilting with pearle cotton might be fun??? 
Thanks for letting me share this part of the adventure with you!  Writing this morning has been a great way to procrastinate cleaning house but I need to buckle down and do some of that to make it more pleasant to be here for another week?!?  I have to confess to feeling a bit anxious at heading back out into world this week -- slow and steady looks like the best strategy!

But I did get to visit the triplets yesterday afternoon -- they are soon to be a year old.
Would you look at those eyes -- three different sets but all endearing for sure!
(girl, boy, girl)
Stay focused and busy this week!



Saturday, November 7, 2015

Quiet Mary

That's who I've been for the past couple weeks -- quiet Mary.  No particular reason, just feeling quiet.
But of course, I've been busy.
 
We've had a week of rare beautiful, mild November weather and there has been lots of woods walking but I finally finished quilting this piece for my younger daughter.  The only table with available work space was out on the patio so that's where I trimmed it for binding. 
She pieced and appliqued it at least 10 years ago and I noticed it wadded up in her knitting supply closet earlier this year and offered to bring it home and quilt it for her.
I might have quilted the border too densely for the interior of the quilt, but I'll wait to make that final decision until it has been washed -- it would be easy enough to go back in and add some more quilting.  I'll bind it this weekend and take it to her next week.
My studio time has been used cutting and organizing Rose Star kits for workshops this coming week in upstate New York.  It provided another opportunity to test my cutting strategy for this block -- you can read about that HERE
I'm even "marking the dots" since it's only a half day workshop and I want everyone to get the entire block pieced.  No two kits are exactly alike and I'm a little nervous about everyone liking my choices but if they don't, they'll have a holiday gift almost done when they leave the workshops.
This little spot of color in the garden caught my eye yesterday morning from the office window.  The new fall crocus bulbs were up and blooming.  I took some pictures to remind me where they are planted so I don't dig them up next summer while planting something else.
And my red witch hazel shrub is absolutely glowing.
A friend remarked that it would be a good color combination for a quilt.
The handouts are ready, the quilts for my lectures are almost piled up, and this weekend I'll assemble the workshop supplies and review everything for an early launch on Monday morning!
Maybe I'll see you in Syracuse?
 
Have a pleasant weekend!!
 
Mary Huey


Tuesday, May 5, 2015

Antique Rose Star Cutting Strategy

After several months of cutting and piecing the Rose Star block and several workshops helping students through the process, I decided to try a new strategy for the cutting.  It was apparent that the fabric decisions for this block are the real challenge and it's not unusual to re-cut some or all of the pieces several times before settling on a combination that I like.
 
Last week, I followed through with a scheduled workshop even though it was below my minimum number of students so I could test a new approach to the cutting.  I joined with my students in the cutting process and am happy to share the results with you today!
 
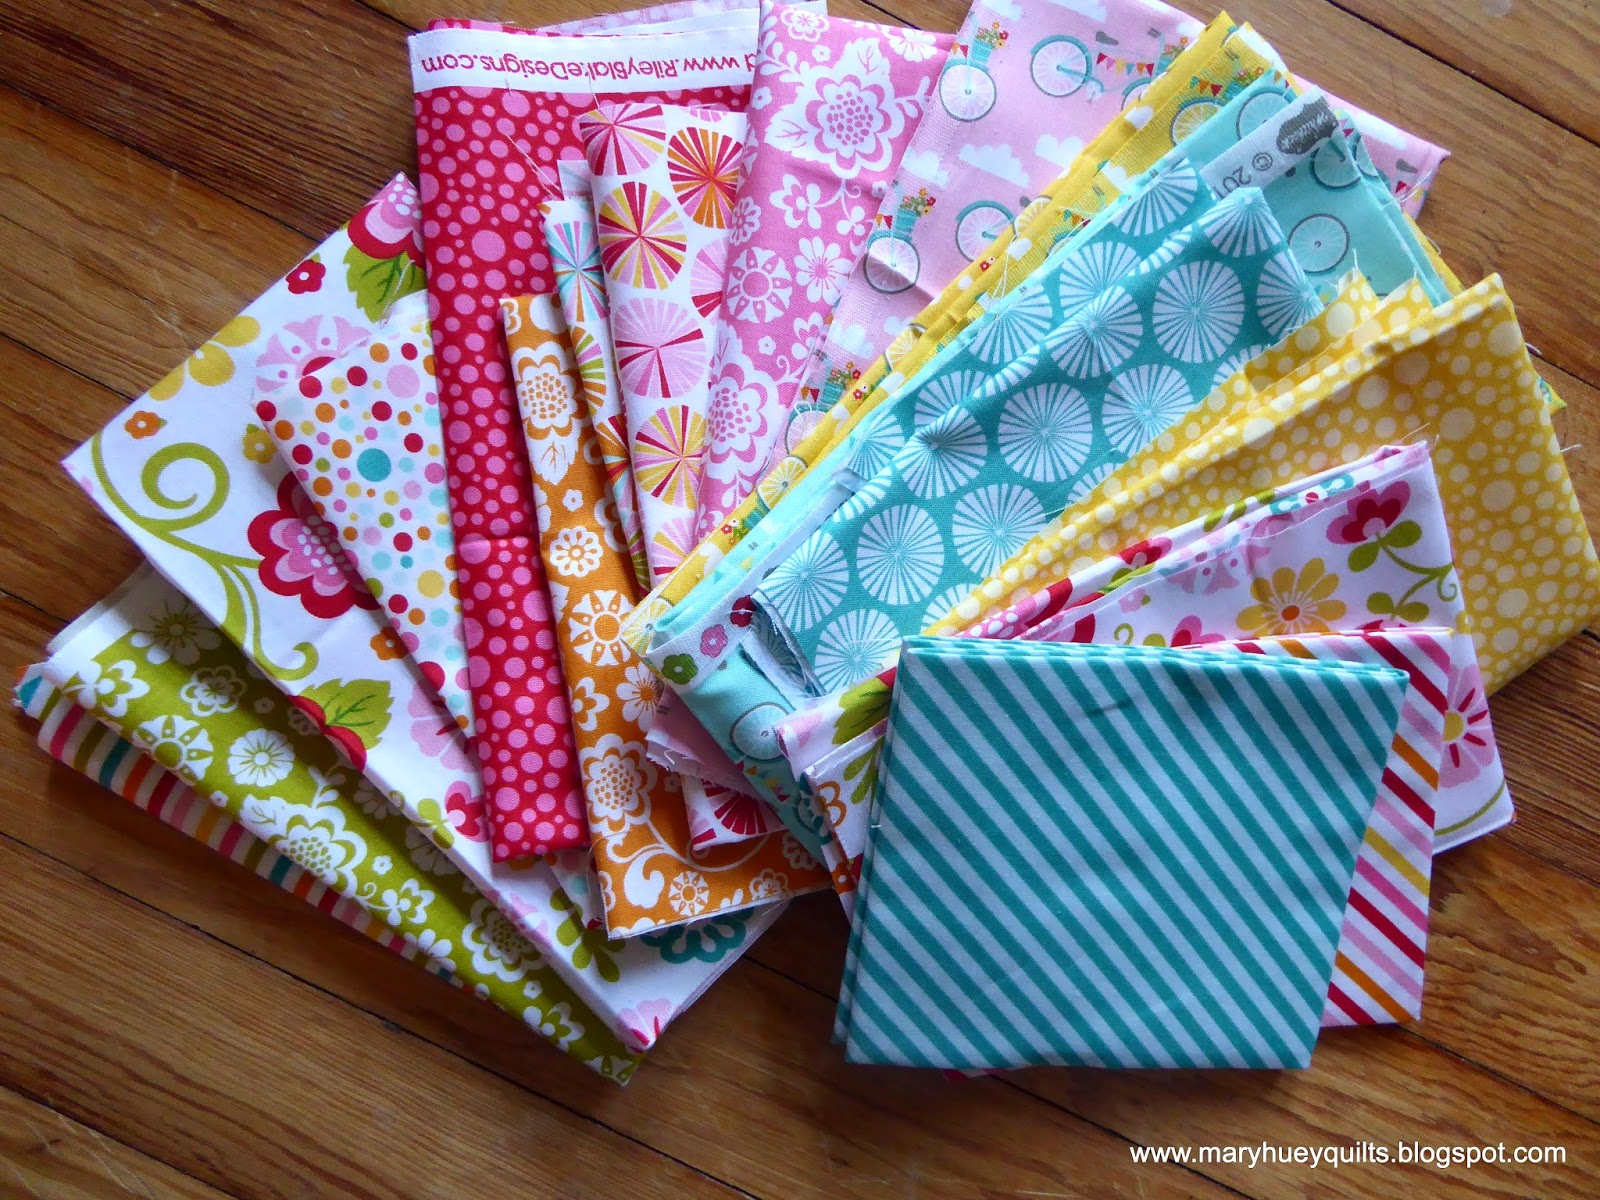
I've had a fat quarter stack from Riley Blake on my "sacred" shelf for about a year.  On the way out the door I grabbed it for my first trial run of the idea.
Each of us began by cutting six kites and six crowns from most of the fabrics we brought.  We used Marti Michell's new Kite and Crown Template sets.
 I set aside the directional prints and stripes.
These are the two basic shapes used in this block and at least six of each are needed in every block.  As the block layout process begins, you might need more kites but it's easy to cut those as needed. 
The center of each block can start with a hexagon, three crowns, or six kites.  I used one of the directional prints in the assortment to cut three crowns for each center -- looks like a bicycle-go-round doesn't it?
The second round (my turquoise pieces above) can be six crowns or twelve kites.
The final round is a combination of kites to make equilateral (60 degree) triangles that alternate with crowns.  Here you see my two auditioning options.
The yellow green sits back and the turquoise print comes forward.  With them laid in both positions, it easier to decide which I like better.  Do I want the points of the star to stand out (on the left side) and the crowns to site back or vice versa (on the right side)?
 
It's almost like playing cards -- just deal out the pieces and change what you don't like and keep what you do.  Be ready for the happy accidents and cut a few more pieces when needed.
And so I played with combinations, moving pieces around, taking photos (gotta love that phone!!) until I was happy with each combination.
 No right or wrong -- just personal preference!!
As we worked, one of the gals remarked while it felt random at first, it helped her get a better feel for how to proceed and I would echo that.  I began by laying out three blocks -- once I was happy with those, I turned to the leftover kites and crowns and began to add the stripes.
 
I forgot to bring my auditioning set of mirrors but I know that laying the kite template on a stripe this way gives good results.  There are two layers of the stripe, wrong sides together in this photo.  Since it's an uneven stripe (in the way the colors appear), cutting this way gives me "rights" and "lefts" and make it easier to manage the designs created with it.
Pairing the kites together creates a crown and won't this be a great star around the center hexagon?
Because I cut to manage the uneven stripe, I know I'll get perfect chevrons wherever I use the kites.  And if they don't work in one of these two positions, they can be used as the points of the star.
I didn't stitch any of them together yet (need to cut the background pieces), but I left with six stars designed and ready.  The students left with a block pieced and 3 to 5 more planned.  I noticed they were a lot less exhausted at the end of class, too.  I think it's because, we took a playful, intuitive approach to the fabric rather than trying to "visual" how each piece would look cut for a specific fabric, cutting it, laying it out, not liking it, having to cut some more. . . .
 
This idea can be applied to any multi-fabric set of blocks, not just Rose Star, but it feels like a  winning approach to me and so this will be my strategy in the future (I think).  I'm teaching the workshop again at the end of the week, so will test it and then decide for sure. 
What do you think?
 
Mary Huey


Monday, April 6, 2015

Antique Rose Star

Have you discovered the Antique Rose Star block?  I give credit to an Australian quiltmaker, Sarah Fielke, for bringing this block to my attention in the book Material Obsession II.  Her "English paper pieced" renderings are so exciting -- I do some EPP but my forte is really machine piecing.
 
 
Happily, just about the time I discovered the block, Marti Michell released two template sets with the shapes needed to rotary cut and machine piece this design -- the Kite and Crown!! 
 
 
A few days ago I stumbled into a wonderful page full of Antique Rose Star blocks on Flickr -- there are over 500 photos shared in a group that was organized a couple years ago.  I'm not sure I can handle that much inspiration!!
https://www.flickr.com/groups/rosestarblockparty/

The students in the first two workshops I taught had the same reaction to their success -- "this is so much easier than I thought it would be!!"  We are often intimidated by blocks that have lots of pieces but this is one of those instances where we should not be!!

Didn't Susan do a wonderful job of fuzzy cutting here pieces?
Actually the most challenging part of making this block for me is choosing the fabrics. It might be because there are so many positioning options.  A student in one workshop decided to cut six kites and six crowns from every fabric she was considering and then play.  What a great strategy!!

Dianne's happy version generated enough pieces for two more stars?!?
I think this is my new favorite workshop to teach -- not only is it a great pattern to introduce quilters to Set-In Piecing Simplified technique but I love it when everyone has a good time and leaves excited about what they are doing.  So there are two more coming up soon. 
 
Friday, May 1, 2015 from 10 a.m. to 3 p.m. at Cottonpicker's in Chardon, Ohio
Call 440-279-0610 to register and get the supply list.
 
Friday, May 8, 2015 from 9:30 to 3:30 at The Sew'n Place in their new location in Fayetteville, PA
Call 717-352-3050 to register and get the supply list.
 
Don't live near either of those places?  Sorry I would love to meet you but I just posted a special on my website so you can learn this terrific technique for chain piecing through set-in seams -- order my DVD workshop and one of the Kite & Crown sets and I'll give you FREE shipping -- offer good only through 4/15/2015 and USA shipping!
 
Have a pieceful day!
Mary Huey


Friday, February 13, 2015

4 X 7 Stitching and Last Chance to enter GROW YOUR BLOG Giveaway!!

Good morning, quilters!!  Have you been stitching every day for the past week?  I have!!
 I hope I can keep up the pace for the remaining two weeks of February.
 
My big push this week was to get two workshop samples to a displayable point by Wednesday.  I kept the quilting on the Rose Star bed runner very simple, did it with my walking foot and did the binding completely by machine (you can read my tips about doing that HERE).  
Done!!
The second sample is basically a "first" draft of an idea that has been rolling around in my head for the past several months and I just haven't made the time to focus in on it.  The hexie motifs are sample blocks from Mickey Depre's book, Pieced Hexies which will be the textbook for my workshop at Lake Metroparks Farmpark Quilt Show on Saturday, March 14, 2015.  The color palette was inspired by this Jane Sassaman print I hoarded the summer of 2013!!
Happily my deadline mentality pulled it out of the fire again and I got the background together over the course of two afternoons in the studio.  The motifs (which have been together for a couple months) are basted in place at this point so it can be displayed at the Park.  When it returns to the studio next month, my goal is to carve out a block of time to push this piece along.
 
Once those two were ticked off the list, I took advantage of a short lull in the action to layer up this very old top that I intend to quilt next week.  It's hanging over the top of my APQS George for two reasons -- to keep the helpful little black cat off of it and to remind me to work on it!!
Yesterday I realized that the pillowcases I started for my grands needed to be mailed now to arrive in time for Valentine's Day.  That meant rethreading my serger with lighter thread which meant I needed to do a small alteration (short arms, you know) and a little repair first with the dark thread that was on the machine. 
 
Happily, the rethreading went smoothly -- not a hitch -- and the tension was perfect immediately, no fiddling required!!
And when I left the house at noon to meet a friend for lunch, I left with a package ready to drop off at the post office!!  One for a boy and one for a girl!!  The main prints were new purchases last week when I paid a visit to Mercantile on Main in Coshocton, Ohio to see the brand new location!!  They are still arranging and rearranging, but it's a roomy space with the highest ceilings I've ever seen -- boy, will their quilts look great hanging on those wall!!
It's almost over, the GROW YOUR BLOG Hop!  Thanks to everyone who has visited me over the past 3 weeks as a result of that! 
 
This afternoon is dedicated to packing for the Hexie Lover's Workshop tomorrow -- the sooner I get that done, the sooner I can stitch!!
 
Mary Huey