Showing posts with label Jolly Little Christmas Sewalong. Show all posts

Thursday, November 16, 2017

Big Finish!!

Two weeks ago, I decided to finish up my grands' Jolly Little Christmas sampler quilts and hand them off to their mother this weekend to save on mailing.  The quilts are their BIG present from Grandma this year but I wanted them to be able to enjoy the quilts throughout December!!
By keeping the quilting simple and staying focused I was able to have the quilting finished in a week!?!  I used long vertical wavy lines with snowflakes inserted randomly.
Lori Kennedy's Snowflake tutorial was the inspiration -- check it out HERE
To have them ready in spite of being on the road for six days, I cut the bindings and packed the trimmed quilts and my machine in the car. 
As good luck would have it, the hotel on my free evening had a desk that was perfect to get the job done and enjoy another episode of Vera (my current English crime favorite). 
I returned home yesterday afternoon and after putting away the stack of quilts from my lecture for the National Road Quilt Guild in St. Clairsville, Ohio -- I was ready to wash and dry the newly finished quilts so they are ready to wrap and hand off this weekend! 
I always wash quilts before giving them away.  My go to settings are lots of cold water on gentle cycle with an extra rinse.
I have used Quilt Soap for over 30 years and it always does the job well!  It's gentle, pure, and rinses out completely.  It's also very concentrated, so a little goes a long way.
Thankfully, I noticed this little bleed mark when I was binding the quilts.
That meant, add ColorCatcher sheets.  The box says two but I put in three just in case.
Then I had to find something to do so I could hear the washing machine when it finished -- it doesn't do to leave wet quilts laying in the machine when you are trying to control bleeding.
Glad I did that!!
Look what's down there at the bottom of the machine!?! 
Pink!!
I ran each quilt through another rinse just to be sure all the renegade red was out. 
Fifteen minutes in the dryer on low and then I hung them outside to take advantage of today's breeze to finish the job!
My grandson's version has a male cardinal and the moose.  I used green for the cornerstones and the binding.
The backing is so cute and so perfect for this kid who loves to be outdoors.
He doesn't have a red pickup yet (he's only 9) but I wouldn't be surprised if there's one in his future. 
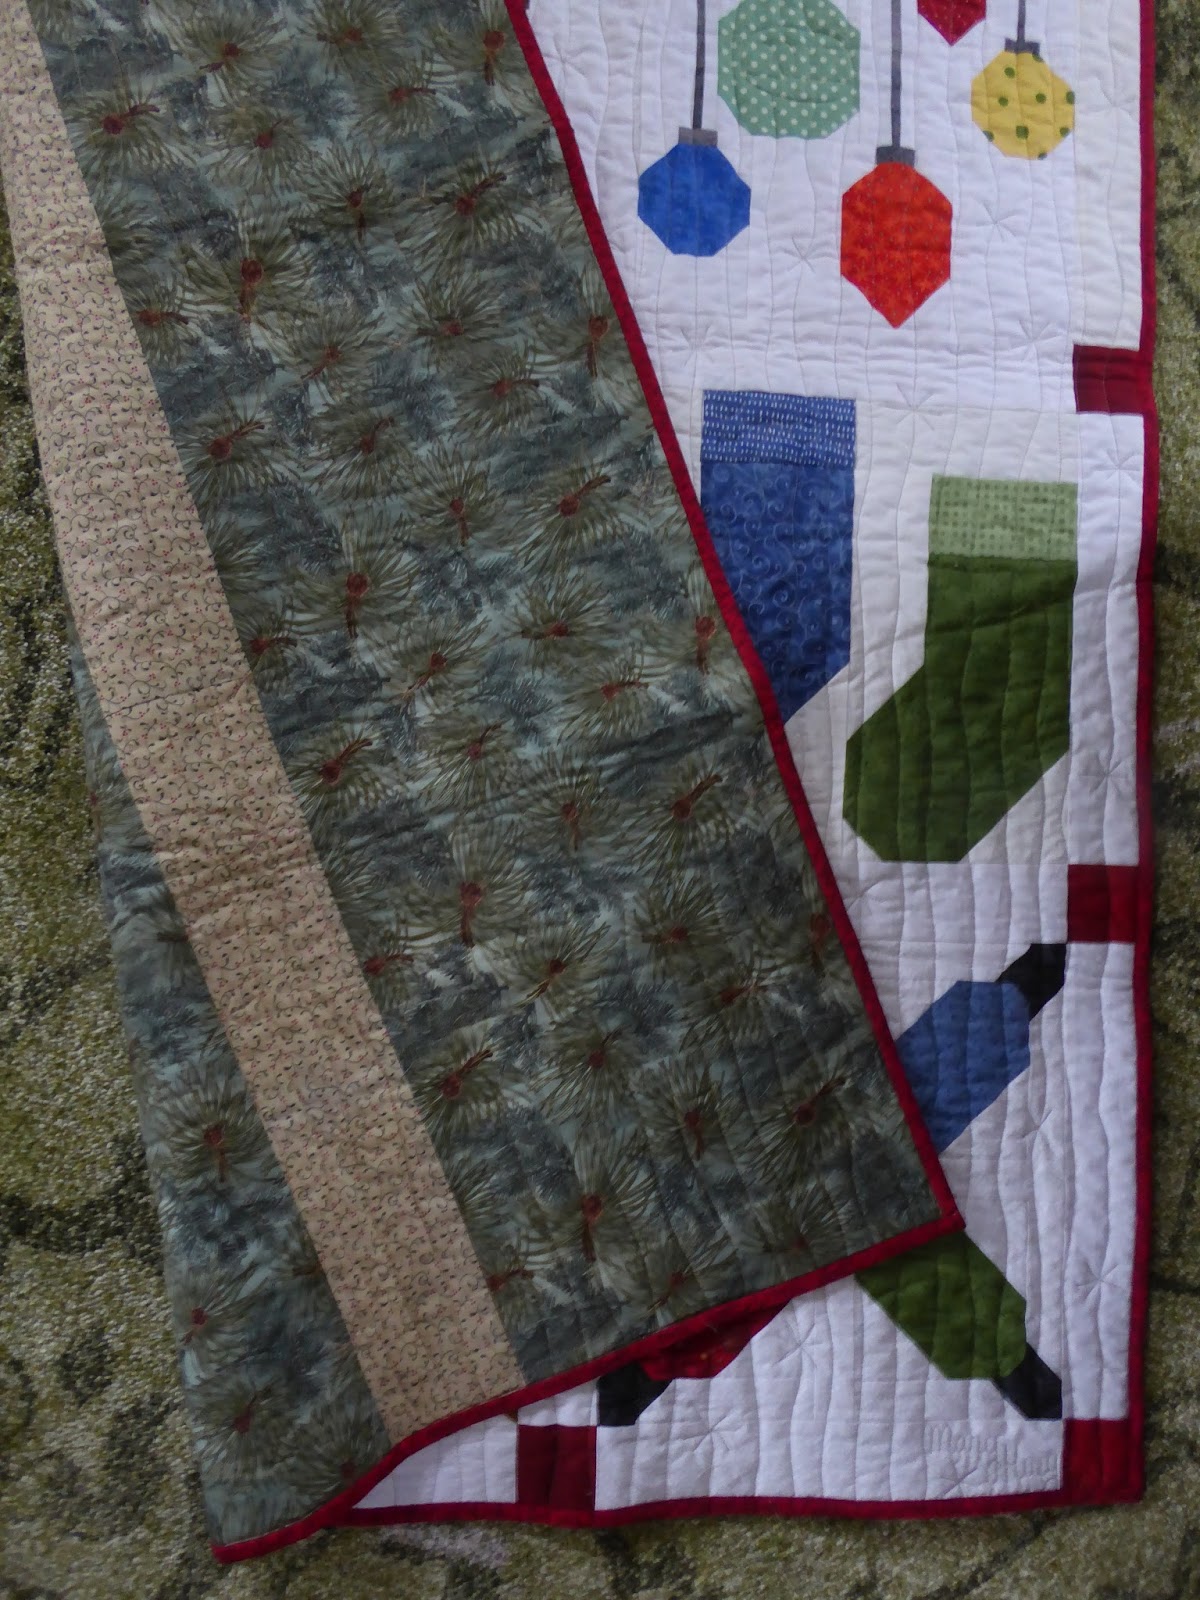
My granddaughter's quilt has a female cardinal and the reindeer block.  I used red for the cornerstones and the binding. 
The backing is a beautiful print of pine boughs from Hoffman Fabrics that I have been hoarding for years! 
I signed both quilts, dated them, and quilted the kids names into them.
I used Quilter's Dream Machine Blend batting and a silvery gray Isacord rayon thread left over from my machine embroidery days.  
You can find the patterns for these blocks and a few more over at Sew Fresh Quilts!

So two BIG presents done and two finishes from my fourth quarter 2017 Finish A Long list!!
What's next?!?
If you follow @52quilters on Instagram, I'm next week's host!!
Lots of y-seam fun stuff planned!!

Enjoy the weekend!
Mary


Friday, September 8, 2017

Steady Progress!

Sunflowers at last!!
We've had to beat off the rabbits and the deer, but we were finally able to harvest a small bouquet for the dining room table!!
Since finishing my Smorgasblocks Sampler last weekend, I've been focused on painting woodwork (boring but necessary) while listening to a new book on Hoopla -- Jane of Austin by Hillary Manton Lodge -- it's the plot from Jane Austin's Sense and Sensibility set in modern times.
Harry (the indoor black cat) has been my companion.
This lump is Harry -- I did not realize that he was so fond of burrowing into the perfect napping spot?
My rewards for making painting progress have been slipping away to bird a nearby park (can't miss fall migration) or spending time in the studio working on assembling these two quilts for my grandchildren.
I decided on sashing these blocks with the background fabric to set each of them off.
I thought I would share how I handle sashing -- not sure why I started taking this approach?
Did someone teach me this? 
Mary Ellen Hopkins perhaps? 
Or one of my It's Okay teaching pals?
I add the sashing to blocks before doing any assembly of rows -- it makes for much less matching!
After being sure all the blocks are uniform in size, I add a plain sashing strip to one side of all the blocks in the quilt.  Doesn't matter which side, but must be the same for all the blocks.
Here I've added it to the right side.
I pressed the seams towards the sashing.
Then I add a cornerstone to one end of another batch of the sashing strips.
You can see one of the pineapple blocks at the back of the picture -- they are my current "sew-offs" as I need just three more blocks to finish another top.
I pressed these seams towards the sashing.
Those sashing/cornerstone pairs are now added to all the blocks -- once again, which edge doesn't matter except that it's the same side for all the blocks.
I pressed the seams for the  two outside vertical rows of blocks towards the sashing and the center row towards the blocks.
(The paper in the center of her forehead reminds me where she belongs in the layout.)
The final step to preparing the blocks is to add sashing and cornerstones around two of the outer edges.  One of them will have a cornerstone on each end.
For this layout, the left edge and the upper edge blocks will get one more pair so they are sashed on three sides.
The upper left corner is the only block that will be sashed on all four sides.
Here are all the blocks with sashing and cornerstones attached ready to be assembled into rows and the completed quilt top -- my task for this weekend!
The tops will be 44" by 58" and the verdict is still out on borders.  Borders will frame the tops nicely but may also make the quilts larger than I intended.
Auditioning will yield a verdict.

Harry emerged from his cocoon in time for supper but is back down for a long afternoon nap!
Perhaps we all need a bit of a nap this weekend!
Mary

The blocks are from Lorna's most recent sew along at sewfreshquilts.blogspot.com 


Tuesday, August 29, 2017

Productive Procrastination

Why does "procrastinating" always get such a bad rap?  
If you are productive in the midst of it, isn't that okay?
I'm suppose to be sanding woodwork and bead board wainscoting to prepare it for a new coat of pain.
Hate sanding!! 
Even with power equipment -- hate it!!
But I'm not wasting my time -- no!!
Not surfing Instagram, not gazing out into space.
I'm getting other things done!!

For example, I've started quilting one of the tops I layered earlier this month!
I've only made one pass across it but it went well and if I complete two passes a day, it will be ready to bind this weekend!
Excellent!!
I revitalized my sourdough starter!
It took two batches of pizza dough and a batch of pancakes, but it's better than it's ever been.
Turns out, I've been adding too much water during the feeding process.
I made two loaves of bread -- they didn't get very high, but the texture and flavor is perfect.
Next time it will be higher!
I've been working all weekend to finish the blocks for the two Advent quilts I'm making for my grandchildren.  The blocks were designed by Lorna at SewFreshQuilts and are part of the Jolly Little Christmas SewAlong.
Check it out HERE.
We are having unusual August weather here (read not hot), so I took the cutting tools and fabric out to the patio on Saturday and filled these file folders with everything needed to make the last few blocks.
I also sanded (for about 30 minutes) -- maybe if I break it down into little sessions?
I made the Christmas Lights blocks first -- easy piecing.
So cheerful!! 
Time for some more sanding!
Then the Wreath blocks.
The details Lorna works into the blocks fascinate me -- look at the right side and the under side of the ribbon. 
Must go sand!
The quilts will be similar but I'm customizing them a bit with the color choices but I've also made just one reindeer (for my granddaughter's quilt) and one moose (for my grandson).
With so many pieces, I find it helpful to sort everything before I start to sew.
A set of those alphabet letters to clip to each stack would be helpful but one would have to remember to look for them at my LQS. 
I also keep a ruler next to my sewing machine so I can check measurements -- yep, this one is too short -- grrrrrrrr. 
I like Lorna's instructions -- they include lots of diagrams to illustrate the words.
Aren't these antlers cute? 
Cute, yes.
Wrong, yes.
I puzzled for a couple minutes what was wrong -- pays to look carefully at the diagrams before stitching!
Now they are right! 
Here's the finished block!!
Just too cute!! 
Here are the twelve blocks on the design wall -- some rearranging will happen before the sashing is added and I might need to shop for border fabric but we'll see. 
I still have two more blocks to stitch together and half the sanding is finished.
Wanna bet where I'm headed now?

Mary

P.S. Oh, yes and I cleaned up the work bench in the basement -- well, I had to find all the stuff I needed to start the sanding in the first place??


Wednesday, June 28, 2017

Is "Catching Up" Possible?

I've been pondering that possibility the past couple days -- no answer yet, just more questions.
I'm supposed to be on a little botany trip with friends but a brief illness changed my plans and yielded 4 empty days -- bonus!!  I can get caught up!!
A little naïve, perhaps?

I've fallen behind on the blocks for Sew Fresh Quilt's Jolly Little Christmas SewAlong so spent time last week getting three of the blocks cut.
And now happily, here's the time to piece them
I tackled the snow men first!  Look at these cute little faces!?!
Zoom, zoom, the piecing goes so quickly!
Although all these units had to be "destitched". 
Going too fast and forgot to insert the brim of the hat pieces -- not just once, but six times!
One of the "perks" of chain-piecing?
Soon I was back on track and in the end finished two more darling blocks for the piles!
Wouldn't this block make the cutest border or row in a quilt?? 
The Holly and Berries blocks went together quickly and Lorna has shared a design on her blog for a cute tablerunner project using this block!
This is always the dangerous moment for me -- I'm on a roll, really making good progress!
"Let's do the third set of blocks", she said!
Going carefully, double checking the organization of the pieces to be stitched!
Achieving consistent skinny bands by measuring the seam allowance from the left instead of the right -- excellent tip someone shared with me years ago and easy to do with the Bernina #37 1/4" foot.
Ornaments ready to trim and press -- this block is so cute!! 
All the units are stitched and in the correct positions -- awwwesomme!!
(You need to say that word in a falsetto sing-song voice (-;  )
Oops -- the top half and the bottom half aren't lining up?? 
It seems that in my confident state of mind,  I fell into the "look at the pictures and skip the words" trap.
Result -- units that needed trimmed were not and now there needs to be more destitching.

Conclusion -- no, catching up is not possible today -- because I've made more work for myself by being careless and not reading everything!  Lorna does a great job of organizing these posts and writing instructions -- I need to do a better job of using them!!
Perhaps I should do a study on whether it takes longer to read or destitch??

I'm out of here -- going for a walk and get centered!!
Mary