Friday, March 21, 2014

Diamond Star Playtime Sew-Along -- Step 2 -- Fussy Cuts!

Time to talk about fussy cutting with the diamonds.
  I've been playing with a couple different fabric pulls so hope it's not too distracting when I jump back and forth between them. 
You can also download a PDF of it by clicking here.
Many of you have fussy cut motifs out of a print for a special effect or made a "stack & whack" style quilt.  We'll use some of those same techniques.  The fabric you are working with will dictate what you can do to some extent.  A symmetrical print like the one below is the easiest to anticipate results -- when you set down a pair of mirrors at a 60 degree angle, what you see is pretty much what you will get (minus the seams).


But a print with a scattered, directional or asymmetrical design can't be auditioned as easily because you will never be able to reproduce what you see in the mirror.
And it might just be ugly!! 
What you get from prints like that are swirls of design motifs so you have to be open to a little surprise. 
There are two ways to cut these pieces.  The diamonds for this star (above) were cut using Bethany Reynolds "stack and whack" approach of layering up 6 pieces of fabric, matched identically, and then cutting all six diamonds at the same time.  The fun of these is that you always have two options.
The hardest part of fussy cutting is making the decision to chop a beautiful piece of fabric up like a slice of Swiss cheese.  But that's the only way to get beautiful stars like this one in my quilt, Pieceful Constellations!
I play with the mirrors to get a rough idea of what a motif will look like in a swirl of six.  Then I   rough cut the motif staying about 1/4" outside the template.   
I use that first rough cut piece to search out and rough cut five more pieces. 
When doing the final cut, I work on a small mat or my rotating mat so I can cut all the way around the template easily and safely -- twist and cut, twist and cut. 
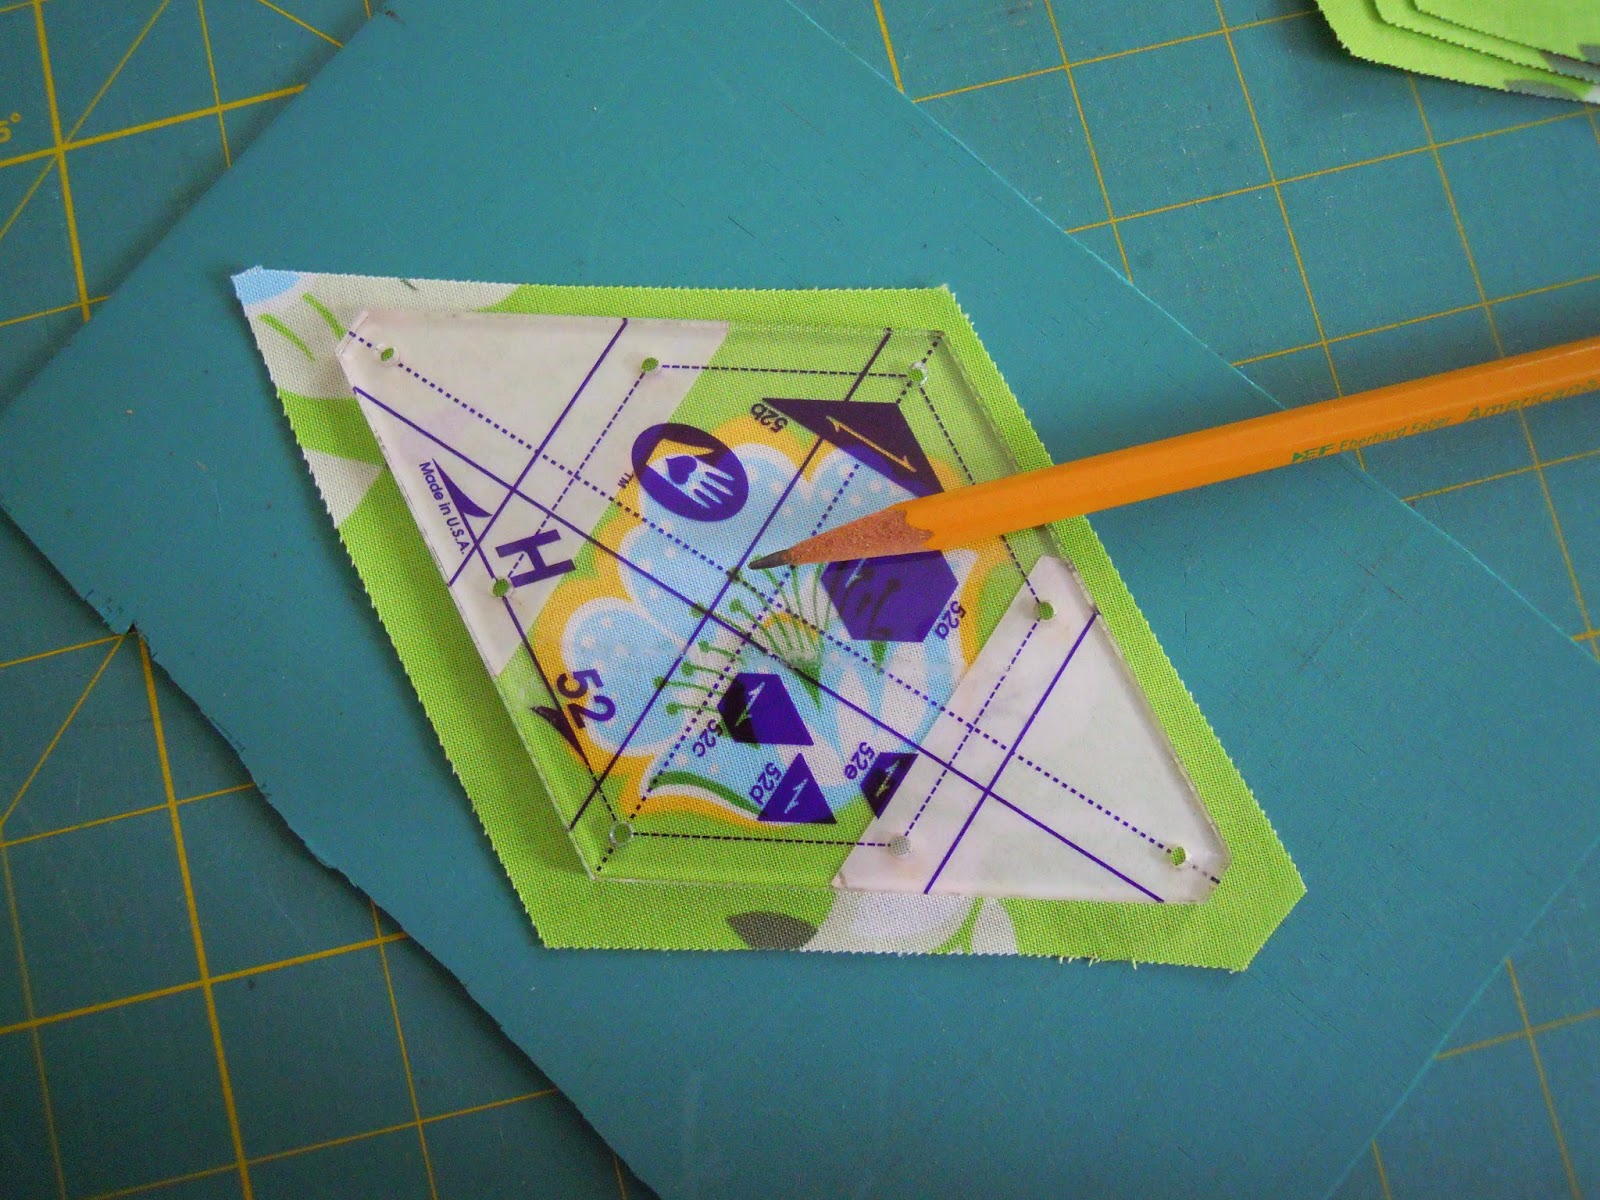
On this template, I used the intersection of two lines near the center of the template (where the pencil is pointing) as my register mark to cut each diamond. 
 I centered that register mark
on the same small dot near the center of the flower (where the pencil is pointing) for each piece.  Since the right and left sides of this motif are different, good placement works fine.  For a symmetrical repeat, setting up several register marks on the template might be necessary for better alignment.
Here's the finished block for that set of diamonds!
I had planned to talk about working with stripes today also, but it's long enough.  Next Friday, 3/28, I post a tutorial on several ways to cut stripes for interesting effects.  If you have a print that calls for some fussy cutting, make a couple stars this week. 

If you are looking for Step 1, it's here!

Mary Huey

All material Copyrighted by Mary Huey Quilts!

If you are having trouble finding Marti's templates locally, you can order them directly from her at 

Monday, March 10, 2014

Diamond Start Playtime Sew-Along -- Step 1 troubleshooting tips!

I hope you have had time!  I promised some troubleshooting tips and these are based on teaching the Set-in Piecing Simplified technique for almost two years. 
If you missed Step 1, click here to read it over.

#1 -- the center of a 3 diamond (tumbling block) unit has a pucker.

To diagnose the problem, look at the wrong side!  It's easy to fix and pressing isn't the fix.

The most common reason is that the stitching goes past the dot and that's one of the benefits of this technique, you can be up to a stitch short of the dot and still get excellent results because the end of the seam is so secure.

Another common cause of the pucker is when the end of one of the three seams is not lined up with the other two correctly.  After helping dozens of students trouble shoot this, it boils down to not matching the corners of the diamonds.  The first two diamonds are easy to match.  The problem usually pops up when adding the third diamond.  It's hard to see the inside corner.
You need to pull the upper diamond back so you can see the corner of the lower diamond.
Now when you lay the third diamond right side down, it must match the corner of the lower diamond to get good results. 
The photo below show poor alignment and the end result will be seams that don't meet and a pucker on the right side at the intersection of the three seams.   In this photo, the black diamond needs to be shifted up to the left until it aligns with the corner of the gray diamond.

#2 -- the center of the star is askew.  The most common cause of this is haphazard pressing which then makes it challenging to control the bulk where the six seams come together at the center.

EVERY subunit of the star must be pressed identically so when the three units are joined, the seams will always nest together flat.

 If you have encountered other problems, e-mail me at maryhueyquilts@hotmail.com
  
I'm ready to make another star!!  How about you?

Mary Huey

All material Copyrighted by Mary Huey Quilts!

Friday, March 7, 2014

Diamond Star Playtime Sew-Along -- Step 1

Are you ready to begin?  Have you ordered Set-In Piecing Simplified?  Have you tried out the piecing technique?  Have you gathered up a starting assortment of fabric?   If you answered "YES" to all of these, then let's get started with the first star block for our sampler. 

This first step is a long post.  I promise they won't all be so long.  You can also download a PDF of it by clicking here.

If you haven't practiced the sewing technique from Set-In Piecing Simplified, I suggest you start with some scraps and make a couple stars before working with your sampler fabrics.  The resulting blocks would be perfect to use on a tote bag or pillow top.  The practice will give you a chance to review the process and improve your results.  As I say on the DVD, it took some practice for me to get comfortable with it and that is certainly the experience my students have during workshops.

We'll begin with one basic two color 6-pointed star.  The rest of the stars in the sampler will be variations of this basic one.  Pick two prints with a good contrast.  If you are using multiple background fabrics, choose one that goes with your star prints.
For my cutting sample, I'm using Marti Michell's 60 Degree Diamond but the cutting will be the same for whichever template you choose for your blocks.  First we'll cut strips and then diamonds from the strips.  I'm going to cut 3 1/2" diamonds (remember -- this measurement refers to the finished length of any side of the diamond -- not the width of the strip).
The width of the strip needed is often an "UGLY" measurement that is hard to see on a ruler and generally impossible to cut consistency. 
Marti teaches us to use the tool or template to "measure" the width needed right on the fabric.  In the photo below I have already straighten the edge of my fabric and now have the line for the size diamond I'm cutting matched to that edge.  Oops, I have it on 3" and it should be on 3 1/2" -- good thing I noticed before I cut! 
 I then brought my long rotary ruler up against the opposite edge of the template and I'll move the template down the length of the fabric to be sure the ruler is aligned perfectly the entire way.
Once the ruler placement is just right, I pull the template away and cut along the right hand side of the ruler.  If I were left-handed, I would work from the opposite side of the fabric.  If you are also working with this tool, the instruction booklet that comes with it explains this method (with illustrations) on pages 6 and 8.  If you have Volume 6, Six is for Hexagons, the same instructions are on page 8.   Or go here for a PDF from Marti's website that explains the process. 
I cut several strips of background fabric so those diamonds will be ready for future steps.  To cut the diamonds from the strips, open the strips out and layer up two to four of them with the right sides up.  Use the tool to make the first diagonal cut as in the photo below. 
Now slide the tool to the right until the line for your size (3 1/2" for me) or the edge of the template (if you are working with Set G or H) aligns with the first cut.   
Cut away a diamond and gently pull the strips to the right.  Don't move these diamonds yet.  
Nip off the tips sliding the tool into place at each end and before you un-stack the fabric.  (No fussing about the trimming -- it's very helpful in the long run!) 
This is one of my prints for the star -- can you see a problem?  The top set of diamonds is not symmetrical! 
And here is what happened.  I went all the way to the edge of the tool instead of stopping at the 3 1/2" line. 
This cutting error is (thankfully) easy to correct -- just need to take a bit off.
To avoid this, I find that keeping the tool right side up on my fabric so I can read the words eliminates that issue.  (After all, this is the way it was designed to be used.)
And if you are a leftie, keep the tool "upside-down" as in the photo below -- the words are the only thing that is upside-down, everything else will be where it should be.  
Last thing to do before we go to the sewing machine is make dots.     I use a standard pencil most of the time, but on those dark ones, I use a bright orange colored pencil as ultimately the markings won't show.  (Once again, no fussing -- the dots are important!!)
We could make dots at all four corners of each diamond, but we really only need the two opposite each other -- upper right corner and lower left corner in this photo.
Time to sew!!  I lay out the block as it will look finished -- never skip this step -- it's too easy to get a piece in the wrong place.
If you pull away every other background diamond, you'll notice there are three identical units and they are tumbling blocks.  We could also divide the star in half and make two half stars but after all the 6-pointed stars I've made, I get better centers making three tumbling blocks units.  And so do my students!
So here are the three tumbling block units ready to stitch. 
This part of the piecing is covered in the first part of the DVD.   I take a "production line" approach to my piecing.  I start by flipping the top diamond right side down onto the left side diamond and stitching that seam (chain-piecing as in the DVD) for all three units.  I can start at the raw edge of the point that will be on the outside of the unit, but I have to stop at the DOT!!
I lay each unit back in position and add the right-side diamond to the starting pair. 
 
Now there is just one more seam to finish the tumbling blocks -- pay attention to my tips in the DVD on the best matching point at this stage to assure accurate centers and remember, it's better to stop a stitch short of the dot when chain-piecing through the set-ins!
Press all the tumbling block units EXACTLY the same with the seams swirling in one direction (you'll get a little hexagon in the center on the back).  Pressing all of them identically pays off as you join them together in the next step.
Now it's time to lay out the units in the star again.
Bring the remaining three background diamonds back into the layout. 
First set together the tumbling block units -- review the second part of the DVD at this point to help you through this step -- you will be stitching from DOT to DOT.  If the seams on all three units swirl exactly the same way, when two units are right sides together, the seams will mesh together perfectly.  If they don't, stop now and press again!!  That seam will act like a dot at those corners helping you stop in the right place.

Two together!  Then set in the third one and close up the star!
Now you are ready to set in the remaining background diamonds.  You can start at the raw edges of the outer points, but you must stop at the dot on the inside corner. 
To press the final block, follow the swirl direction started by the tumbling block units.  Notice the center of this star swirls counter clockwise and the swirls along the background swirl clockwise.  If you press all the stars identically throughout the Sew-Along, the blocks set together more easily at the end. 
Now it's time to check the center.  Pretty good I'd say.  If yours isn't perfect, not to worry.  Just try another one.   I'll post some troubleshooting tips on Monday (3/10) to help you diagnose problems as well as introduce you to the Flickr group where you can post photos of your stars. 
Now make another two color star -- use the same background or change it to a slightly different print.  The second one should go together faster and easier as you begin to feel more comfortable with the set-in piecing technique.  Two stars are enough for now.
The second step will be ready on March 21 -- we'll explore fussy cutting the diamonds and managing striped fabrics.

If you have questions as you work through this, e-mail me at maryhueyquilts@hotmail.com

Mary Huey
All material Copyrighted by Mary Huey Quilts! 

If you can't find Marti's templates locally, you can order all of them from her website!




Tuesday, March 4, 2014

Diamond Star Playtime Sew-Along -- Choosing fabric!

Sometimes I put too many oars out of the boat at the same time and you know how that works -- one can only handle one or two of them at a time, so the fabric yardage post for the Diamond Star Playtime Sew-Along had to wait until this morning.  Thanks for your patience!!

I'll be working with Marti Michell's 60 degree diamond templates during the Sew-Along.  There are several choices and if you missed the two posts about that, they are here and here.

Pulling fabric is my favorite part of making a quilt.  Hardly surprising after 26 years of running a quilt shop, is it?  I can make piles of fabric that go together all day long (no doubt that explains my seemingly endless collection of UFO's).  It's important to understand that when I took up buying fabric for my shop in the late 1970's there were no "collections" of coordinated fabrics.  If you are more comfortable using a collection that has been coordinated by a designer, the instructions that follow may seem unnecessary.  But if you want to break out of the mold and do your own thing, read on!

This Sew-Along will be a guided process to help you make your own version of a sampler featuring 6-pointed stars rather than copying a specific layout planned by me.  Obviously you will need a pile of fabric to begin and these are general yardage guidelines.  Don't worry about exact quantities -- it is likely that you will want to add fabrics as you get more involved in making the stars.  "Running out" of fabric is a spur to creativity, so don't worry about that either!

I began both of my samplers with a focus fabric which I used  to guide my color choices and print style.  Diamond Star Playtime was the first one and the border was the focus fabric.   I sorted through my stash (which is formidable) and pulled pieces that matched the colors in the border print without making judgments about their "suitability" -- just color at this point.  In this quilt, I used "contrast of color" more than "contrast of value".
Once I pulled as much as I had, I laid them out in a row overlapping so that about an
 inch of each is showing -- that way nothing dominates the scene.  Then I open out my "focus" fabric and refold it so that I can lay it across the row of possible fabrics as shown below.  Now I leave the room -- go fold a load of laundry, perhaps? 

When I come back a little while later -- I pull out any fabrics that jump out at me because that means they aren't blending together with the rest of the group.  In this case, I've pulled out the ones that are above the original row.  I may not put them away at this point, but will hold them in reserve just in case.  By the way, this is my pull for a new project . . . . . .
You can use a similar approach when you are shopping -- pull a bolt of something you just love and then walk it around the store and pull anything that matches the colors of the focus.  Line your pulls up and drape the focus across them.  Leave it for a few minutes and then come back and begin to eliminate the ones that jump out at you.  I find it is easier to eliminate possibilities than it is to get four or five that you love and then try to find more to go with them.  This approach also exposes your eye to unexpected possibilities which you miss when you are trying to "match" pieces one at a time.

The focus fabric for Pieceful Constellations was a large print that was chosen for it's potential for fussy cutting motifs to use in the stars.  While it guided my color and print selections, it only appears in the quilt as small pieces.  One of the good aspects of this particular print was the amount of background space between motifs. 
When choosing a fabric that you expect to fussy cut, be sure you have or buy enough to get 6 repeats of the print motifs.  Look at how repeats of a motif are available from side-to-side in the print as well as looking at the running repeat in the yardage.  This print had a 12" running repeat and each of those sections of the print averaged 5 identical motifs.  To be able to cut 6 motifs, I needed a minimum of two running repeats -- of course, I got more to give me flexibility -- four repeats (1 1/2 yards) gave me twenty of most motifs. 
If you think your focus print may become the borders of the quilt, it's easiest to have yardage that corresponds to the anticipated length of the quilt.  But if you don't, I've figured out several ways to work around that and I'll talk about those as we near the end of the Sew-Along.
In this quilt, I had a designated background fabric -- the ivory solid -- a half yard would have worked but I got a couple yards because in my mind, all the stars would use it and there were no tumbling blocks in the original "plan" (and it will never go to waste).   In this quilt, I used "contrast of value" rather than "contrast of color".  There was no designated background in Diamond Playtime.

I always work with dozens of prints in a piece so 1/4 yards of a print generally are sufficient.  If I really like it,  I'll get a 1/2 yard or if it's a stripe. In this close-up, notice the variety of textures and values I included.  There was more fabric left in my pile when I finished the quilt than I used to make the quilt!   Some pieces were only used once because I didn't like it as well in a finished star.  The brown and aqua plaid was a 1/2 yard cut and I liked the way it worked so much that I went back and bought another yard (so I wouldn't run out?).  In the end, I used it for the binding, too.
So to boil all this chatter down into simple guidelines, I suggest that you start with 1 1/2 yards of a focus print for a moderate size wall hanging (3 yards for a full-size bed quilt) and 1/4 to 1/2 yards of a dozen prints ("love it" or making a large quilt - 1/2 yard each; "just okay" or small size quilt - 1/4 yard each) and 1 to 2 yards background fabric.  Be sure to include an interesting print for fussy cutting or a stripe, and maybe a polka dot? 

 Once we begin to piece the stars, you'll gravitate to prints and combinations that please you the most -- new fabrics may appear and some may not get used at all.  Generally, it takes about 3 yards to make a quilt that is 45" by 60"; 7 yards for 72" by 90" (twin); and 11 yards total for 90" by 108".  Just relax and enjoy the process. 

If you need reassurance during the fabric selection process, send me a photo of your pull with questions you might have and I'll give you some feedback.  Send it to maryhueyquilts@hotmail.com

We'll begin with simple two fabric stars and a basic tumbling block.

Let the fun begin!!

Mary Huey

All material Copyrighted by Mary Huey Quilts!