Are you ready to give this block a try? Today's tutorial is long but full of pictures which I hope will make it easy to follow. Read all the way through it first, then sew through it slowly. If you don't "get it", just do it and it will make sense as you finish the first block. If you didn't pull out a UFO for "leaders/enders" (I know you have at least one), do that before you start to sew. Not only will it make the rhythm of the process smoother, it will be a win-win because you will finally make a bit of progress on that UFO!?!
Step 1 is to sew the six pairs of blades together -- start at the narrow end, 1/4" seams.
.JPG)
Stitch up to or just short of the dot -- it's okay to stop less than a stitch from the dot!

I've learned "short of the dot" works as well as "on the dot" -- but don't stitch past the dot.
If your 1/4" seam is accurate, your needle will be aimed directly at the dot.

Now for the "trick" that makes it possible to chain-piece while stitching set-in seams!
With the needle down, lift the presser foot and pivot the fabric clockwise until the left edge of the presser foot aligns with the edge of the patchwork.

Next, stitch onto the second pair of blades and repeat the process until you have all six pairs stitched together.

I leave every blade attached to the chain as you see here.

Clip off the first five pairs and leave the last pair under your needle. Don't press anything yet -- it's not helpful!! Grab the six kite points.

Open up a blade pair and position the kite point as below.

Flip the kite point right side down onto the left blade being sure to match the corners of the pieces.


Stop at or just before the dot and pivot clockwise as before. Now you can clip off the last blade pair and continue to add kite points to all six blade pairs.

Once you have the kites attached to one side of all the blade pairs,
Cut off five of the blade units, align the second side of the kite to the other side of the blade unit and continue on -- chain-piecing all the way until all six blade units are finished.

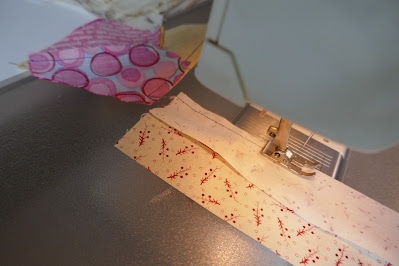
This is where I grab something from my UFO "leaders/enders" stack -- once I've sewn onto this little strip set, I can clip off all the blade units and head to the ironing station!
.JPG)


.JPG)


Press the seams of the blade units with the long seam going towards the darker fabric and the end seams going towards the kites. Do not press the seams open!! Not only is this unnecessarily time consuming (in my opinion) but it weakens the patchwork.
.JPG)
Time for the second sewing round! Make three pairs of blade units -- match the seams as shown below.

Since I'm going to applique a 1" hexagon at the center of the star when I'm finished with the piecing, I trim 1/2" off the tips before stitching them together to reduce bulk.

Here we go! Sewing off the little strip set from my UFO onto the blade joining seam.

All the way to the dot (or just short of it -- less than a stitch), pivot clockwise.

Before pressing, let's add a background diamond to each unit.

More of the same -- align the background diamond right side down on the left side of the blade unit.

Stitch to the dot and pivot clockwise.

Keep chain-piecing! There is a rhythm to this process and it may feel awkward for the first few blocks you piece. Stay with it -- do one every day instead of trying to do all of the blocks in one long session. Practice makes the process smoother and your brain will find the rhythm better with a daily session.

Once the background diamonds are attached to one side of the blades, flip it around and attach the second side. Still chain-piecing!!

All three units are finished and it's time to sew onto another UFO unit.

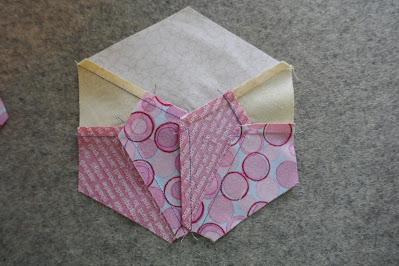
Before I press the blade units, take a look at this close-up of where the seams "meet" -- in other set-in piecing techniques, the "gap" you see between the ends of the seams would be a problem because it would be weak and leave a hole. But with the "set-in piecing simplified" technique, the "sew-off" stitches secure the end of each seam with no apparent hole on the right side.

Those "sew-off" stitches are the reason you can stop a bit short of the dot and there is no "back-stitching" which doesn't work well anyway.
Looks perfect!!

Press the seams between the blade units in the same direction as the first seams -- this way the seams will swirl around the finished star in one direction. Press the outer edges of the blade units towards the background diamonds -- this makes for crisp points when we start to set the blocks together.

All that is left to do is set the three blade units together and add in the last three background diamonds.

I stitch the three blade units together first, starting at the center of the star so I can pivot at the dots. I need nine "leader/ender" units at this point, so the short seams of these 3" 9-patch blocks were perfect.

Once the three blades units are assembled, start setting in the background diamonds -- one block seam, one UFO seam, one block seam, one UFO seam, and so on.

Ready to press and half the 9-patch blocks are done!!
Press the remaining seams to match what is already pressed.
.JPG)
The last step is to prepare an applique center -- I like using a 1" hexagon but the few pictures I've seen of vintage Dresden Stars use a circle. Your choice!
For a circle, try a 1 1/2" finished diameter circle and see if you like that size -- you can always go smaller.
I prep the hexagon like English paper piecing, folding the seam allowances over a paper hexagon and pressing (or basting) them in place. If you don't have a friend who can give you a few 1" EPP hexagon papers, "google" it -- there are quite a few free printable sources for them.

Take out the paper, position the hexagon -- look how beautifully it lines up with the seams of the blades.
Hand or machine stitch in place.

Here's the back side and the reason I trimmed off the tips -- no bulk and a nice flat center.
.JPG)
.JPG)
.JPG)

My finished sample block -- it's destined for the potholder pile. I should have picked a stronger yellow as the points fade into the background more than I'd like.
Now onto the blocks for my new version of Dresden Stars.
.JPG)
If you are making the pattern size quilt, you'll need to piece seven star blocks. I'm making a laprobe size and will need thirteen star blocks. There are also some half-star blocks which I'll cover in Part 4 along with an introduction to the setting of this quilt.
My UFO project is waiting for my return to the machine! In a couple weeks, I'll have all the Dresden Star blocks ready (one a day) and a few more blocks finished for the UFO.
.JPG)
I have nine finished of the thirty (or thirty-five) I need for this UFO, a lap size quilt top -- we'll see how many I finish. Another nine would put me over the halfway mark!!
.JPG)
THIS WEEK'S ACTION STEPS:
1. Sew, sew, sew!!
If you have questions, put them in the comments. I'm checking everyday to see if answers are needed!
I'll post Part 4 in two weeks -- July 19 -- with the half blocks and cutting for the setting triangles.
Just for fun, if you are on Instagram, post your blocks as you finish them -- use the hashtag, #dresdenstarquilt and tag me @hueymary
Mary
No comments:
Post a Comment
Note: Only a member of this blog may post a comment.