Showing posts with label Katje's Millefiore Quilt-Along. Show all posts

Friday, July 3, 2015

Katje's Millefiore Rosette 6 is together!!

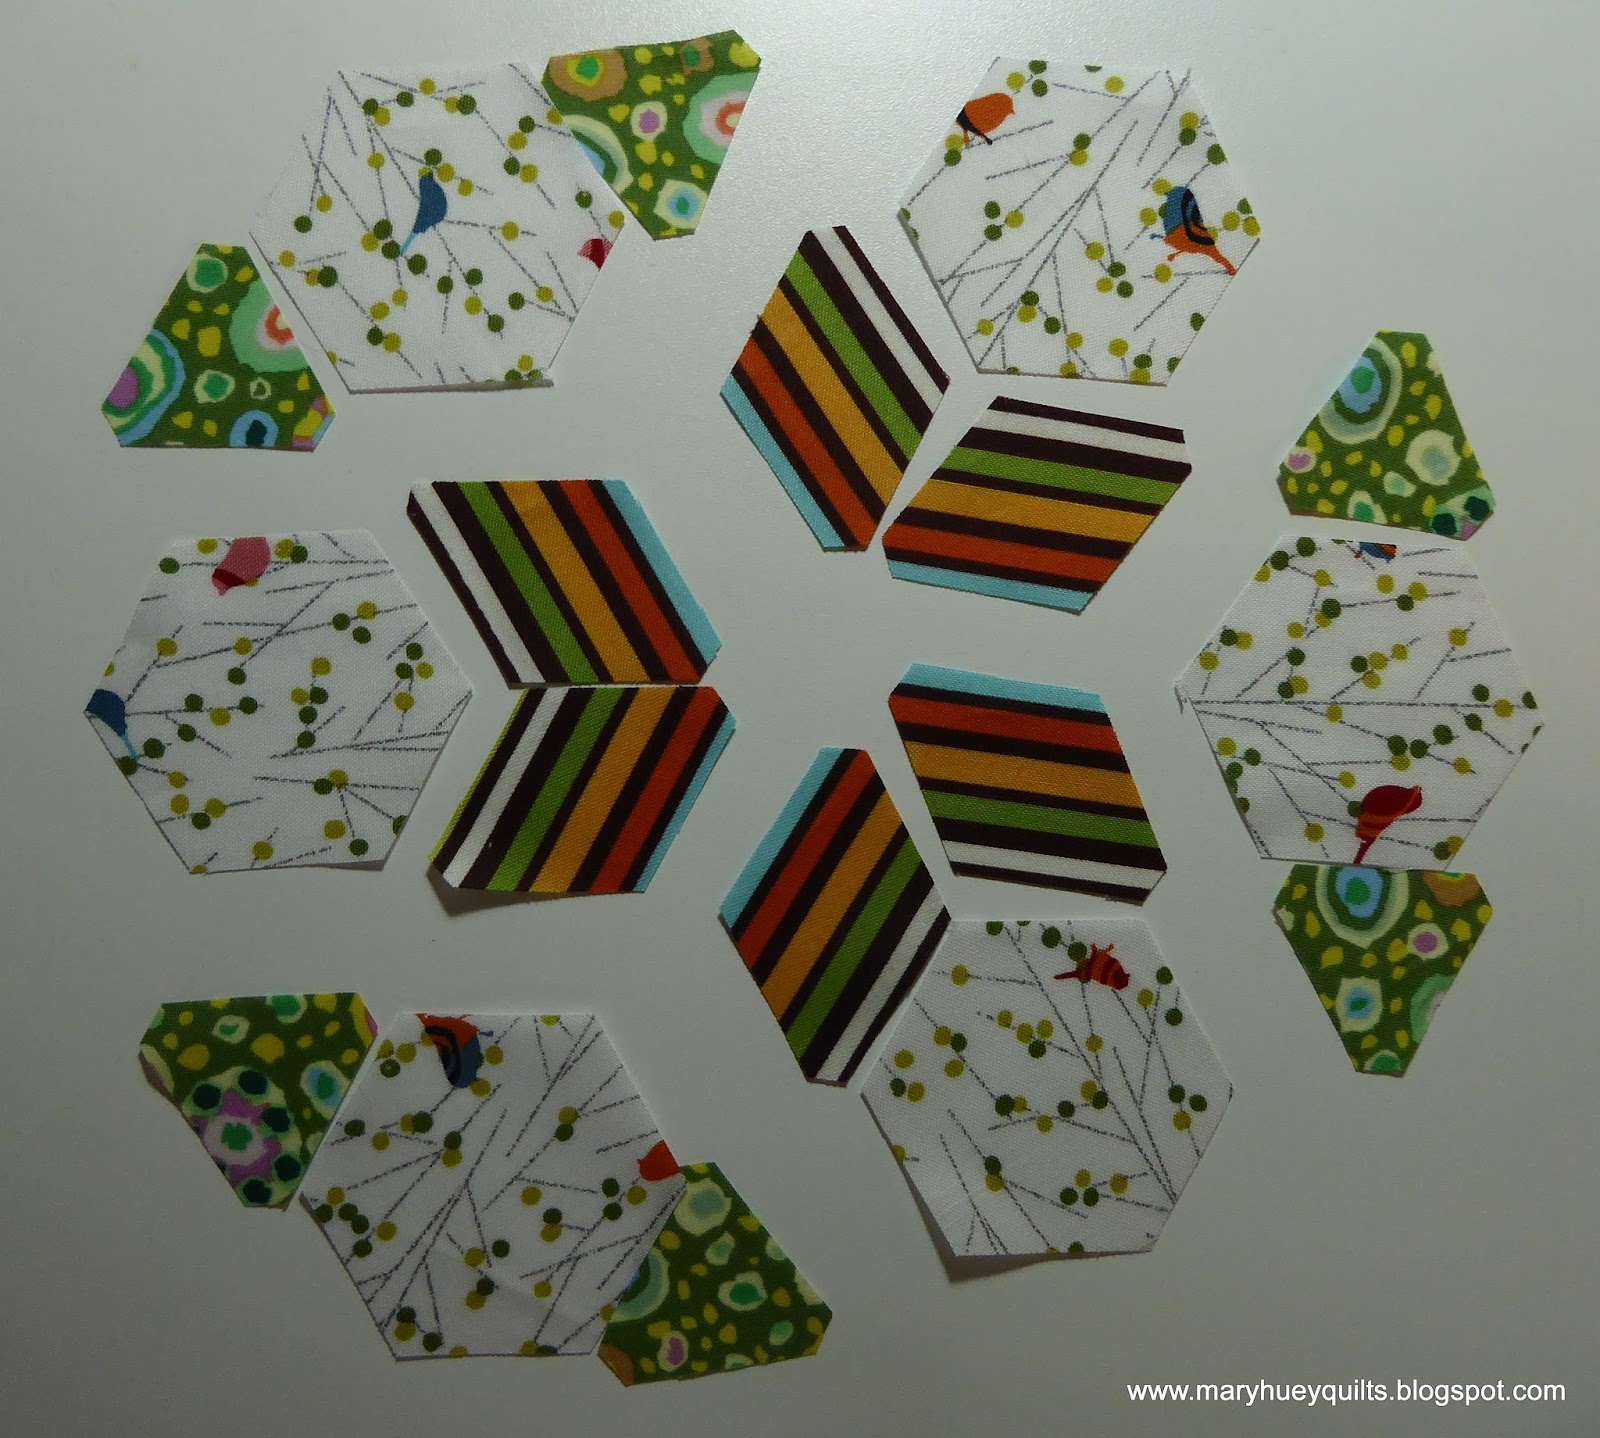
Last month I started piecing Rosette 6 from Katje's Millefiore quilt follow-along.  I showed you how I used Marti Michell's template Set G to cut the pieces for the center hexagon motif HERE.

As I moved out from the center motif, I shared how I used Marti's template Set H and adapted the way I used the templates to get shapes like the elongated hexagon and the parallelograms needed for this hexagon motif HERE.
This past rainy weekend, I finished setting together the entire motif and have another template use modification to share with you.  The green mini-check pieces are rhomboids if I recall my geometry terminology correctly. 
Katje created it by merging together the two diamonds and the equilateral triangle along one edge of this hexagon motif.
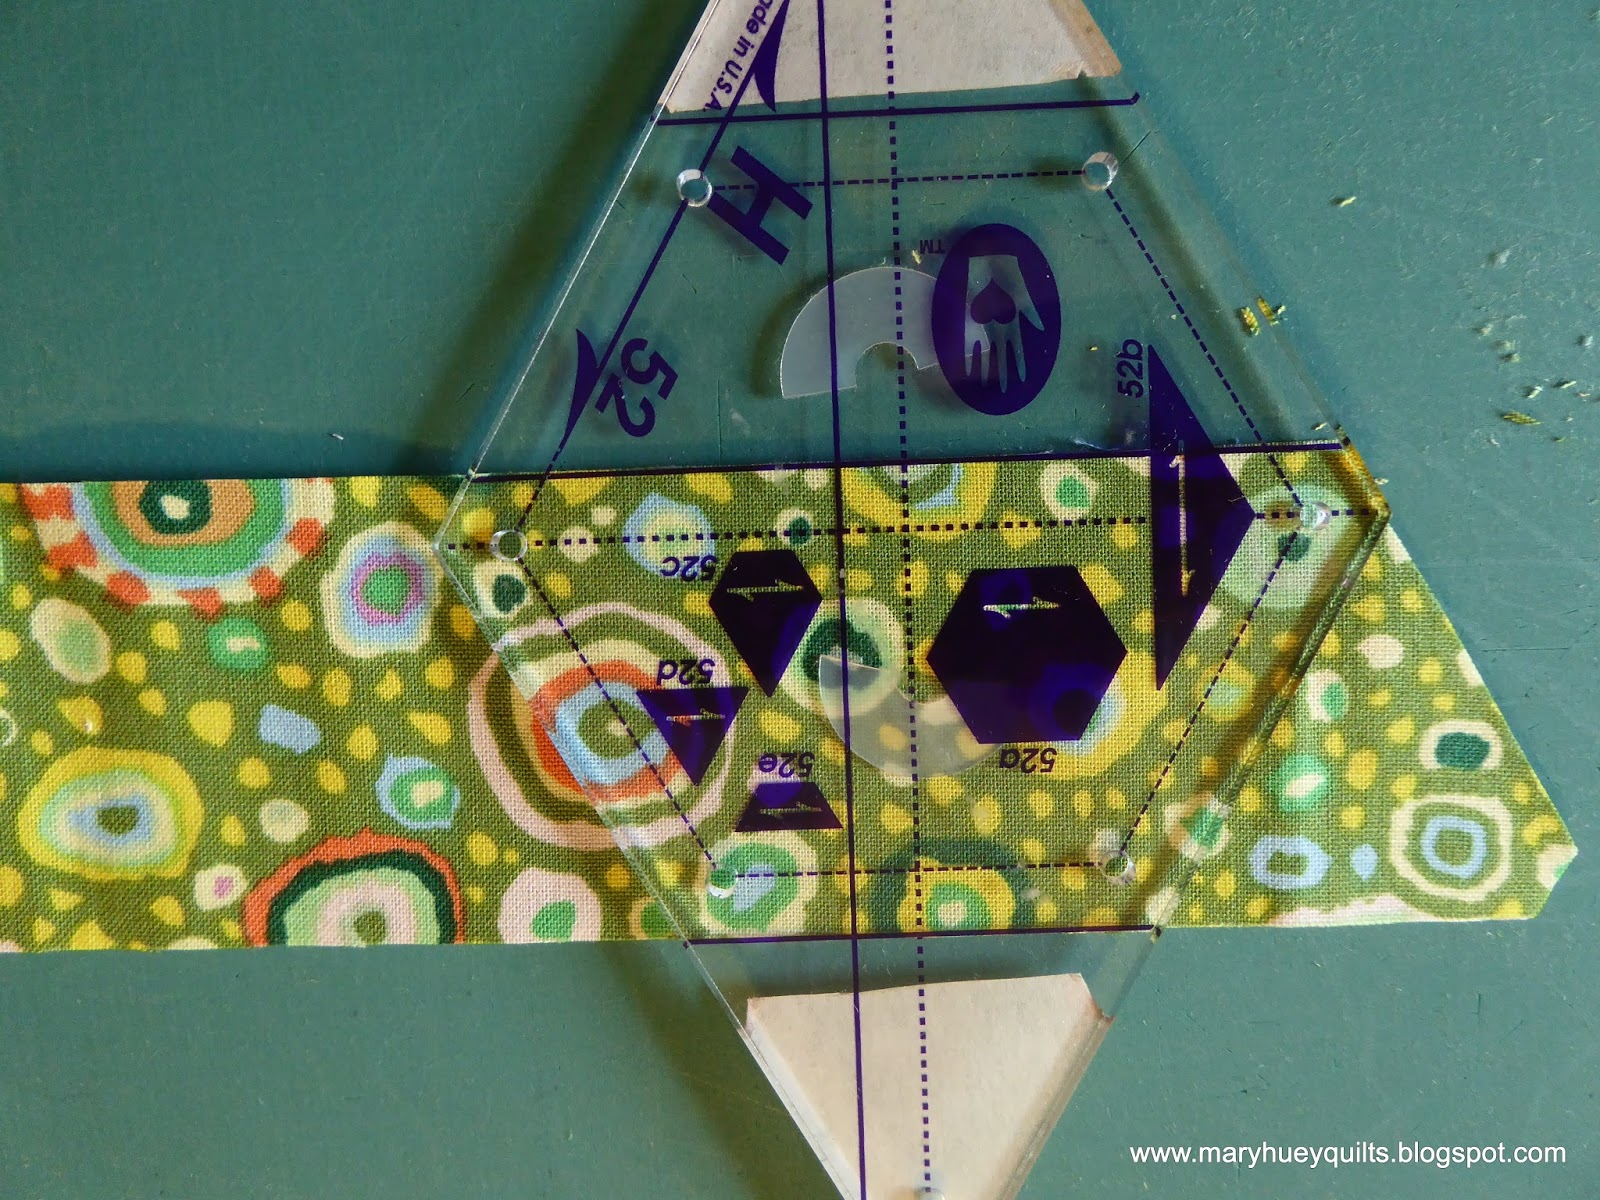
The large template in Set H is a 3" hexagon and it is a perfect match for the finished size of all the hexagon motifs in The New Hexagon.
The small diamond template is a perfect match for the diamonds so I can use that to cut a strip that will be the correct width for the rhomboids.
Now when I lay the large hexagon template on the strip with one edge matching, I can cut rhomboids that are the perfect size.
Taking the time to trim off the tips of the rhomboids will make aligning them with the rest of the motif easier and accurate. (See the photo above.)
Once those six hexagons were pieced, I was ready to set them together to complete the rosette.  I work with Marti's templates most of the time these days, but I still experience a little thrill when I lay two blocks together and they are the same size!!  You can't see the one underneath because it is the exact same size as the one on top!!
I usually work from the center out but decided to try a different approach this time and set the hexagons together in rows.
As with any y-seam construction, I didn't press any of the setting together seams until it was finished.  At every corner I was waiting for points to not match up but it never happened!!
 
And here's the rosette!  Those of you who are doing the entire quilt will notice that I completed the last round because this is going to be the center of something medallion style. 
No plan yet, waiting for inspiration.
If you are one of the seven quilters in the world who haven't discovered this inspired quilt -- visit Katje's website HERE.
I machine pieced the rosette using the chain-piecing approach in my DVD, Set-In Piecing Simplified while continuing to finish setting together this large reproduction mosaic hexagon quilt.  The pieces of the rosette were my "leaders and enders" between the 1" seams of the final assembly. 
I still have about 80 seams to go on the reproduction and my goal is to share the finished top with you in my next post!!  Another rainy day would help, but really we have plenty of water on hand for the moment!!
 
Thanks for stopping by today and reading all the way to the end!!
Enjoy your weekend. 
I hope the USA is warm and sunny for the holiday. 
I hope Europe cools off!!
 
Mary Huey


Tuesday, June 16, 2015

Katje's Millefiore with Marti Michell templates

Last week, I shared how I used Marti Michell's Set G templates to cut the pieces I needed for the center block of the 6th rosette for Katje's amazing Millefiore quilt. 
Over the weekend, I worked on cutting and piecing the other three blocks needed to complete the rosette. I'm not quite there -- stuck on a fabric decision -- but thought my Marti Michell template followers might be interested to see the adapted cutting that is possible with the templates. 
The diagrams for each block in Katje's book, The New Hexagon, are exact finished size (1/4 seams need to be added).  

To decided which templates can be used, I lay the templates from Sets G and H on top of the diagram in the book.  Template 52 from Set H was a perfect match for this hexagon.  That means that the small diamond template (#53) will also fit.
 
Katje modifies some of the blocks in the book for the Millefiore quilt and in this block, she eliminated the two small diamonds in this section making it into an elongated hexagon.
There's no elongated hexagon template in Set H but thanks to the holes drilled in the templates for transferring the "stop/start" dots, an elongated hexagon can be cut with the template.
 
I started with the correct size strip and trimmed the left end of the fabric according to the template.
I marked two dots, one where the pencil is and the second directly below it (just out of the photo). 
Then I slide the template to the right until the holes at the upper left and lower left corners matched the dots on the fabric.  This step is necessary to eliminate the unneeded seam allowance. 
Now I cut the two right hand edges, marked the rest of the dots that I'll need for the stitching, and continued down the strip until I had the six elongated hexagons needed for the blocks. 
I also needed two half hexagons (the gold) and two parallelograms (the green) for each block.
I'm going to use the same template -- here it is laying on top of the diagram from the book -- the dashed lines on the template are the stitching lines and they line up perfectly with Katje's diagram.  So I know that #52e is the size needed for the gold half hexagons.
The parallelograms require another adaptive cut.  I also need rights and lefts, so I layered two strips wrong sides together.
 I trimmed the right end against the template and nipped off the corner.  The solid purple lines indicate the two edges of the half-hexagon on this multi-shape template.
I rotate the template counter-clockwise (without lifting it) and realign the upper right corner of the shape I'm using to the first cut as shown below. 
Now I can cut the left end and trim off the point.  I have a right and left pair for one block.  For the rest of the cuts, slide the template to the left matching it to the corner of the previous cut as in the upper diagram until there are the required number of pairs cut. 
Ready to stitch!!  First the half hexagons to the each long side of the elongated hexagon.
Then add the parallelograms one at a time using your favorite set-in seam technique (I hope that's the one I teach in my workshops and DVD!!). 
This is another of the blocks for the rosette -- none of Marti's templates worked so I had to make my own using the patterns in the book.  The blocks went together well and there were no set-in seams on this one.
I have this group of blocks to finish -- I was able to use Set H adaptively to cut the pieces and the piecing is all straight seams, but I'm stuck on the last fabric.  
I'm almost there, just a matter of pulling more fabric off the shelves until I find the best option?!?
And there is less and less of the hexagon mosaic reproduction on the work wall (look at it HERE) and more and more of it is connected together -- making progress 1" at a time!!
 
Keep on piecing!!
 
Mary Huey
 
Linking up over at LET'S BE SOCIAL and SARAH DID IT!


Friday, June 12, 2015

Progress -- 1" at a time

I have been working this week at assembling the units of this reproduction of an antique mosaic quilt that was exhibited in a local quilt show about 15 years ago.  I've been piecing the rosettes over the past year and for several months, they've been hogging the work wall.
 I finally got all the ivory background hexagons stitched in place.  I've used partial hexagons to fill in the outer edges so borders can be attached easily.
 The time arrived to do some pressing.  I find it easier to manage y-seams if I don't press them until a section is complete so there is lots of pressing to be done at this point.
  So far I've only pressed the large center star motif.
It's not difficult, just tedious.  I started at the center and worked my way out into each point swirling the intersecting seams in opposite directions. 
After a bit I found a rhythm to it and it's laying quite flat.
I'll press the other sections as they are joined to the center.
And because I chain-piece through all my set-in seams, there are no long messy threads!!
This is a section of my piecing chart which I created in Electric Quilt from several photographs of the original quilt.  The colored pencil lines are my guide for where to add the background hexagons to create manageable sections for the final assembly.  I learned that trick from Karen over at Faeries & Fibres -- she maps out all her hexagon mosaic quilts.
I'm going to start by adding the large rosette on the right side to the center star.  I'm working on the machine, so it's 1" at a time.  I joined the center hexagons to each other first.
Then I stitched the two at each end of the section together. 
This gives me more control and keeps the work from feeling like I'm tangling with an octopus.  The pins mark the first three seams I stitched.
Once the units are anchored together, I go back and do the rest of the seams.  I align the edges of the hexagons, slide a pin into place parallel to the seam, and use the chain-piecing technique to stitch the seam. 
My "leaders and enders" this afternoon were the next six hexagon units for the sixth rosette of Katje's Millefiore Quilt Along.  All straight seams in these hexagons -- no y-seams.
I did some rough math for this quilt -- I think there are 1091 hexagons.  I don't usually count pieces but I was contemplating how many 1" long seams I might have stitched -- think it will be at least 3300 if my math is correct.
 
The weekend plan is to weed when it's not raining and stitch hexagons together when it is raining.
What's your weekend plan?
 
Mary Huey


Tuesday, June 9, 2015

Katja's Millefiore Quilt-Along and Simplified Set-In Piecing

Did you see the quilt Julie at Pink Doxies started last week while using my DVD workshop, Set-In Piecing Simplified?  It began with Mrs. Bannister's Star that she found in Jen Kingwell's book, Quilt Lovely. 
 
 She did exactly what I hope every quilter who uses the DVD to learn this exciting y-seam piecing approach will do -- apply it to their next project and stop being afraid of set-in piecing.  The DVD introduces the technique using a scrappy tumbling block quilt, but the idea applies to anything with a y-seam so I want to share another project where I'm using it with you today.

I've been lurking on the Katje Marek's Millifiorie Facebook page for almost six months, printing out and saving all the patterns.  WARNING -- if you click on that link, be prepared to be distracted for a couple hours sifting through the hundred of photos of participants work. 
They make me want to tear my stash apart and start cutting fabric!  
 
Julie's experiment pushed me over the edge and this past weekend, I dipped my toe into The New Hexagon. 

I'm not certain I'll do the entire quilt so I started with the rosette for June and made the center block.  Most of the participants in the project are doing it EPP (English paper piecing) but the first time I opened the book last fall I determined most of the blocks in Katja's book, The New Hexagon, can be cut with Marti Michell's Sets G and H.

 
If you've never used rotary cutting templates, I encourage you to give it a try.  I taught and did massive amounts of strip piecing and rotary cutting for 20 years but since I converted (mostly) to templates 10 years ago, the consistency and accuracy of my work has improved remarkably. 
 
You can read more about cutting and working with these templates by clicking on the Diamond Stars Playtime Sew-along tab at the top of the blog.
I cut the fabrics for the center hexagon as spontaneously as I could.  I'm not sure I LOVE the orientation of the stripe in the center star, but I was anxious to stitch!!
I always lay out the complete block before I start stitching as that makes it easier for me to break it down into the best units for assembly.   Some familiarity with hexagons and their allies is helpful before starting the blocks in this book as the blocks are not dissected for the order of assembly. 
Here are the two basic units that need to be assembled first.
I worked on both units simultaneously -- chain-piecing through the same step on one unit first and then the other, working back and forth until I had all of them ready to press. 
 
I started by stitching the striped diamonds together in a chain,
then added one triangle to the end of each hexagon,
 then went back and started to set the hexagon into the pair of diamonds,
then the second triangle onto the opposite of those hexagons,
and finally the third seam of the diamond/hexagon unit.
Once each unit was pressed, I laid them out again and began to assemble them into the finished block.
At this point, I had to build from the center out and you might be wondering how I maintained the chain-piecing with all this seemingly stop-and-start stitching.
The answer is I had a second project at hand.  I continued to add the background hexies to the piece I'm trying to get off the workwall.  It's multi-tasking!!
This has actually turned out to be a good strategy for getting the big quilt together.  I'm easily bored and so adding in all the background hexies has been challenging until I started using them as the "sew-offs" (or leaders and enders) for other work. 
 
Altogether it took 26 minutes to assemble the center hexagon for the June rosette.
I also took this cluster from this point
to this point -- adding 8 background hexies and a rosette to the unit!!  I was so absorbed by the excitement of the new block that I barely noticed the effort needed to stay on task with the background hexies. 
What's on tap for today?  Happily, I now have all the segments of this big mosaic quilt ready to assemble, so I'm going to dive into that. 
 
But first I have to cut the next group of "new hexagon" blocks for Katje's June rosette so I can keep chain-piecing!!
 
If you are ready to try out this idea, click on the "BUY NOW" button up there on the right side and order your copy of Set-In Piecing Simplified.  It's $15.95 and that includes shipping!  I'll put it in the mail tomorrow morning!!
 
Have a pieceful day!
 
Mary Huey
 
Joining up with a couple new LINK-UP's today!  Check them out!