I understand the world is halfway through the current season -- summer for us up here and winter for you down there. Everyone here is saying "where is the summer going" and probably everyone down there is saying "this is the longest winter ever". We need to watch out for those "never happy" moments, don't we? Embrace the moment -- I hope that's something each of us has come to understand in new ways over the past 18 months especially now with the news media warning us, "it ain't over yet"!!
Before I forget, one thing I need to share with any of you who receive an e-mail notification that I have a new blogpost up -- that notification system is going away. It's not my doing. I don't understand it and while there might be a way I could set up something, I'm not going to do anything -- not because I don't want you to know what I'm doing but because I don't understand it. I'm old(ish) and frankly this constant updating of systems is beyond my energy -- I don't want to be updated -- anyone else with me on this?
That being said, the Bloglovin' connection will still function as usual so you could set yourself up to receive notifications via that website. (Ask a teenager to help you figure it out.) I also share on my Facebook page each time I activate a post so you could request to be a follower? Other than that, you could just stop by every couple weeks and see what's new?
Aren't I helpful???
The fun news is there is another finish (#11) and an almost finish (#12),
Here is #11 lounging in the back yard.
TRIP TO THE STARS
I wrote this pattern, circa 2007, as a mystery quilt for my students when Marti Michell introduced her Sashing Stars tool set. The pattern includes three sizes -- 92" square, 69" square, and 46" square (which is what this one is). To change the size of the quilt, I simply changed the size of the blocks so no matter what size the quilt, it's only sixteen blocks. The sashing is what creates the stars and Marti's set includes the templates for both the typical star and the elongated point stars. Because the sashing rectangles are trimmed with the tool the points are easier, the piecing is accurate and there is very little fabric waste.
Once again, I started quilting without a complete plan -- if I wait for a complete plan to emerge, I never seem to start. And I stayed with design ideas that I can execute well! That means "continuous curve" for the patchwork and straight lines!!
The continuous curve in the soft green triangles and the straight lines down through the peach colored squares were done first and with only a start and one stop. To do this, I quilted diagonally across the first 4-patch, paused, then continuous curve around the triangles to the right and left ending at the corner of the first 4-patch. I continued down the second 4-patch, paused, continuous curve right and left, and then one through the third 4-patch across the 4-patch in the middle of the star and on to the next block until I reached the end of that row.
Now go back and trace that along the photo with your finger.
Make sense?
At this point there was a three or four day pause while I figured out what to do with all the background space. My goal was to reinforce the diagonal grid of the overall design and call attention to the stars, not the blocks. A longarm quilter might have used dense quilting to flatten the background down around each of the elongated point stars but I don't do that well and so elected to outline the entire diagonal square with a series of three lines.
There was another break in the action before I echoed those lines in the triangular areas. I use to get frustrated by my inability to make a decision about how to quilt a section but I've learned that inspirations come just by looking at the quilt for a few days, tracing design ideas on the quilt surface with my finger or a chalk wheel -- eventually, something clicks and I can move forward again.
I was going to hand-quilt with pearle cotton around each of the stars, but opted to do it by machine in the interest of getting it done -- after all, I still have 9 more quilt tops to quilt this year!?!
The border print was the inspiration for the color palette. Since it's a busy print and to keep in sync with the clean look of the rest of the quilt, I returned to the good old reliable "piano keys" quilting . . . . plus it's quick!!
The pattern PDF is still available in my Etsy shop --
MaryHueyQuilts -- and if you want to add it to your "to-do" list, I'd be honored. You can enjoy a 10% discount on the pattern by going to the shop, mark the pattern as a "favorite" and I'll send you a coupon you can use. If your local quilt shop doesn't carry Marti's tools, you can find all of them on her
website HERE.
I found a picture of another version I made of Trip to The Stars! I sold it a couple years ago at the Sisters, Oregon outdoor quilt show.
There is a third one -- it's the big one and very scrappy with a slight variation in the setting. It spends part of every year on my bed but I can't find a picture of it and am feeling too lazy to go set up a picture of it. Maybe I'll add it later???
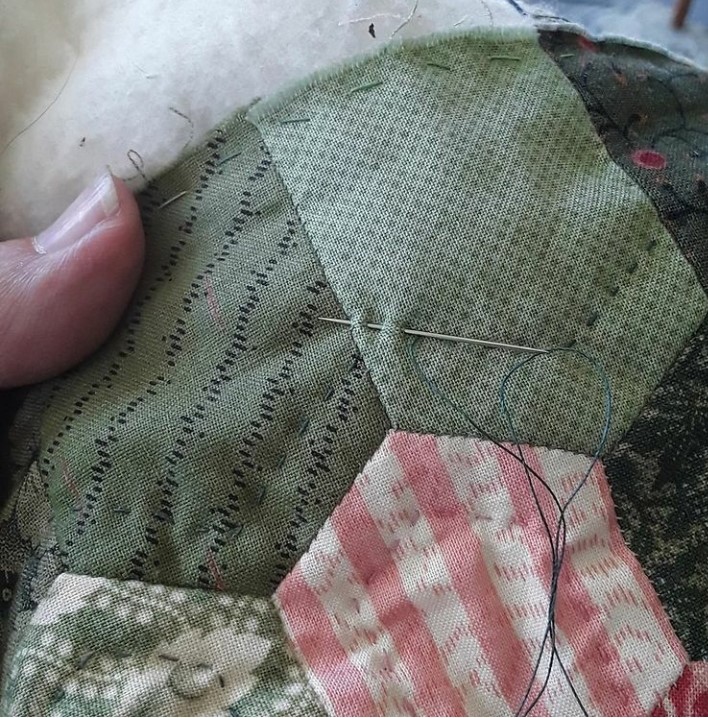
Then yesterday, this happened!!
It's the very last quilting stitches in my Dodecagon quilt!!
I spent a good bit of the day in my pajamas on the front porch and finished the hand quilting!!!
Today I trimmed it, piece together a scrappy binding and set it onto the quilt. All that is left to do is the hand stitching.
So pleased to have this one finished -- I'll post lots of pictures next week!
Keep finishing!!
Mary


Congratulations on your finish!! Your to the Stars quilts are great. Three cheers for the hand quilting finish of your Dodecagon. I look forward to seeing those photos. I'm trying to do the same - finish UFOs. Three quarters done quilting one. It's going to a parishioner who just underwent brain surgery to remove a benign tumor. It went well but will need a long recovery time. Blessings!
ReplyDelete