At the beginning of the year, I decided to participate in APQ's challenge to finish 12 UFO's during 2015 -- or at least deal with them? I have a list of 12 oldies on the back of the studio door and this month's lucky number was 12 -- a very old scrappy Lone Star made in the early 90's using The New Lone Star Handbook by Blanche and Helen Young. This mother/daughter duo pioneered strip piecing techniques for old standards like Trip Around the World and Lone Star.

It was a teaching sample and the only reason I still have it (besides that it isn't finished) is that a good friend asked if she could have it when I was finished using it as a teaching sample. I've been finished teaching with it for quite some time and everytime I come across it, I think, "this is nice, I should finish it and give it to here!" Then I carefully fold it up and put it back on the shelf.
It's 44" square and a bit small for a lap quilt which I think will be more useful to my friend at this point in her life. So do I have any fabric that I used in it or that will work with it still in my stash?

Not much but it will have to do. Some are in the quilt top and others date from that era and are compatible.
Now how to I make the quilt slightly longer?
First I auditioned the idea of small stars (using some from another UFO) -- no, I didn't like the way it pulled my eye away from the central star.

I used a row of leftover diamonds on an 8-pointed star quilt several years ago and liked that look but it needs to go all the way around and that didn't help me create a rectangular quilt.

The winner of the auditioning process (over a period of several days) is this zigzag of diamonds -- it compliments the center star visually. It will elongate the quilt by about 11". And it will be easy to cut and piece.

I don't have the book anymore, so resorted to measuring the original diamonds -- they were cut from 2 1/4" strips. I have a diamond template from Marti Michell's 2 1/2" Stripper Set that will be close to the same size and when paired with template B11, all the pieces can be cut from 2 1/2" strips, trimmed and "dotted" for easy assembly using the chain piecing technique featured in Set-In Piecing Simplified.
(There's a button to buy a copy of the DVD up to the right side of the blog!)

After some sorting and organizing of the fabrics, it only took a couple hours to piece the starting segments and get them into two borders. The segments go together the same way that is demonstrated for a tumbling block in the DVD.

If you've worked with the technique, remember not to press the seams until the basic units are pieced! It helps with the set-in part if the seam can be easily flipped out of the way and once it's pressed, that isn't the case.

Another sort and I was ready to pair up the units.
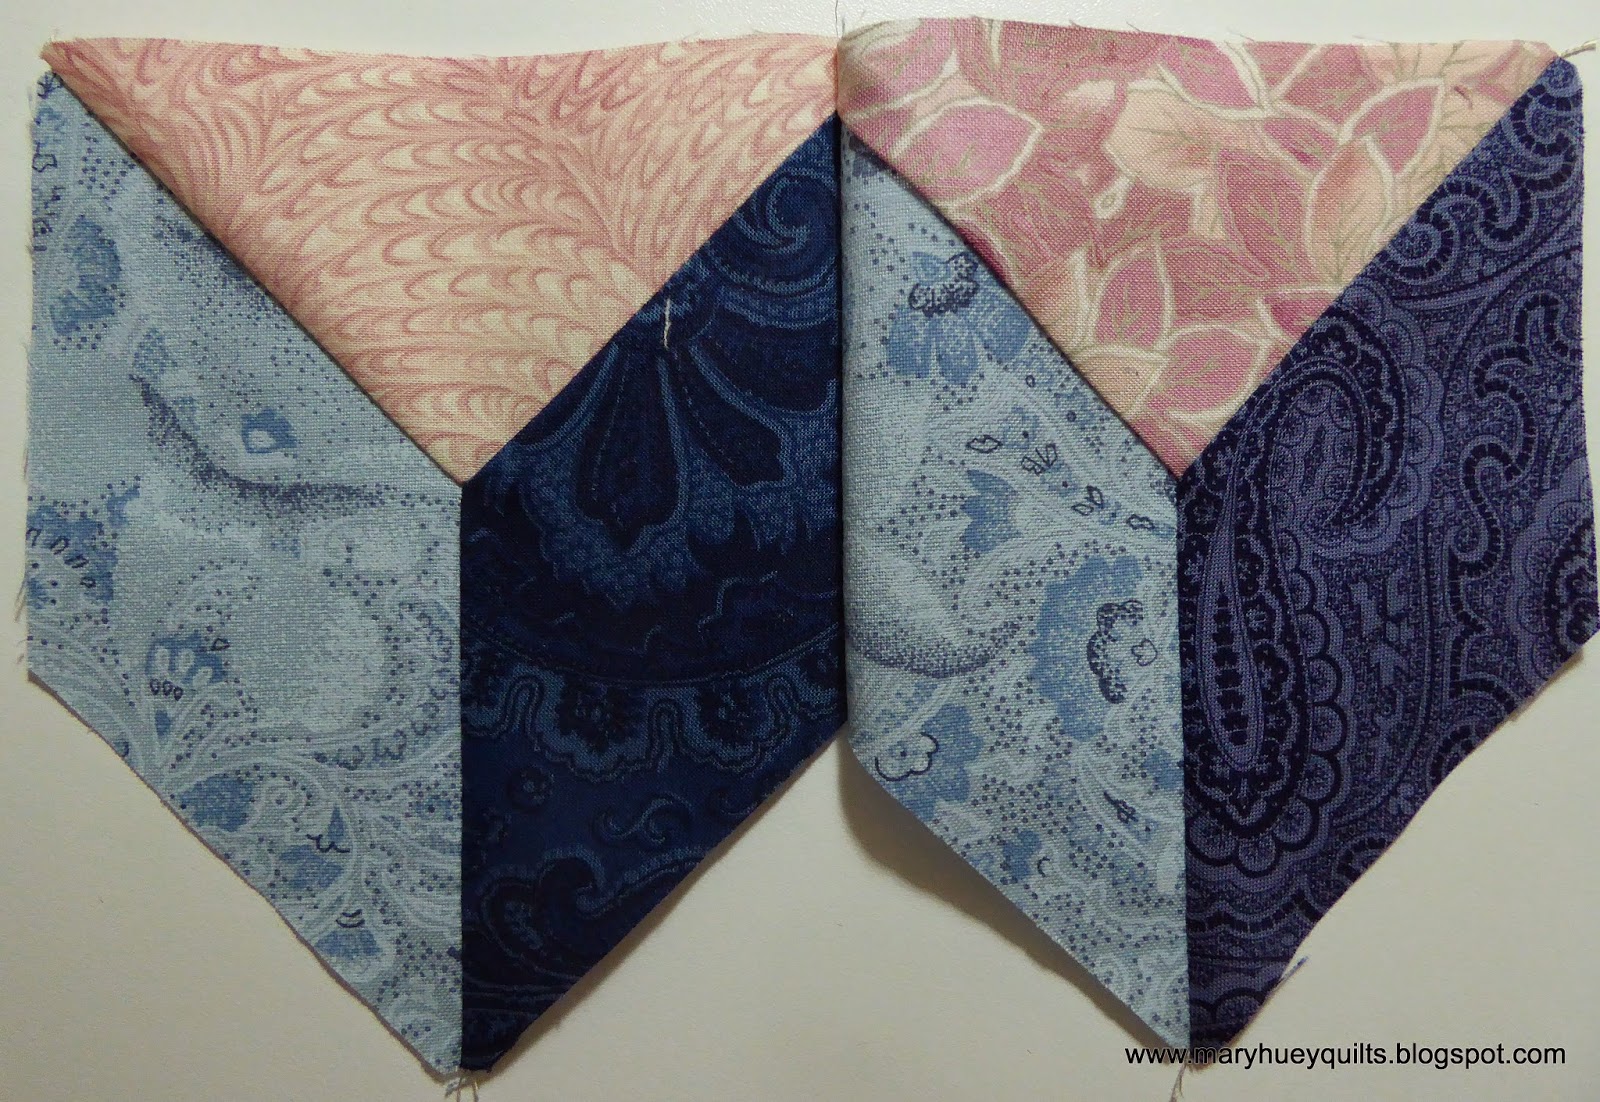
It was easier to add the bottom pink triangles at this point.

Then put together pairs again and add the triangles until I had two borders of 11 units each. The math was a rough approximation -- I measured the "finished" width of one of the 3-piece units (4") and divided that into the size of the top (44"). The borders are a bit longer but rather than agonize over the exact math, I'll modify each end of the border (whack it off) when I get to that point.

I like it!! What do you think? It was easier to assemble than expected (that always thrilling!!) and it doesn't draw my eye away from the center. Now I am auditioning old fabrics for an outer border.

While I like the lightest one with the border, it doesn't do anything for the quilt. I left them simmering on the work wall and when I return to the studio this weekend, the first thing I'll see is this.

I hope my brain will yell out the better choice (it's leaning towards the lower right print) and I can finish the top and organize the backing!
If I had finished the quilt 20+ years ago, I might have made different choices but today my choices are limited. Fabric from the 80's and 90's looks dated at this point and maintaining the integrity of a piece was my challenge.
The key for me is to audition, audition, audition until it "feels" right. I pull out anything that has the colors without regard to value or style. Then I let my brain eliminate pieces naturally and visually. The fabric I'm leaning towards is quite odd and not as pretty as the upper right one, but it plays better with the fabrics in the star. It also helps me to let fabric decisions simmer and not push too hard. The answer always presents itself.
It will be great to have this quilt off the UFO shelf -- it's a lovely quilt and I remember being thrilled with it when I finished it. I wonder if my friend will remember she expressed a desire to have it?
Enjoy your friends and family this weekend!!
Mary Huey
Very beautiful border, thanks for sharing .
ReplyDeleteThanks, Bea!!
DeleteVery beautiful border, thanks for sharing .
ReplyDeleteThe border is stunning. This is a quilt worth finishing!
ReplyDeleteThanks, Karen! Everyone's comments have been so nice -- assures a finish!!
Deletevery nice work on that border
ReplyDeleteThanks, Karen!
DeleteWhat a beauty. First Lone Star I've seen with a red solid. I'm leaning toward that dark print also. It has a lot of the colors and elements as some of the fabric in the star. A great bordr, Mary. Thanks for linking to WIPs Be Gone - this one will be gone soon.
ReplyDeleteThanks, Angie -- as I recall the red was the best way to make the points stand out!
DeleteHello, popped over from Fairies and Fibres. Love your Lone Star. As for decisions on fabric, I mix and blend old and new fabric all the time.
ReplyDeleteThanks for your visit, Caroline! It's fun to blend the old and new!
DeleteLove the addition of the zig-zag diamonds. It is always so funny to see the fabrics we chose many years ago, and a challenge to use them in quilts in ways that will suit current tastes.
ReplyDeleteThanks for the visit and the compliements -- feels good to have it ready to quilt!!
DeleteWhat a fun border! I love it.
ReplyDeleteThanks, Allison -- I used it for a blog topic so I'll be able to find the idea next time I want to repeat it!!
DeleteMy head is spinning. Very clever solution. Doesn't look like something added years later. Congratulations.
ReplyDeleteThanks, Jennie -- the advantage of a deep and old stash!!
DeleteThis comment has been removed by a blog administrator.
ReplyDeleteI have just come across your post... I too have an unfinished Lone Star pretty much the same vintage! Beautiful border, I feel inspired to try mixing the old with the new on my top!
ReplyDeleteI have just come across your post... I too have an unfinished Lone Star pretty much the same vintage! Beautiful border, I feel inspired to try mixing the old with the new on my top!
ReplyDelete