Friday, March 28, 2014

Diamond Stars Playtime Sew-Along -- Step 3 -- Working with Stripes

So how many stars have you made this week?  And are you feeling more comfortable with chain-piecing through the set-in seams?  If you haven't tried it yet, you need to!!  Don't have a copy of my DVD workshop, Set-In Piecing Simplified?  Order it HERE!

If you are just joining the fun, you can find Step 1 here and Step 2 here.


I keep a UFO handy so the chain-piecing never ends.  If you have more than one project going at a time, just keep a stack of pieces handy and use those for your "leaders and enders" (ala Bonnie Hunter).  I am currently piecing some hexagons into flower motifs for another project and that's what fills the chain-piecing gaps between the steps of the stars.

I found a stripe that works nicely with the colors in this assortment and so here are some tips for cutting stripes for your 60 degree diamonds!

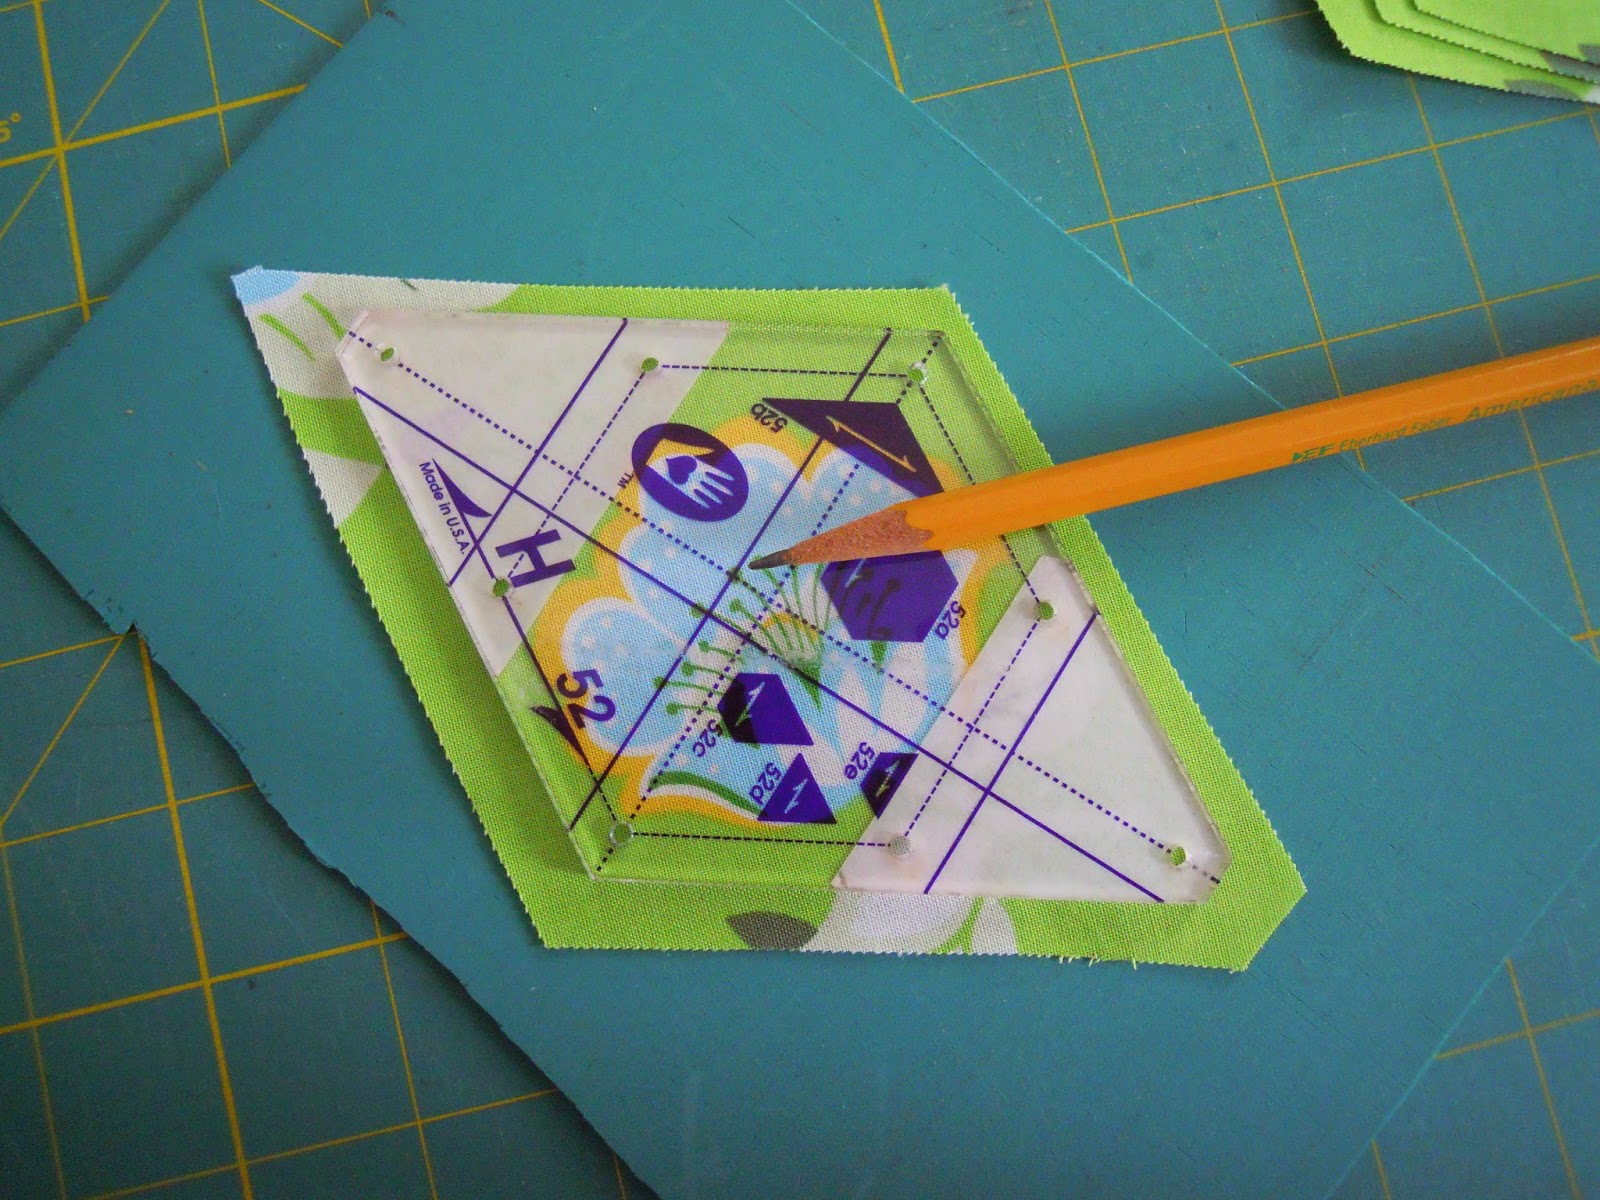
You get to use those mysterious lines that criss-cross many of your rotary rulers.  Quilters use the 45 degree lines off and on, but using the 60 degree lines may be new for you.
The first step is to determine how you want to align the stripes with the shape you are cutting.  I'm going to cut a few where the stripe goes up and down the length of the diamond.  My stripe is an uneven one so the stripes won't repeat or mirror image as the eye moves across the diamonds.
With the template laying on the fabric centered lengthwise on a stripe, push the rotary ruler up against the edge of the template.   Notice that the 30 degree line is lined up with the selvedge of the fabric.  Use that to assure accuracy of the cut.
Pull the template away and cut along the edge of the rotary ruler to create an angle across your fabric.
Then use the template to set up your rotary ruler (as shown in Step 1).
Once you are sure the rotary ruler is positioned correctly, cut a strip.
Now use the template to cut the number of diamonds needed for the block you are making.

 Each diamond will have a different cluster of my stripe, but the stripes will all be oriented the same way.

Here are my stripped diamonds with a set of 3 floral diamonds from my "stack and whack" cutting last week -- this set of florals didn't make a very pretty star together, but I like the way they look with the stripe in this star.
I did an experiment to see if I could get a chevron by cutting diamonds with identical placement on the stripe.  I cut a strip wider than my diamond and folded it in half lengthwise with the wrong sides facing (so there are two layers of fabric under the template in this photo).
Then when I opened the pairs of diamonds out, I got chevrons!  I photographed this star at both angles (points north and south was the other one) but like this orientation better.  Seems a little unbalanced going north and south.  Tilt your head and see what you think.

I also flipped every other one around so the yellow stripe is on the right edge of each diamond -- not too bad. 
Here's another stripe that matches the blue/green star I fussy cut in Step 2.  It's a consistent repeat, but very wide and it's doesn't mirror itself.
Another experiment -- I cut a repeat of the stripe down the length of my yardage.  Once again, I folded it in half lengthwise, wrong sides together.
Before cutting, I laid the template in several different positions on the stripe.  I'm paying attention to where the dashed line (indicating the stitching line) is hitting.  I don't want it in the white because that would melt into the background fabric.  I finally settled on the orientation in the photo -- study it for a minute.
One, two, three cuts, trim the points and I have enough diamonds for a star.
First option for stitching?
Second option?
Third option?  I'm leaning towards the first option but will let it simmer for a couple days before finally stitching it.
I didn't cut the option below because I'm saving it for the next step which will focus on splitting the diamonds.  If I were going to cut it though, I would begin with a strip a bit wider than my template cut across the stripe and then use the flat tip of my template to align the color stripe that I want at the center.
So do you have a stripe in your fabric assortment?  If you do, experiment with it this week and make at least one star.  If you don't, you might want to pull a stripe out of your stash and play with it a bit just for the experience.  And remember if you don't like it at the audition stage -- don't stitch it up.  Set the diamonds aside and you may be able to repurpose them at another stage of our quilt.

As always, if you have questions, post them in the comments below so everyone can see the answers.  Now that we've addressed all the cutting options, we can begin to play more with the diamonds and their relatives to create interesting six-pointed stars.

Mary Huey

All material Copyrighted by Mary Huey Quilts!

If you are having trouble finding the templates locally, you can order them directly from Marti!


Monday, March 24, 2014

Diamond Star :Playtime Sew-Along -- Troubleshooting Step 2 and some other tidbits!!

Good morning all you followers!!  I hope you've had time to make a fussy cut 6-pointed star or two! 

The piecing should have been easier for this step if you did a few stars from Step 1.  The only pitfall I've experienced with a fussy cut block is when I don't like the fussy cut after I lay it out.  But never fear, don't discard those diamonds!!  Just use 3 of them with another print for a two fabric star like I did here. 

You'll see the other 3 diamonds later this week in the "cutting with stripes" post.

On this set, I flipped every other diamond 180 degrees -- don't think it works this time but someday it might so I often try it just in case!


Or hold onto the diamonds and perhaps trimming them for a "star flower" or "hexagons" for future steps will redeem them?

And if all else fails, they might be useful for trimming at the end of the Sew-Along for edge fill-ins. 

Be sure to take time to identify what specific aspect of the cut didn't work for you so you can learn from it and avoid repeating the same misstep in the future.

If you encountered any other pitfalls with the fussy cut 6-pointed stars, let me know in the comments section below and I'll respond so everyone can learn from it, too!

Mary Huey

All material Copyrighted by Mary Huey Quilts!

Friday, March 21, 2014

Diamond Star Playtime Sew-Along -- Step 2 -- Fussy Cuts!

Time to talk about fussy cutting with the diamonds.
  I've been playing with a couple different fabric pulls so hope it's not too distracting when I jump back and forth between them. 
You can also download a PDF of it by clicking here.
Many of you have fussy cut motifs out of a print for a special effect or made a "stack & whack" style quilt.  We'll use some of those same techniques.  The fabric you are working with will dictate what you can do to some extent.  A symmetrical print like the one below is the easiest to anticipate results -- when you set down a pair of mirrors at a 60 degree angle, what you see is pretty much what you will get (minus the seams).


But a print with a scattered, directional or asymmetrical design can't be auditioned as easily because you will never be able to reproduce what you see in the mirror.
And it might just be ugly!! 
What you get from prints like that are swirls of design motifs so you have to be open to a little surprise. 
There are two ways to cut these pieces.  The diamonds for this star (above) were cut using Bethany Reynolds "stack and whack" approach of layering up 6 pieces of fabric, matched identically, and then cutting all six diamonds at the same time.  The fun of these is that you always have two options.
The hardest part of fussy cutting is making the decision to chop a beautiful piece of fabric up like a slice of Swiss cheese.  But that's the only way to get beautiful stars like this one in my quilt, Pieceful Constellations!
I play with the mirrors to get a rough idea of what a motif will look like in a swirl of six.  Then I   rough cut the motif staying about 1/4" outside the template.   
I use that first rough cut piece to search out and rough cut five more pieces. 
When doing the final cut, I work on a small mat or my rotating mat so I can cut all the way around the template easily and safely -- twist and cut, twist and cut. 
On this template, I used the intersection of two lines near the center of the template (where the pencil is pointing) as my register mark to cut each diamond. 
 I centered that register mark
on the same small dot near the center of the flower (where the pencil is pointing) for each piece.  Since the right and left sides of this motif are different, good placement works fine.  For a symmetrical repeat, setting up several register marks on the template might be necessary for better alignment.
Here's the finished block for that set of diamonds!
I had planned to talk about working with stripes today also, but it's long enough.  Next Friday, 3/28, I post a tutorial on several ways to cut stripes for interesting effects.  If you have a print that calls for some fussy cutting, make a couple stars this week. 

If you are looking for Step 1, it's here!

Mary Huey

All material Copyrighted by Mary Huey Quilts!

If you are having trouble finding Marti's templates locally, you can order them directly from her at 

Monday, March 10, 2014

Diamond Start Playtime Sew-Along -- Step 1 troubleshooting tips!

I hope you have had time!  I promised some troubleshooting tips and these are based on teaching the Set-in Piecing Simplified technique for almost two years. 
If you missed Step 1, click here to read it over.

#1 -- the center of a 3 diamond (tumbling block) unit has a pucker.

To diagnose the problem, look at the wrong side!  It's easy to fix and pressing isn't the fix.

The most common reason is that the stitching goes past the dot and that's one of the benefits of this technique, you can be up to a stitch short of the dot and still get excellent results because the end of the seam is so secure.

Another common cause of the pucker is when the end of one of the three seams is not lined up with the other two correctly.  After helping dozens of students trouble shoot this, it boils down to not matching the corners of the diamonds.  The first two diamonds are easy to match.  The problem usually pops up when adding the third diamond.  It's hard to see the inside corner.
You need to pull the upper diamond back so you can see the corner of the lower diamond.
Now when you lay the third diamond right side down, it must match the corner of the lower diamond to get good results. 
The photo below show poor alignment and the end result will be seams that don't meet and a pucker on the right side at the intersection of the three seams.   In this photo, the black diamond needs to be shifted up to the left until it aligns with the corner of the gray diamond.

#2 -- the center of the star is askew.  The most common cause of this is haphazard pressing which then makes it challenging to control the bulk where the six seams come together at the center.

EVERY subunit of the star must be pressed identically so when the three units are joined, the seams will always nest together flat.

 If you have encountered other problems, e-mail me at maryhueyquilts@hotmail.com
  
I'm ready to make another star!!  How about you?

Mary Huey

All material Copyrighted by Mary Huey Quilts!

Friday, March 7, 2014

Diamond Star Playtime Sew-Along -- Step 1

Are you ready to begin?  Have you ordered Set-In Piecing Simplified?  Have you tried out the piecing technique?  Have you gathered up a starting assortment of fabric?   If you answered "YES" to all of these, then let's get started with the first star block for our sampler. 

This first step is a long post.  I promise they won't all be so long.  You can also download a PDF of it by clicking here.

If you haven't practiced the sewing technique from Set-In Piecing Simplified, I suggest you start with some scraps and make a couple stars before working with your sampler fabrics.  The resulting blocks would be perfect to use on a tote bag or pillow top.  The practice will give you a chance to review the process and improve your results.  As I say on the DVD, it took some practice for me to get comfortable with it and that is certainly the experience my students have during workshops.

We'll begin with one basic two color 6-pointed star.  The rest of the stars in the sampler will be variations of this basic one.  Pick two prints with a good contrast.  If you are using multiple background fabrics, choose one that goes with your star prints.
For my cutting sample, I'm using Marti Michell's 60 Degree Diamond but the cutting will be the same for whichever template you choose for your blocks.  First we'll cut strips and then diamonds from the strips.  I'm going to cut 3 1/2" diamonds (remember -- this measurement refers to the finished length of any side of the diamond -- not the width of the strip).
The width of the strip needed is often an "UGLY" measurement that is hard to see on a ruler and generally impossible to cut consistency. 
Marti teaches us to use the tool or template to "measure" the width needed right on the fabric.  In the photo below I have already straighten the edge of my fabric and now have the line for the size diamond I'm cutting matched to that edge.  Oops, I have it on 3" and it should be on 3 1/2" -- good thing I noticed before I cut! 
 I then brought my long rotary ruler up against the opposite edge of the template and I'll move the template down the length of the fabric to be sure the ruler is aligned perfectly the entire way.
Once the ruler placement is just right, I pull the template away and cut along the right hand side of the ruler.  If I were left-handed, I would work from the opposite side of the fabric.  If you are also working with this tool, the instruction booklet that comes with it explains this method (with illustrations) on pages 6 and 8.  If you have Volume 6, Six is for Hexagons, the same instructions are on page 8.   Or go here for a PDF from Marti's website that explains the process. 
I cut several strips of background fabric so those diamonds will be ready for future steps.  To cut the diamonds from the strips, open the strips out and layer up two to four of them with the right sides up.  Use the tool to make the first diagonal cut as in the photo below. 
Now slide the tool to the right until the line for your size (3 1/2" for me) or the edge of the template (if you are working with Set G or H) aligns with the first cut.   
Cut away a diamond and gently pull the strips to the right.  Don't move these diamonds yet.  
Nip off the tips sliding the tool into place at each end and before you un-stack the fabric.  (No fussing about the trimming -- it's very helpful in the long run!) 
This is one of my prints for the star -- can you see a problem?  The top set of diamonds is not symmetrical! 
And here is what happened.  I went all the way to the edge of the tool instead of stopping at the 3 1/2" line. 
This cutting error is (thankfully) easy to correct -- just need to take a bit off.
To avoid this, I find that keeping the tool right side up on my fabric so I can read the words eliminates that issue.  (After all, this is the way it was designed to be used.)
And if you are a leftie, keep the tool "upside-down" as in the photo below -- the words are the only thing that is upside-down, everything else will be where it should be.  
Last thing to do before we go to the sewing machine is make dots.     I use a standard pencil most of the time, but on those dark ones, I use a bright orange colored pencil as ultimately the markings won't show.  (Once again, no fussing -- the dots are important!!)
We could make dots at all four corners of each diamond, but we really only need the two opposite each other -- upper right corner and lower left corner in this photo.
Time to sew!!  I lay out the block as it will look finished -- never skip this step -- it's too easy to get a piece in the wrong place.
If you pull away every other background diamond, you'll notice there are three identical units and they are tumbling blocks.  We could also divide the star in half and make two half stars but after all the 6-pointed stars I've made, I get better centers making three tumbling blocks units.  And so do my students!
So here are the three tumbling block units ready to stitch. 
This part of the piecing is covered in the first part of the DVD.   I take a "production line" approach to my piecing.  I start by flipping the top diamond right side down onto the left side diamond and stitching that seam (chain-piecing as in the DVD) for all three units.  I can start at the raw edge of the point that will be on the outside of the unit, but I have to stop at the DOT!!
I lay each unit back in position and add the right-side diamond to the starting pair. 
 
Now there is just one more seam to finish the tumbling blocks -- pay attention to my tips in the DVD on the best matching point at this stage to assure accurate centers and remember, it's better to stop a stitch short of the dot when chain-piecing through the set-ins!
Press all the tumbling block units EXACTLY the same with the seams swirling in one direction (you'll get a little hexagon in the center on the back).  Pressing all of them identically pays off as you join them together in the next step.
Now it's time to lay out the units in the star again.
Bring the remaining three background diamonds back into the layout. 
First set together the tumbling block units -- review the second part of the DVD at this point to help you through this step -- you will be stitching from DOT to DOT.  If the seams on all three units swirl exactly the same way, when two units are right sides together, the seams will mesh together perfectly.  If they don't, stop now and press again!!  That seam will act like a dot at those corners helping you stop in the right place.

Two together!  Then set in the third one and close up the star!
Now you are ready to set in the remaining background diamonds.  You can start at the raw edges of the outer points, but you must stop at the dot on the inside corner. 
To press the final block, follow the swirl direction started by the tumbling block units.  Notice the center of this star swirls counter clockwise and the swirls along the background swirl clockwise.  If you press all the stars identically throughout the Sew-Along, the blocks set together more easily at the end. 
Now it's time to check the center.  Pretty good I'd say.  If yours isn't perfect, not to worry.  Just try another one.   I'll post some troubleshooting tips on Monday (3/10) to help you diagnose problems as well as introduce you to the Flickr group where you can post photos of your stars. 
Now make another two color star -- use the same background or change it to a slightly different print.  The second one should go together faster and easier as you begin to feel more comfortable with the set-in piecing technique.  Two stars are enough for now.
The second step will be ready on March 21 -- we'll explore fussy cutting the diamonds and managing striped fabrics.

If you have questions as you work through this, e-mail me at maryhueyquilts@hotmail.com

Mary Huey
All material Copyrighted by Mary Huey Quilts! 

If you can't find Marti's templates locally, you can order all of them from her website!