Tuesday, May 23, 2017

The Lichen Tree

 It's finished -- The Lichen Tree!!
There it goes, sailing around in the breeze while I try to get some daylight photos.
The breeze finally dropped and the clothes line quit spinning.
I finished the quilting last week. 
It's mostly wavy vertical lines with a few details here and there.
I was inspired by a recent design that Lori at The Inbox Jaunt shared to create these "water droplets" here and there throughout the background fabric.
In the tree trunk, I created some knot holes and scars in the bark.
I was delighted to find a color of Aurifil (#4653) to create patches of lichen along the snow plastered side of the tree trunk.
The backing fabric was in my stash of classic "landscape" prints -- nice to have it handy and nice to be able to use it!! I faced the edges rather than binding them -- not sure I enjoyed doing that but I like the finished look.  I guess I just didn't feel confident about the outcome.
Do you see what happened to the top edge?
The trunk of the tree breaks through the top edge of the quilt -- happy improvisational result!!
Edit -- 6/2/2017 -- I entered the piece in the annual Fairmount Center Art Exhibition in Novelty, Ohio and much to my great surprise and delight, the quilt won first in the fiber category of the show (and a nice cash prize to go with it)!  Wahoo!!!

You can revisit my post about piecing this quilt top HERE.
This is perhaps the fifth non-traditional piece I've created over the past 20 years -- I'm never quite sure where they come from but I've enjoyed discovering each one!!

Linking up to the second quarter sharing over at 2017 Finish-A-Long HERE.

Mary

**A lichen is a composite organism -- algae living among filaments of a fungus in a symbiotic relationship. The combination gives lichen properties that are very different from the properties algae or fungus.  Lichens come in many colors, sizes, and forms but they are not plants.


Wednesday, May 17, 2017

A Day Out With Botany Nerds

Mostly I bird -- but I also enjoy hanging out with "botany nerds".  Their obsession with plants and inclination to ask questions and focus on details feels comfortable!!
Tuesday, I joined a group of ONAPA members for a trip to a Northwest Ohio.

Our first stop was at the Castalia Prairie in the Resthaven Wildlife Area west of Castalia, Ohio!
This 60 acre prairie is commonly regarded as one of the best prairie remnants in the state harboring a number of rare plant species.  It was burned over this spring for the first time in several years -- if you aren't familiar with prairie management, a burn is good.  It knocks back woody species and maintains the open health of the habitat.
It was immediately obvious that the wildflowers in bloom were nothing with which I am familiar (no prairies on my side of the state).
The Star-Flowered Solomon's Seal was new to me and a charming little plant!
This was our main quarry -- the Showy White Lady Slipper orchid!  They were obviously enjoying the after burn of the prairie!
I was delighted to also spot a Yellow-breasted Chat!!
(That's a bird.)
Look how small this orchid is!?! 
This is a hybrid that also occurs in small numbers as a result of a population in the near-by woods of a yellow lady's slipper.  It is identified by it's maroon upper petals.
Then we were off for the ferry to Kelley's Island.  There are a number of islands in the western Lake Erie basin and Kelley's is the largest at just around 4 square miles.  It has been inhabited since the early 1800's and was the site of several quarrying operations and some winemaking. 
Today, the main attraction is relaxing and visiting one of the best preserved glacial grooves in the world. 
My first visit to the island was 1963 with my birding mentor, Gretta.  We rented bikes for the day and rode around the island birding (first orchard oriole sighting of my life) and visiting the sights.
Since then, there have been many trips to share a pleasant day with friends or family.
Basically, the island is a huge hunk of limestone (thus all the quarrying).
Unbeknownst to many in Ohio, a group of botanists have been working since 1989 to establish a viable population of the Lakeside Daisy to protect it from extinction as it is threatened on the mainland by development and quarrying. 
This is an old quarry site littered with limestone gravel and stone.
At first, you wonder "what's all the fuss about?"
Then you look down and see this plant thriving in what appears to be a completely inhospitable habitat.
There are now thousands of plants spread over 4 sights on the island and they are spreading outside the protected locations -- a good sign! 
It was exciting to see a success story!
So often, attempts to preserve a habitat or a species are thwarted on every side, but these tough little flowers have responded to the attention of a devoted group of botanists and their efforts are inspiring -- both the plants and the botanists!!
There is an accessible daisy preserve on the mainland in Marblehead, Ohio!  Even after the daisies have finished blooming, there are other uncommon and interesting plants to be seen such as Stiff Goldenrod and Dense Blazing Star.

Today, I'm staying home -- a little tidying up, some grocery shopping, blocking a quilt, some weeding in the gardens -- but it's back to the woods tomorrow for more birding!!
I just love spring!!

Mary


Friday, May 12, 2017

Birds, birds, birds . . . . but still stitching!

The migrating birds have had most of my attention for the past few days.  I live on the south shore of Lake Erie and most birds coming north for the summer don't like to fly across the lake, so the woods and marshes throb with a wide variety of birds for a few weeks in May, resting and feeding to make the final leg of the trip around the lake.  
I'm indulging in the luxury of being able to drop everything else and go look for them!!

I don't photograph birds as a rule -- my camera isn't equipped for it and I prefer to watch them through my binoculars.  But this young red-shouldered hawk was posing, so I took a couple pics of him earlier this afternoon.
The late spring wildflowers are blooming -- this jack-in-the-pulpit was one of the biggest ones I saw today. 
This white wild geranium caught my eye yesterday -- usually they are a pale red-violet color.
And the camas lilies are just beginning to bloom -- they are a lovely native and work well in garden settings, too.  They are available in some bulb catalogs and natural beautifully in moist areas.  Most of them are a pale blue, but we found a white one yesterday -- another rare sight in this region.
The woods in the park nearest to my home is quite wet and today, I came across several clumps of squaw root - it looks like fungi, but it's a native parasitic plant that grows on the roots of woody plants such as oak and beech trees. 
The sewing has slowed down a bit but I did get the courthouse steps blocks for the Long Time Gone SAL pieced while watching a delightful movie (A Bird of the Air) on my Kindle the other evening. 
Do you use Hoopla to borrow movies and audio books?
I just discovered Dirty Rotten Scoundrels in the list of available movies -- love that movie so think it will be a "watch" this weekend!
I cut all the strips for these blocks with one of Marti Michell's Log Cabin rulers -- the blocks just fly together using this method and working with the lengthwise grain strips keeps the blocks square and uniform!! 
I did a slight variation in the value placement making half of the blocks with the darks dominant and the others with the lights dominant.  Its another trick I learned from Marti and I like the balance better. 
I've also started to make the pineapple blocks -- there are quite a few of them and I'm using them as my "leaders and enders" while working on the everything else!
Using Marti's Pineapple Ruler set!!
 
Here are the Courthouse Steps blocks set into three bands as they will be used in the quilt.
Relying on value (light vs. dark) to make this cheerful set work!! 
Week 9's task was four chevron log cabin blocks -- I was a bit puzzled by the fabric pull on this one since there isn't any need to do "light vs. dark".  After some floundering around, I pulled assortments of fabrics that were compatible with the starter square for each block.
I was surprised in the end by how similar they look and no blues?
Hopefully it will look okay in the quilt! 
If not, they are pretty blocks and will find another home easily.
My last bird of the day this afternoon was lurking behind this stump as I walked along the trail.
Peek-a-boo!!  See that little glint of red?
And out popped a pileated woodpecker (about the size of a chicken).  He was busy tearing up a rotten log searching for insects.  Nice!!
One more day of intense over the top birding and then I need to reel it in for a few days and attend to my garden and house.  One benefit of staying outside all day is that I'm not having any trouble sleeping!!

I hope the weekend is a good one for you!!
Mary


Friday, May 5, 2017

Are You Doing Some #memademay2017 Stitching?

My motivation for some May sewing this week is #memademay2017 on Instagram!  I stumbled onto it last year and enjoyed seeing all the great clothing makes stitchers were sharing.  There was lots of inspiration and I discovered some indie clothing pattern designers, so why not join in this year?

I prefer simple blouses to t-shirts and at the end of last summer, my favorite one wore out.
The neckband was frayed and the fabric was so thin, a hole just popped through in the back.
I found this old pattern in my stash -- same neckline, same sleeve style!
(I did a quick internet search and the company still has a website HERE, but didn't find anyone selling their patterns.)
With cooler weather at hand, there was no rush so I watched for fabric I liked during the winter and took everything along to a retreat to cut out.  There wasn't enough fabric for a collar for the first fabric I cut but one of the things I admire about young sewists these days is their comfort with "hacking" a pattern to meet their personal design ideas.
So I eliminated the collar on both blouses.

I needed to create my own back facing piece but that is in my skill set (have a degree in Clothing and Design which I rarely use these days, but it's good to have the skills when I need them!)
After tracing the neckline of the back pattern piece, I measured the depth of the front facing
 making a series of dots that could be connected for the lower edge of the facing.
I labeled it and added it to my pattern pieces. 
The pattern didn't call for interfacing in the neckline and front facings but I added it anyway to make the edges more durable.
Don't ever hesitate to take steps you know will improve the finished product. 
I don't use my serger very much but I love having the ability to clean finish all my seams and hems -- so much more professional looking and less effort than zigzagging all over the garment.
And I can even "chain-piece"!! 
I remember how much I hated setting sleeves in when I was a teenager learning garment construction.
It's really not that awful, just requires patience and careful attention.  I do think the current strategy of setting a sleeve into a garment before the underarm seam is stitched makes the process easier. 
It's one of the few times that I pin when I'm stitching and definitely worth the extra time it takes.
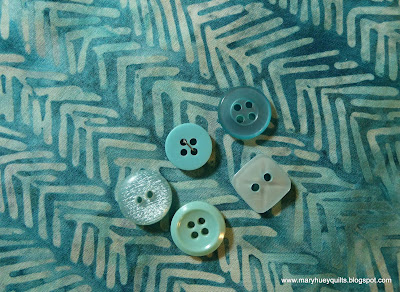
My assortment of buttons lives in color coordinated jars and since I tend to use them more for decorative purposes than clothing, it's sometimes a challenge to find enough for a garment.
Sorting through them on the fabric makes the decision easier. 
Five pretty ones for the Liberty lawn fabric!  
 But there weren't five of any button in the "teal" jar.  I've done mismatched buttons for decorative purposes before and picked out these five to use for the teal batik.
Love my Bernina presser feet when it comes to tasks like buttonholes. 
This is the foot for the older mechanical machines -- matching the button to the red tab on the right and then sliding the red unit on the left along until the beginning of it is parallel to the opposite edge of the button always gives me the right length.
I also thread the bobbin thread through this little hole on the bobbin case finger to increase the bobbin thread tension. This "unbalancing" creates a smoother edge on the top side.  It used to be a Bernina exclusive for machine with oscillating hooks.
It's also a good strategy when doing satin stitch machine work.
I was taught to always do a test buttonhole!! 
"Painting" the back of the buttonhole with a seam sealant such as FrayCheck makes the buttonhole more durable.  Just let it dry for 15 minutes before cutting it open. 
This is a buttonhole cutter -- best investment ever.  Clover makes them and they should come with a chuck of very hard wood to put underneath so you don't damage the table.  Just press down and it punches the hole open.  Less risky than sliding a ripper along and inadvertently cutting through the end of the stitching --- grrrrrr. 
And here they are -- on their way to the closet!
The color of the Liberty lawn is more accurate in the pictures with the buttons but it's really dreary here today.
The backs -- the Liberty version has the yoke and the pleated back as the pattern was designed but I did a "hack" for the batik -- eliminating the yoke and the pleat. 
Now I can get back to my piecing!!  With the tunics I made this winter and these new blouses, my summer wardrobe is spruced up! 

If you are on Instagram, check out that hashtag --
#memademay2017
-- and prepare to be impressed with all the garment construction that is going on out there!!
It might inspire you to break out your garment construction skills!

Hoping for a dry weekend!!
Mary