If you could see my "blog planner", you would know that today's post is not in the plan -- it came out of nowhere and surprised me. When that happens, I'm grateful because it often gives me some breathing space when I'm flailing around for topic inspirations.
This picture from my post earlier this week may have piqued your curiosity -- it certainly did mine!

Over the New Year weekend, I stumbled into information about Project Quilting, the brain child of Nikki at Persimon Dreams -- it will be easier for you to just jump over THERE and read about it for yourself. There are already over two dozen finished projects posted in the linky at the end of the post.
If you are new reader from the Project Quilting "linky", thanks for visiting! I'm Mary Huey, I quilt in Northeast Ohio and have a long history as a quilt maker -- teaching, owned a shop, and now blogging!
The above diagram was included in the first challenge -- "eight is great" -- guidelines. I was intrigued, as I am with all things "star", and a coloring session (unusual in itself) helped me dissect the sphere and experiment with color and value options.
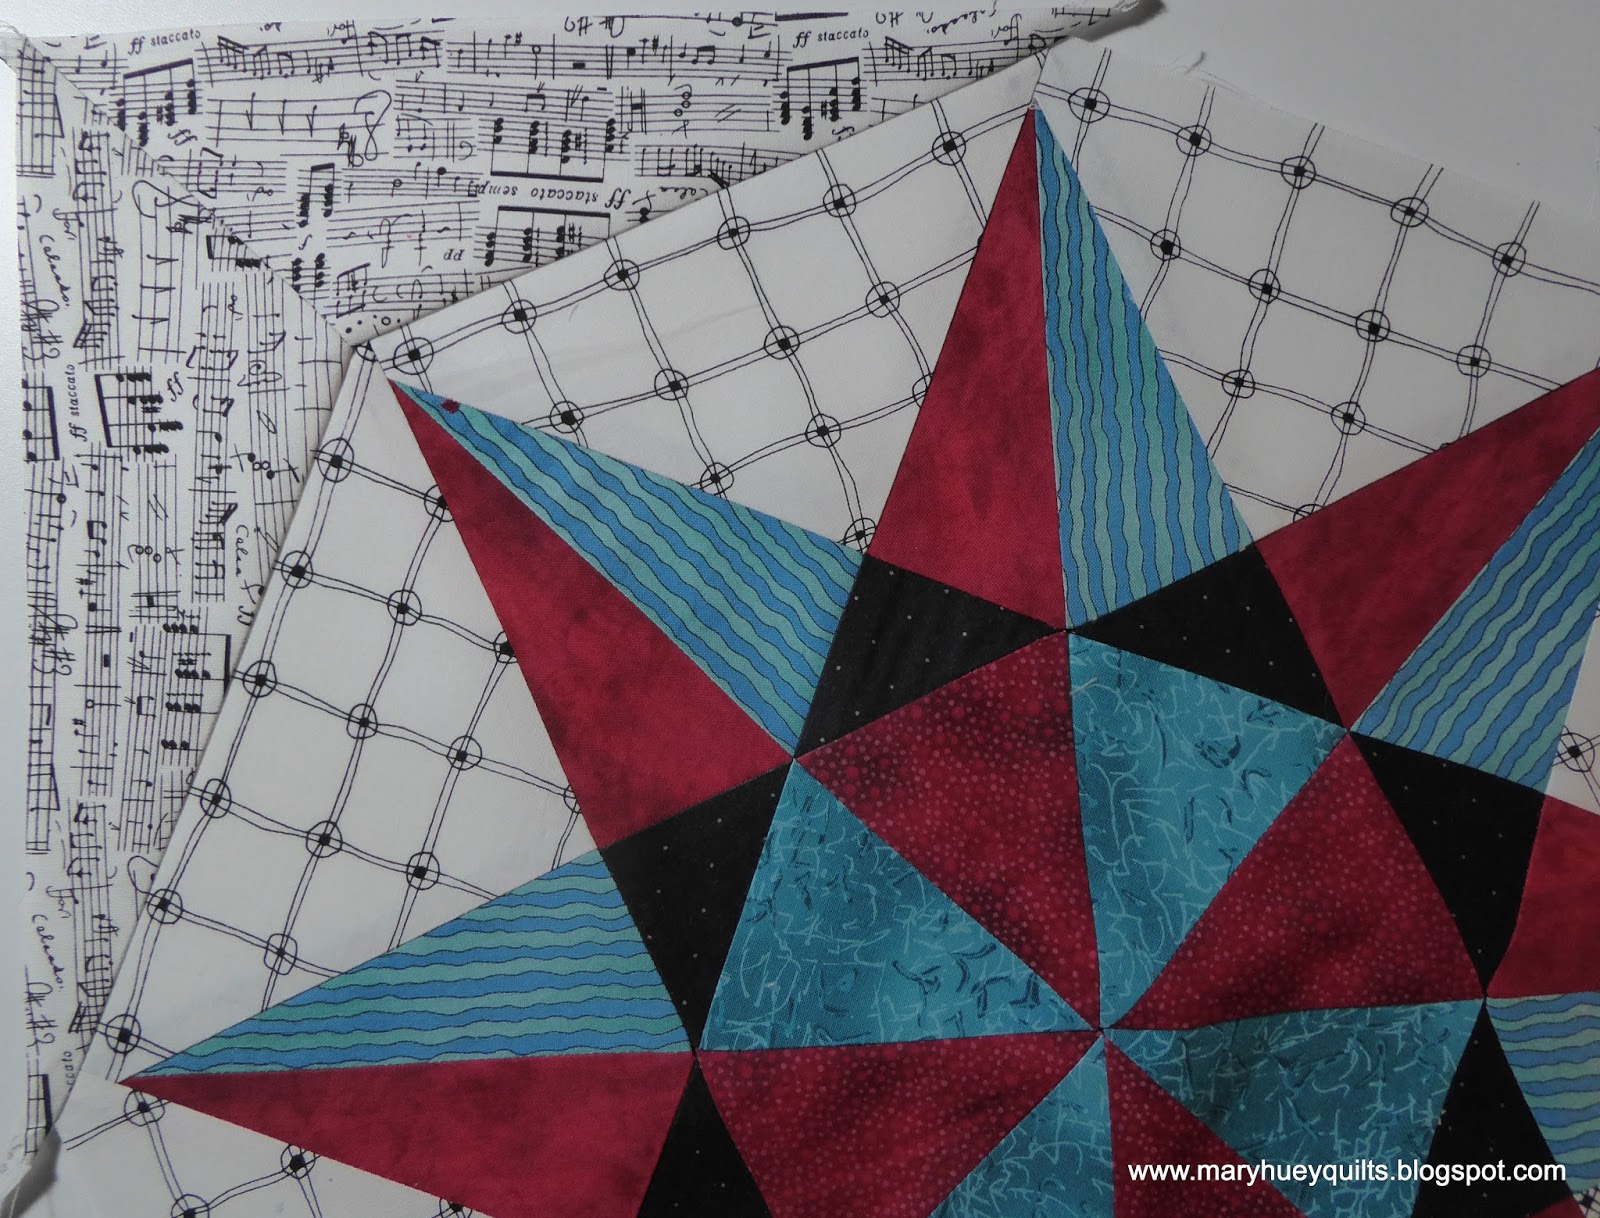
The basic unit of the block is the "kite" shape associated with 8-pointed stars!
I teach with Marti Michell's Multi-size Kite Ruler so I used the largest kite to draft a pattern for a 17" block. It's a little hard to see my diagram but as a result of becoming reacquainted with paper piecing last year, I decided the quickest way to achieve the dissected kites would be paper piecing.

I made 5 copies of my patterns -- one to use as cutting patterns (check out this post for my previous comments about this) and four for stitching. I'm always challenging myself to use my expansive stash and this time, I elected to try interpreting a contemporary color scheme (aqua and red) with older fabrics.

Once the pattern was organized and the fabrics picked, it didn't take long to settle in at the machine and of course, I found a chain-piecing aspect to the process!

Once the paper pieced kite units were stitched, I used Marti's ruler to trim them to the perfect size.

During the cutting process, I decided to piece the alternate points without paper (seems quicker in my mind).

After pressing the seams, I centered my pattern on the fabric, set the kite ruler on top of it and trimmed them to size.

I opted for a single background fabric to maintain the clean line of contrast and they are actually simple right triangles (though they appear to be otherwise in the original drawing).

I made them slightly larger than necessary to give me a cushion or float around the finished star.
Here are the two finished units ready for the final construction of the star.

Of course, it's a y-seam but piecing those are easier than you are thinking thanks to the "set-in piecing simplified" technique which I have been teaching for the past 4 years (thanks to the insight of Mary O'Keefe in Watertown, NY.).

How many times have you read my rhapsodizing about this technique?
Are you curious yet?
Time to buy my PDF teaching guide, Set-In Piecing Simplified, and quit avoiding y-seam piecing!!
You'll have it in a week. It takes 30 minutes to view (though I recommend doing it in two sittings with some trial stitching after the first segment). With some practice, you'll soon be able to apply the idea to any y-seam block working with any of the many tools currently available.

My final decision was to square up the block with the slightly darker background fabric. It was in the running for framing the star, but it softened the edges of the star too much so this was a perfect way to get it into the finished block. Those background pieces are half-kites and easily cut with the Multi-size Kite ruler. I just had to be sure to cut each pair together with the fabric right sides facing to guarantee the necessary "right" and "left" orientation.
I love the block and I can see it as the center of a fabulous medallion but part of the challenge is to finish within one week -- a completed piece!!

As I finished the piecing, I considered my options -- small quilt, pillow cover, table topper, tote bag.
The colors don't work in my home color scheme which revolves around neutrals and greens so using it for a "good deed" quilt was the best option. But finishing a quilt in 4 days (during the designated week of deep kitchen cleaning) was not the best option.
And I don't like to make tote bags.
If you follow me on Instagram (@hueymary), you know this is where I headed out to shop (vegetables and bird seed) because I was struggling to decide how to finish it.
On my rounds, I stopped at a local park for a (birding) walk and came to the conclusion that making a tote bag to donate during my church's annual Lenten collection for a local young families support ministry would be just the thing!
Rather than dig or search for a specific pattern, I cobbled together a large sturdy lined bag that I hope will serve as a cheerful tote for a young mother with limited resources.

The lining and this whimsical fabric for the pocket came out of boxes of fabric I culled from my stash last summer.

I'm not even going to show you how I constructed the bag -- there are so many great tutorials and patterns from stitchers who enjoy making them!
The lines of the original grid drawing inspired most of the quilting and were done with the walking foot.

And here it is. I'm pretty surprised with the results!?!
The best part was making it quickly -- four days -- and responding to lots of spontaneous ideas.
When I got stuck, I stepped away and let the ideas sort themselves out.

Are you interested in the pattern drawing (just the block) so you can make your own version?
It finishes at 18" square with the final wedges.
I'll organize a PDF to post on Craftsy this weekend.
I still think it would be a terrific medallion center block!
There are five more challenges during the three month run of Project Quilting. I'll miss one while on vacation but I look forward to the discoveries waiting for me in the other four!
In the meantime, I need to finish a UFQ this weekend!!
How about you?
Mary
If you can't find Marti's Multi-size Kite tool locally, send me an e-mail. I keep them in stock for workshops even though I don't have a selling website.
maryhueyquilts@hotmail.com
You often surprise me with new ideas- and today is an example. This looks very intriguing - especially the coloring part! I'll look for your Craftsy tutorial later, and a medallion is on my list, still. Thanks Mary!
ReplyDeleteI wanted to do this challenge and I even colored it, but too much on my plate right now to do so. I look forward to the pdf as mine was 8 inches. It turned out beautiful!
ReplyDeleteIt really would look wonderful in a medallion quilt! Hmmm... I have that ruler...
ReplyDeleteThanks for the very detailed look at this block - very inspiring!
That is an awesome design, and I think it turned into a great tote bag. I can't believe you did it all in 4 days.
ReplyDeleteThat is a beautiful bag! You did a fantastic job on the design. You are right, it would make an amazing center piece for a quilt top.
ReplyDeleteThis is fantastic! I'm so happy to have you joining in on my fun challenge. Thanks for sharing your process too!
ReplyDeleteWOW - you worked out a BEAUTY for this challenge! I'm totally in love with your finished piece, and so glad you've joined us in the fun of Project QUILTING. :)
ReplyDeleteBeautiful! Such lovely points!
ReplyDelete